
This no bake coconut bites recipe is a quick trip down memory lane, bringing back the simple joy of childhood snacks. I love how a handful of shredded coconut, a touch of honey, and a few other staples can turn into something so satisfying without ever turning on the stove. It’s perfect for those moments when you want a sweet treat but don’t want to deal with fuss or heat.
What makes this recipe special isn’t just its nostalgic flavor—though that’s a big part—it’s how adaptable and forgiving it is. Over the years, I’ve played around with nuts, dried fruits, even a splash of vanilla, and each version feels like a little discovery. It’s a kind of kitchen therapy, mixing and shaping these bites into a batch that’s both comforting and a little bit fancy.
Focusing on the nostalgic comfort of childhood snacks, this recipe transforms a simple treat into a sophisticated, no-bake coconut bite that sparks memories and satisfies cravings with minimal fuss.
Nostalgic Coconut Comforts
- Making these bites always takes me right back to summer afternoons at my grandma’s house, where she’d stash shredded coconut in a jar just for me.
- There’s a tiny thrill in shaping these into perfect little rounds—like crafting tiny treasures that disappear way too fast.
- I love how adaptable this recipe is—sometimes I toss in a handful of chopped almonds, other times I sprinkle a dash of sea salt on top for contrast.
- Whenever I make these, the smell of toasted coconut fills my kitchen, instantly lifting my mood and easing the day’s chaos.
- These bites are my go-to for a quick dessert that I can whip up in minutes, especially when I need something sweet but don’t want to turn on the oven.
The story behind this recipe
- This recipe was born out of my obsession with quick, satisfying snacks that don’t require heating up the kitchen. One afternoon, I rummaged through my pantry and found a bag of shredded coconut that I’d bought on a whim. Instead of letting it sit, I started mixing, shaping, and tasting—realizing I’d stumbled onto a perfect no-fuss treat that’s both nostalgic and adaptable.
- What keeps me coming back to this recipe isn’t just the ease—though that’s a huge plus—it’s how it sparks memories of childhood afternoons, simple pleasures, and the smell of toasted coconut wafting through the house. It’s like capturing a moment of comfort, compacted into a bite-sized piece, ready to be enjoyed whenever cravings strike.
- heading: ‘The story behind this recipe’
Trivia and Historical Tidbits
- These coconut bites have roots in tropical coastal communities where quick, energy-rich snacks are essential for long days in the sun.
- Historically, no-bake treats like these gained popularity during times of rationing and resourcefulness, making use of simple pantry staples.
- The concept of shaping shredded coconut into small, portable bites dates back to traditional recipes in Southeast Asia, where coconut is a staple ingredient.
Ingredient breakdown
- Shredded coconut: I love the chewy, chewy texture and rich flavor. If it feels too dry, add a tiny splash of coconut oil to help it stick better.
- Honey: It’s the glue that holds everything together, adding a subtle sweetness. Swap with maple syrup for a different flavor punch, but expect a slightly thinner bite.
- Almonds: Chopped almonds give a nice crunch and nutty aroma. You can substitute with chopped cashews or even dried cranberries for variety.
- Vanilla extract: Just a dash elevates the sweetness and depth. If you’re out, a pinch of almond or coconut extract works well too.
- Salt: A pinch balances the sweetness and enhances coconut flavor. A tiny sprinkle of sea salt on top before chilling creates a nice contrast.
- Coconut oil: Helps the mixture bind and adds a glossy finish. If you want a firmer bite, reduce or omit, but it might be a bit crumbly.
- Optional add-ins: Dried fruits or mini chocolate chips are great for extra flavor. Use sparingly so they don’t overpower the coconut.
Spotlight on key ingredients
Shredded coconut:
- I love the chewy, chewy texture and rich flavor. If it feels too dry, add a tiny splash of coconut oil to help it stick better.
- Honey: It’s the glue that holds everything together, adding a subtle sweetness. Swap with maple syrup for a different flavor punch, but expect a slightly thinner bite.
Honey and Coconut oil:
- Honey: It’s the glue that holds everything together, adding a subtle sweetness. Swap with maple syrup for a different flavor punch, but expect a slightly thinner bite.
- Coconut oil: Helps the mixture bind and adds a glossy finish. If you want a firmer bite, reduce or omit, but it might be a bit crumbly.
Notes for ingredient swaps
- Dairy-Free: Swap honey with agave syrup for a plant-based alternative that’s just as sticky and sweet.
- Nut-Free: Use sunflower seed butter instead of almond butter—keeps the flavor nutty but safe for allergies.
- Sweetener: Maple syrup can replace honey for a richer, caramel-like sweetness, but expect a slightly softer bite.
- Coconut Oil: Substitute with melted shea butter for a similar fat content, adding a slightly different aroma and richness.
- Add-ins: Dried cranberries or chopped dried apricots can replace chocolate chips for a tangy twist and chewy texture.
- Flavor Boost: A splash of lime or lemon juice brightens the flavor—skip if you prefer a more mellow coconut profile.
- Texture: For a crunchier bite, toast the shredded coconut lightly before mixing—smell the nutty aroma as a cue.
Equipment & Tools
- Mixing bowl: To combine all ingredients thoroughly.
- Spatula: For mixing and folding ingredients evenly.
- Baking sheet: To hold the shaped bites during chilling.
- Parchment paper: To prevent sticking and make cleanup easy.
Step-by-step guide to coconut bites
- Gather your equipment: a mixing bowl, a spatula, a baking sheet, and parchment paper. Keep everything nearby to keep the process smooth.
- In a large bowl, combine 2 cups shredded coconut, 1/4 cup honey, 1/4 cup melted coconut oil, and 1 teaspoon vanilla extract. Mix well until the mixture is evenly coated and sticky.
- If you want added crunch or flavor, fold in 1/4 cup chopped almonds or mini chocolate chips now. Be gentle to keep the mixture cohesive.
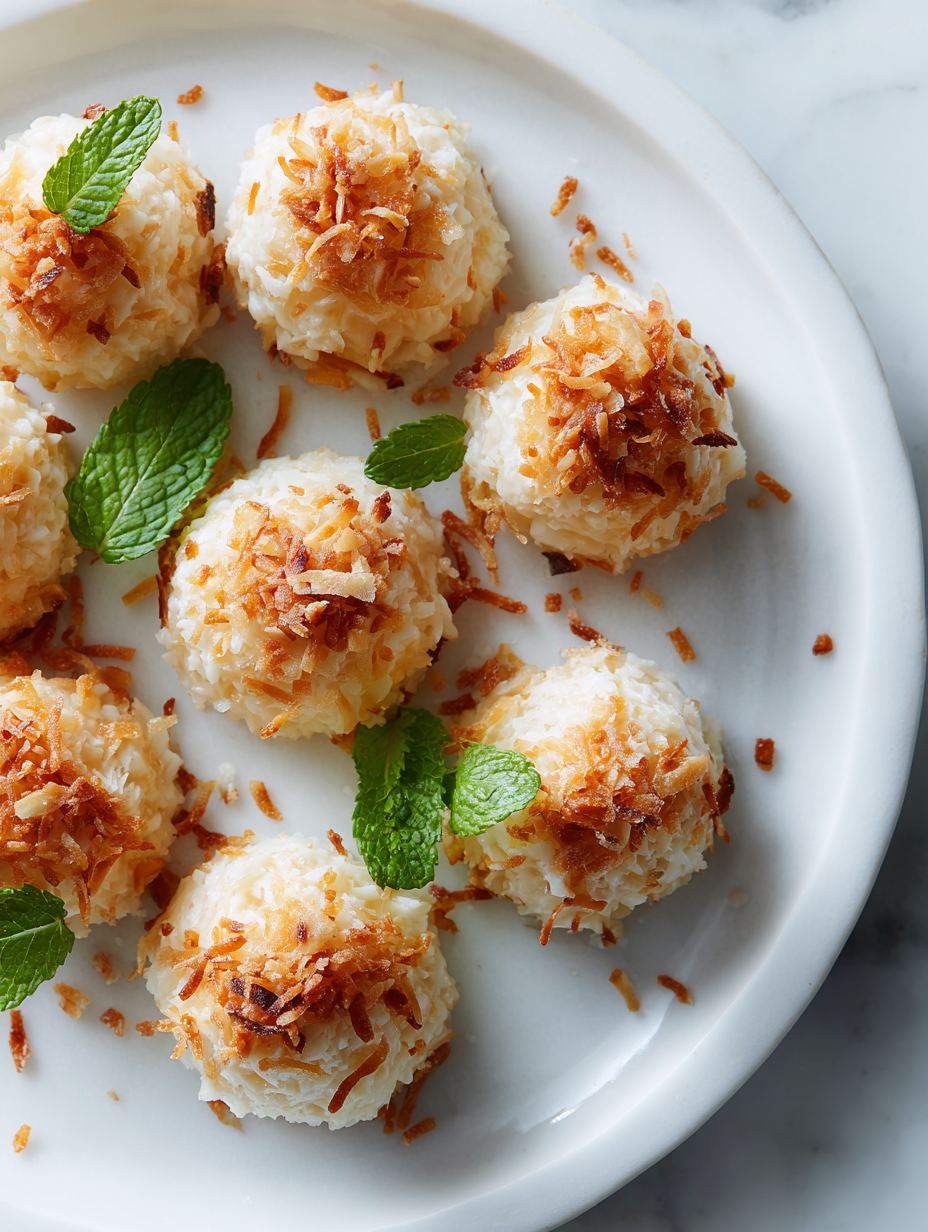
- Scoop about a tablespoon of the mixture and roll between your palms into a compact ball. Place each ball on the parchment-lined baking sheet. Repeat until all mixture is used, about 12-15 bites.
- Once all bites are shaped, press lightly to flatten slightly if desired. Chill in the fridge for at least 30 minutes to set. The coconut will firm up and the flavors meld.
- Check the bites: they should feel firm but not hard, with a slight chewiness. The edges should look toasted and golden if you toasted the coconut beforehand.
- If the bites are too crumbly, add a tiny splash of coconut oil or honey and mix again. If too sticky, refrigerate for a bit longer or add a sprinkle of shredded coconut.
- Remove from the fridge and serve directly from chilled. For a more gooey texture, let sit at room temperature for 5-10 minutes before eating.
Chill the bites for at least 30 minutes until firm. Serve straight from the fridge or at room temperature after a brief sit. For best texture, store in an airtight container in the fridge for up to a week.
How to Know It’s Done
- Bites are firm and hold shape when gently pressed.
- Edges are lightly toasted and golden.
- Mixture feels sticky but manageable, not overly wet or dry.
Nostalgic Coconut Comforts
Ingredients
Equipment
Method
- Gather your equipment: a mixing bowl, spatula, baking sheet, and parchment paper, and keep them nearby.
- In the mixing bowl, combine the shredded coconut, honey, melted coconut oil, and vanilla extract. Stir with the spatula until the mixture is evenly coated and sticky, and you can see the ingredients binding together.
- If you're adding crunch, fold in the chopped almonds now, distributing them evenly throughout the mixture.
- Scoop about a tablespoon of the mixture and roll it between your palms into a compact ball. Place each ball on the parchment-lined baking sheet, pressing gently to flatten if desired.
- Repeat with the remaining mixture, arranging the bites with some space between them. You should have about 12 to 15 bites in total.
- Place the baking sheet in the fridge and chill for at least 30 minutes, allowing the bites to firm up and flavors to meld. You'll notice a slight golden hue on the toasted coconut if you toasted it beforehand.
- Once chilled and firm, remove the coconut bites from the fridge. Serve directly from the fridge or let sit at room temperature for 5-10 minutes for a softer, chewier texture.
Notes
Tips and tricks for perfect bites
- Bolded mini-head: Use slightly toasted shredded coconut for a richer, nuttier flavor and deeper color.
- Bolded mini-head: Keep honey slightly warm to make mixing easier and ensure the ingredients bind well.
- Bolded mini-head: Chill the mixture before shaping—this firmens it up for cleaner, less sticky bites.
- Bolded mini-head: When rolling, dampen your hands slightly to prevent sticking and create smoother rounds.
- Bolded mini-head: Toast optional add-ins like nuts or coconut chips separately to intensify their flavor and crunch.
- Bolded mini-head: Don’t overmix once ingredients are combined—this can make the bites dense instead of tender.
- Bolded mini-head: Let the bites sit at room temperature for a few minutes before serving to soften slightly and enhance flavor.
Common mistakes and how to fix them
- FORGOT to measure ingredients precisely → Use a scale for accuracy.
- DUMPED in too much liquid → Add more shredded coconut to balance moisture.
- OVER-TORCHED coconut → Lower heat or remove sooner to prevent burnt flavor.
- MISSED chilling time → Chill at least 30 minutes for firm bites and better flavor.
Quick Fixes and Pantry Swaps
- When mixture is too sticky → Splash in a bit more shredded coconut and knead gently.
- If bites are crumbly → Patch with a tiny drizzle of honey or coconut oil and reshape.
- Splash with water if mixture feels dry and crumbly before shaping.
- Shield burnt coconut by lowering heat immediately and adding fresh shredded coconut.
- When in doubt, pantry swap: swap honey for maple syrup for a richer flavor and easier binding.
Prep, store, and reheat tips
- You can prepare the coconut mixture a day in advance; keep it covered in the fridge to let flavors meld and make shaping easier the next day.
- Store the finished bites in an airtight container in the fridge for up to one week. The coconut stays chewy and fragrant, with a slightly toasted aroma.
- For longer storage, freeze the bites in a single layer on a baking sheet, then transfer to a zip-top bag. They’ll keep for up to a month, maintaining texture and flavor.
- Refrigerated bites become firmer and more cohesive. If you prefer a softer, chewier texture, let them sit at room temperature for 5–10 minutes before serving.
Top questions about coconut bites
1. Can I use unsweetened coconut?
Yes, you can use shredded unsweetened coconut, but the bites will be less sweet and may need a touch more honey or maple syrup to stick together.
2. How long do coconut bites last?
Storing in an airtight container in the fridge keeps them fresh for about a week. For longer storage, freeze them for up to a month.
3. Should I chill the bites before serving?
Chilling helps set the bites, making them firm and easier to handle. Let them sit at room temperature for 5-10 minutes before eating for a softer bite.
4. What if the mixture is too dry or sticky?
If the mixture feels too dry and crumbly, add a tiny splash of honey or coconut oil and knead it in. If too sticky, refrigerate briefly or add more shredded coconut.
5. Can I add chocolate or other toppings?
You can dip the bites in melted chocolate for an extra indulgence or roll them in cocoa powder or chopped nuts for added texture.
6. Can I substitute honey?
Yes, you can substitute honey with maple syrup or agave nectar. Keep in mind that the flavor and consistency might change slightly.
7. How do I toast the coconut?
To toast the coconut, spread it on a baking sheet and bake at 180°C (350°F) for 5-7 minutes until golden and fragrant, stirring halfway through.
8. How do I shape the bites evenly?
Use a teaspoon or small cookie scoop to portion out the mixture for uniform bites. Wetting your hands helps prevent sticking during shaping.
9. Can I make nut-free coconut bites?
For a nut-free version, replace almonds with dried cranberries or sunflower seeds, but expect a different texture and flavor.
10. What do I do if the bites fall apart?
If the bites are too crumbly, add a tiny amount of coconut oil or honey, then knead until the mixture holds together better.
These no bake coconut bites are a nod to childhood comfort, but with a slightly grown-up twist. They’re a quick fix for when cravings hit and you need something simple yet satisfying. Plus, they’re perfect for sharing, if you’re feeling generous or just want to savor them over a few days.
In a way, they remind me that sometimes the best treats come from just a handful of ingredients and a little bit of patience. No matter the season, a batch of these can turn a dull afternoon into a moment of pure, familiar joy.