
Making no-bake chocolate peanut clusters isn’t just about quick sweets — it’s about capturing a moment of childhood nostalgia. Those little bites of crunchy peanut and melty chocolate always remind me of weekend afternoons, when the kitchen was filled with the warm smell of roasted nuts and melting chocolate. It’s a no-fuss project that’s perfect for when you need a sweet fix, but don’t want to wrestle with the stove or oven.
What I love most is how flexible this recipe feels. You can swap ingredients based on what’s in your pantry or what’s craving hits hardest. Plus, it’s a reminder that sometimes, the simplest ingredients—peanuts, chocolate, a little salt—bring the biggest comfort. It’s honest, unpolished, and kind of a messy joy to make, which is exactly why I keep coming back to it.
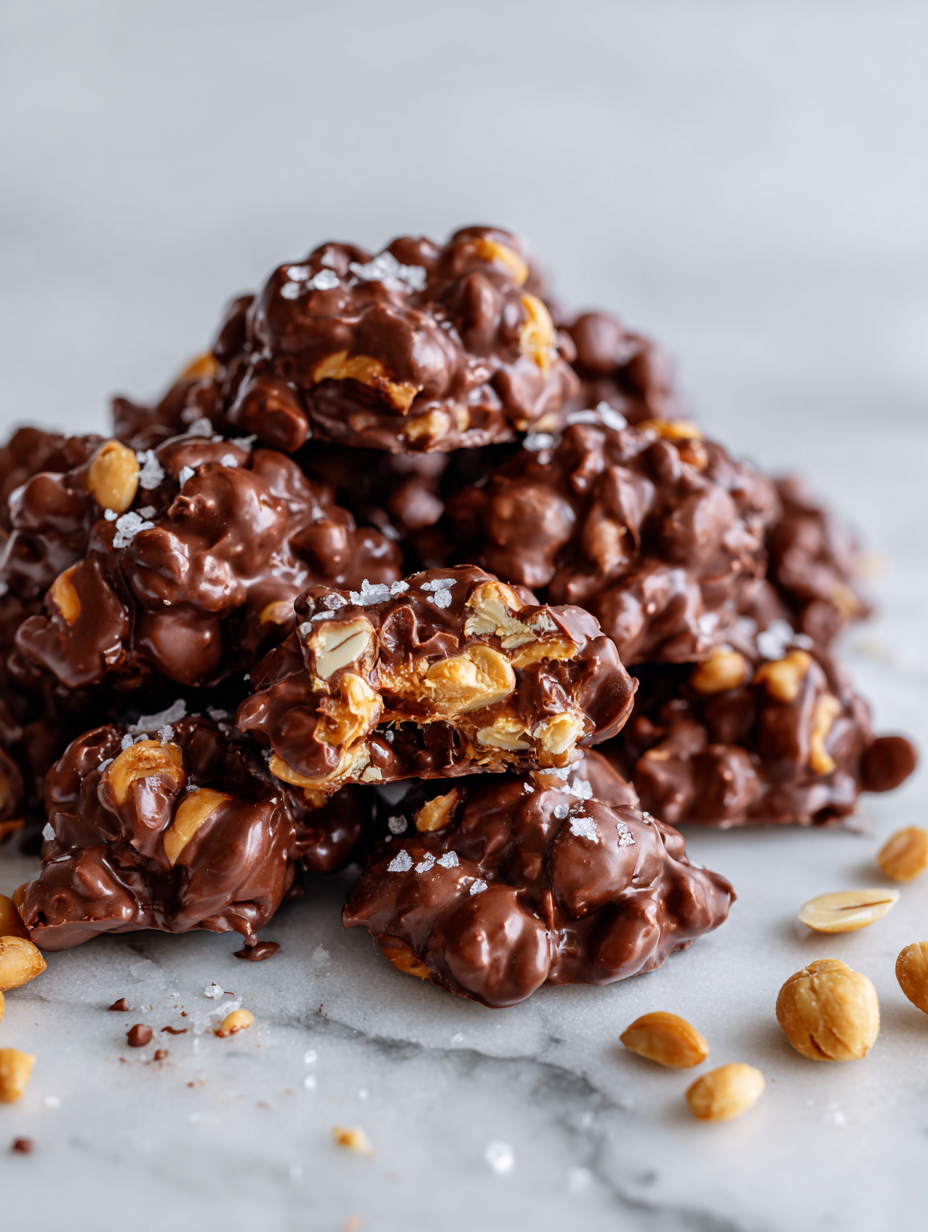
This recipe is a nostalgic nod to childhood treats, but with a twist—making it a perfect no-bake project for busy adults craving simple comfort.
A Childhood Favorite Reimagined
- Making these clusters always takes me back to lazy Sunday afternoons with my grandma, who’d sneak me an extra peanut or two.
- There’s something oddly satisfying about pressing the mixture into the tray and watching it set—like a little act of patience paying off in crunchy bites.
- Whenever I need a quick, no-fuss dessert, these are my go-to—simple, honest, and deeply nostalgic.
- I love how a handful of peanuts and a drizzle of chocolate can turn into a moment of pure, uncomplicated joy.
The accidental inspiration
- This recipe actually came from an accidental kitchen mess. I was trying to make a fancy dessert but ended up with a sticky, chocolate-coated handful of peanuts instead. Instead of tossing it out, I tasted it—those imperfect clumps were addictive. Now, it’s my go-to for when I want something sweet and crunchy without fuss.
- There’s a kind of freedom in the chaos of making these. No melting bowls over double boilers, no careful timing—just a spoon, some chocolate, and a handful of peanuts. It’s a messy, honest process that feels more like a treat than a recipe.
- heading
- story_type
Historical & Cultural Trivia
- These clusters originated as a way for home cooks to use leftover chocolate and peanuts during wartime shortages, turning simple ingredients into a satisfying treat.
- Historically, no-bake confections like these gained popularity in mid-20th century kitchens, serving as quick, affordable desserts before the advent of processed sweets.
- In some regions, similar recipes are called ‘peanut butter bites’ or ‘chocolate nut clusters,’ with variations reflecting local tastes and available ingredients.
Ingredient breakdown: key components
- Peanuts: I love the crunch of roasted peanuts, but raw works fine too—just toast them lightly for extra flavor and aroma.
- Chocolate: Good quality semi-sweet chocolate melts smoothly and sets up firm—skip the cheap stuff or it might seize or stay soft.
- Butter: A bit of butter helps the chocolate coat the peanuts evenly—use unsalted to control saltiness, but salted if you prefer a savory note.
- Sweetener: I sometimes add a touch of honey or maple syrup—just a teaspoon—to boost sweetness and add a hint of richness.
- Salt: A pinch of flaky sea salt elevates the chocolate and peanut flavor—don’t skip it, or the sweetness might taste dull.
- Optional add-ins: Dried fruit or coconut flakes can add texture and contrast—just toss them in after mixing the chocolate and nuts.
- Cooling surface: Use parchment-lined trays or silicone mats—makes for easy cleanup and no sticking, especially if the chocolate is runny.
Spotlight on key ingredients
Peanuts:
- I love their roasted, salty bite—try raw if you prefer a milder flavor, but roasting deepens the nutty aroma and crunch.
- Chocolate: I prefer semi-sweet for balance; it melts smoothly and sets firm—cheaper brands may seize or stay soft, so quality counts.
- The way they ooze a little oil as they melt makes the clusters rich and satisfying—don’t skip toasting for maximum flavor.
Chocolate:
- Watch it melt—glossy and smooth, with a faint crackle when you stir it—any graininess means it’s overheated or seized.
- The type influences texture—bittersweet keeps it sharp, while milk chocolate makes it creamier and sweeter, but both melt the same.
- When cooled, it should hold its shape and snap slightly—if it’s sticky or dull, it needs more cooling or a better-quality bar.
Notes for ingredient swaps
- Dairy-Free: Use coconut oil or coconut butter instead of butter—won’t set quite the same but adds a rich, tropical flavor.
- Nut Variations: Swap peanuts for almonds or cashews—different crunch, but equally delicious with chocolate.
- Vegan Chocolate: Choose dairy-free dark or vegan chocolates—still melts smoothly and packs a punch of cocoa.
- Sweetener Alternatives: Maple syrup or agave nectar can replace honey—adds a different depth of sweetness and aroma.
- Salt Options: Flaky sea salt is classic, but smoked salt offers a smoky twist that complements the chocolate well.
- Add-ins: Dried cranberries or coconut flakes—frozen berries work too if you want a tart pop with your crunch.
- Chocolate Type: Milk chocolate can be used, but expect a sweeter, creamier finish—less intense cocoa flavor.
Equipment & Tools
- Microwave-safe bowl: Melts the chocolate evenly without scorching.
- Skillet: Toasting peanuts for added flavor.
- Parchment paper or silicone mat: Prevents sticking and makes cleanup easier.
- Cookie scoop or small spoon: Portioning and shaping clusters neatly.
- Cooling rack or tray: Supporting the clusters as they set.
Step-by-step guide to no-bake clusters
- Gather all ingredients and equipment. Line a baking sheet with parchment or silicone mat. No need for a double boiler; a microwave-safe bowl will do.
- Roughly chop the chocolate into small pieces. This speeds melting and prevents burning. Set aside.
- In a microwave-safe bowl, melt the chocolate in 30-second bursts on medium power (about 600W), stirring after each, until smooth. Be careful not to overheat; the chocolate should be glossy and fluid.
- While the chocolate melts, toast the peanuts lightly in a dry skillet over medium heat (about 5 minutes). Stir often. They should smell nutty and golden, not burnt.
- Once melted, stir in a pinch of salt and a teaspoon of butter for shine and smoothness. Mix well. If the chocolate seizes or becomes grainy, add a tiny splash of warm milk or coconut oil to loosen it.
- Add the toasted peanuts to the chocolate. Stir until evenly coated. If you want extras like coconut flakes or dried fruit, fold them in now.
- Using a small spoon or cookie scoop, drop spoonfuls onto the prepared tray. Press gently to flatten slightly. Work quickly before the chocolate starts to set.
- Let the clusters sit at room temperature for about 30 minutes or until firm. For faster setting, refrigerate for 15-20 minutes. The chocolate should be shiny and the clusters hold their shape.
- Once set, gently lift the clusters from the tray. Store in an airtight container at room temperature for up to a week, or in the fridge for longer if your kitchen’s warm. Reheat briefly in the microwave if needed to restore gloss.
Let the clusters rest at room temperature until firm, about 30 minutes. Store in an airtight container, layered with parchment to prevent sticking. Serve straight from the fridge if you prefer firm, chilled bites.
How to Know It’s Done
- Chocolate is glossy and fully melted without lumps.
- Peanuts are toasted and fragrant, not raw or burnt.
- Clusters are firm but not hard, with a shiny surface and even coating.
No-Bake Chocolate Peanut Clusters
Ingredients
Equipment
Method
- Line a baking sheet with parchment paper or a silicone mat to prevent sticking.
- Roughly chop the semi-sweet chocolate into small pieces to help it melt evenly.
- Place the chopped chocolate in a microwave-safe bowl and melt in 30-second bursts, stirring well after each, until smooth and glossy.
- While the chocolate melts, toast the peanuts in a dry skillet over medium heat for about 5 minutes, stirring often until fragrant and lightly golden.
- Add a pinch of salt, a teaspoon of butter, and honey to the melted chocolate, then stir until combined and shiny.
- Fold the toasted peanuts into the chocolate mixture, stirring until they are evenly coated.
- Using a small spoon or cookie scoop, drop dollops of the mixture onto the prepared tray, pressing gently to flatten slightly.
- Sprinkle with extra flaky salt or add optional mix-ins like dried fruit if desired.
- Let the clusters sit at room temperature for about 30 minutes, or refrigerate for 15-20 minutes until firm and shiny.
- Once set, gently lift the clusters from the tray and store in an airtight container at room temperature or chilled.
Notes
Pro tips for perfect clusters
- Bolded mini-head: Use high-quality chocolate for a glossy finish and rich flavor—cheap brands can seize or stay dull.
- Bolded mini-head: Melt chocolate in short bursts and stir—this prevents overheating and keeps it smooth and shiny.
- Bolded mini-head: Toast peanuts lightly before mixing—boosts flavor and enhances crunch, making each bite more satisfying.
- Bolded mini-head: Chill the clusters briefly in the fridge—this speeds up setting and ensures they hold their shape.
- Bolded mini-head: Work quickly when dropping clusters—chocolate sets fast, so have all tools ready before you start.
- Bolded mini-head: Add a pinch of salt to the chocolate—brightens flavors and balances sweetness, especially with dark chocolate.
- Bolded mini-head: For extra shine, stir in a teaspoon of butter or coconut oil after melting—improves texture and appearance.
Common mistakes and how to fix them
- FORGOT to pre-chill the chocolate? Use room temperature chocolate to avoid seizing.
- DUMPED in all the chocolate at once? Melt in stages for smooth, glossy coating.
- OVER-TORCHED the chocolate? Use low heat and stir constantly to prevent burning.
- MISSED the cooling step? Refrigerate briefly to speed setting and avoid melting during handling.
Quick Fixes & Pantry Hacks
- If chocolate seizes, splash in a teaspoon of coconut oil and stir until smooth.
- When peanuts are burnt, dump and toast fresh ones—don’t risk bitter flavors.
- Splash warm milk if melted chocolate is too thick—restores a silky texture.
- Patch dull clusters by reheating briefly and adding a touch more melted chocolate.
- Shield delicate clusters from humidity by storing in airtight containers away from steam.
Make-Ahead & Storage Tips
- You can prepare the clusters up to 24 hours in advance; store in an airtight container at room temperature for optimal freshness.
- For longer storage, refrigerate for up to a week, but note the chocolate may develop a duller sheen over time.
- Refrigeration enhances firmness but can cause condensation—bring to room temperature before serving for a better texture and shine.
- If you want to reheat, briefly warm in the microwave at 10-second intervals until slightly soft, then let cool to set again. Watch for melting or softening if overheated.
Top questions about peanut clusters
1. Can I use different types of chocolate?
Use high-quality chocolate for a shiny, smooth coating, which melts evenly and sets beautifully.
2. What if my chocolate seizes when melting?
Absolutely. Milk, dark, or semi-sweet chocolate all work. Adjust the sweetness accordingly.
3. How do I fix seized chocolate?
Add a teaspoon of coconut oil or warm milk to loosen seized chocolate and restore smoothness.
4. How should I store these clusters?
Store in an airtight container at room temperature for up to a week, or refrigerate for longer freshness.
5. Can I refrigerate the clusters?
Refrigerate for 15-20 minutes to speed up setting; bring to room temp before serving for better texture.
6. Will refrigeration affect the texture?
Yes, but be aware that cold can dull the chocolate’s shine and make them a bit harder to bite into.
7. Should I toast the peanuts?
Toast peanuts lightly in a dry skillet until fragrant and golden—this intensifies their flavor and crunch.
8. Can I use different nuts?
You can swap peanuts for almonds, cashews, or other nuts—just toast them for extra flavor.
9. Are vegan options possible?
For a vegan version, choose dairy-free chocolate and omit butter—still melts well and tastes great.
10. How long do these keep?
Yes, refrigerate or freeze the clusters to extend shelf life, especially in warm climates or humid conditions.
These no-bake chocolate peanut clusters are more than just a sweet treat; they’re a reminder of how simple ingredients can bring comfort and nostalgia. When I make these, the smell of melting chocolate and toasted peanuts fills the kitchen, and I can’t help but feel a little bit of childhood come rushing back.
Whether you’re craving a quick fix or sharing with loved ones, these clusters are a messy, honest joy to whip up. They’re perfect for those moments when you want something homemade that’s honest, unpolished, and deeply satisfying. And honestly, I keep coming back to them, no matter the season or occasion.