
Sometimes, all you need is a quick, no-fuss treat that hits the sweet spot without any fuss. These fudge balls are perfect for those moments—no oven, no melting chocolate mess, just a handful of pantry staples and a little bit of patience. They come together fast and disappear even faster, especially when you need a little comfort or a sweet pick-me-up in a busy day.
What I love most is how forgiving this recipe is—no precise measurements, just eyeballing ingredients and adjusting to your taste. Plus, they’re a nostalgic nod to childhood treats, but with a grown-up twist of rich cocoa and buttery sweetness. When you’re craving something satisfying but don’t want to mess with complicated recipes, these fudge balls are your new best friend.
Focusing on how these fudge balls serve as a nostalgic, no-fuss treat that can be whipped up in moments when craving something sweet and satisfying, perfect for busy days or unexpected guests.
Nostalgic treats in minutes
- Making these fudge balls always takes me back to lazy Sunday afternoons in my childhood kitchen.
- I love how forgiving this recipe is—adjusting ingredients feels like a little culinary rebellion.
- There’s a quiet joy in rolling these into perfect little spheres after a hectic day.
The story behind this recipe
- This recipe came together one rainy afternoon when I was craving something sweet but didn’t want to turn on the oven. I remembered my grandmother’s simple approach to treats—using what’s in the pantry and trusting the process. Those moments of spontaneous baking always remind me that comfort food doesn’t have to be complicated.
- I started experimenting with different nut butters and cocoa, aiming for a fudge-like richness that’s easy to mold. The first batch was a bit crumbly, but once I added a touch more honey and a splash of vanilla, everything came together. Now, these fudge balls are my go-to for busy mornings or when friends drop by unexpectedly.
- heading: The story behind this recipe
Historical and cultural trivia
- These fudge balls originated as a way to use up leftover chocolate and condensed milk in post-war kitchens, turning simple pantry staples into a decadent treat.
- They gained popularity in the 1970s when no-bake desserts became trendy, offering a quick fix for busy families craving something sweet without the oven.
- In some cultures, similar no-bake confections were made with dates and nuts centuries ago, with modern versions adding cocoa and butter for richness.
- This recipe’s simplicity reflects a time when home cooks relied on intuition and readily available ingredients, making treats accessible and fuss-free.
- Today, they’re a nostalgic throwback, often associated with childhood memories of school lunches and quick weekend snacks.
Ingredient breakdown: key components
- Dates: I love how sticky and sweet they get when chopped—just make sure to remove pits first—so naturally, they become the glue in these balls.
- Creamy peanut butter: It adds a salty richness that balances the cocoa’s bitterness—go chunky if you want a bit more texture.
- Cocoa powder: Bright and slightly bitter; sift it first to avoid clumps—really makes the mixture velvety and smooth.
- Honey: It binds everything and adds a glossy finish—adjust to taste if you prefer less sweetness or more chew.
- Oats: I use quick oats for ease, but rolled oats work just as well—adds a chewy bite and helps hold shape.
- Chocolate chips: Optional but fun—melt them into the mix or sprinkle on top for extra gooey richness and visual pop.
- Vanilla extract: Just a splash enhances everything—don’t skip it, or the flavor might feel flat and dull.
Spotlight on key ingredients
Dates:
- They get oozy and sticky when chopped, acting as the natural binder. Removing pits is essential; they become the glue that holds everything together.
- Creamy peanut butter: Adds a rich, salty depth that balances the cocoa’s bitterness. Chunky peanut butter gives a bit more texture and crunch.
Cocoa powder:
- Bright and slightly bitter; sift it to avoid clumps and ensure a velvety, smooth mixture. Adds that deep chocolate flavor that defines these bites.
- Honey: It binds all ingredients and lends a glossy finish. Adjust to taste if you prefer less sweetness or more chew.
Notes for ingredient swaps
- Dates: I prefer medjool dates—they’re sweet, soft, and oozy when chopped. Swap with dried figs or raisins if you like a different sweetness profile, but expect a slightly different texture.
- Creamy peanut butter: Use natural peanut butter for a richer, more roasted flavor. Almond or cashew butter works well too, adding a slightly different nuttiness.
- Cocoa powder: Unsweetened is best for that deep, smoky chocolate flavor. You can try Dutch-processed for a mellower cocoa taste, but avoid sweetened versions—too sugary.
- Honey: Maple syrup or agave nectar can replace honey if you want a vegan option. They’ll add a different nuance—more caramel or floral—but keep the mixture sticky.
- Oats: Rolled oats can be substituted with quick oats for a finer texture. If you’re gluten-free, try certified gluten-free oats—they work just as well.
- Chocolate chips: Swap for chopped dark or milk chocolate, or omit altogether for a less sweet, more fudgy bite. For a nutty boost, add chopped toasted nuts instead.
- Vanilla extract: A splash of almond or coconut extract can add a different aroma. Skip it if you want a more straightforward chocolate flavor.
Equipment & Tools
- Mixing bowl: Combine ingredients evenly
- Spoon: Mix and portion the mixture
- Parchment-lined baking sheet: Prevent sticking and easy cleanup
- Knife and chopping board: Finely chop dates
- Fridge: Chill and set the fudge balls
Step-by-step guide to fudge balls
- Gather all ingredients and equipment. Set out a mixing bowl, a spoon, and a baking sheet lined with parchment.
- Chop the dates finely. They should be sticky enough to hold the mixture together. This takes about 2 minutes.
- In a large bowl, combine the chopped dates, peanut butter, cocoa powder, honey, and oats. Mix thoroughly until the mixture is cohesive and sticky, about 3 minutes. If it feels too crumbly, add a teaspoon of water or more honey and mix again.
- If using chocolate chips, fold them into the mixture now for bursts of gooey richness. For a more uniform look, press some on top later.
- Using your hands, roll the mixture into small balls about 2.5 cm (1 inch) in diameter. If the mixture is sticking too much, dampen your hands slightly.
- Place the formed balls on the prepared baking sheet. Chill in the fridge for at least 30 minutes to firm up, which makes handling easier and improves flavor melding.
- Optional: Melt a few chocolate chips and drizzle over the chilled fudge balls for an extra touch of decadence.
- Once firm, serve immediately or store in an airtight container in the fridge for up to a week. For longer storage, freeze for up to a month.
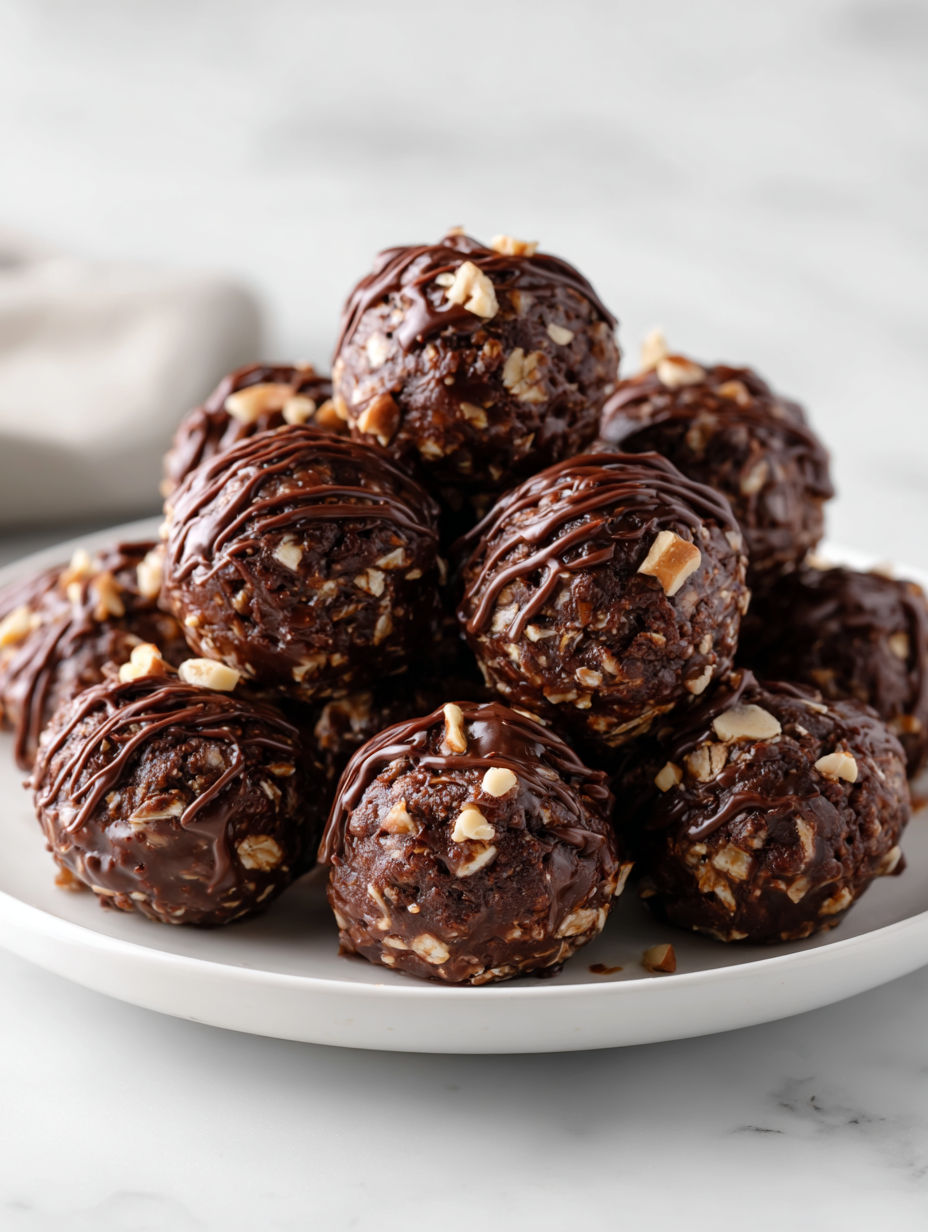
Chill the fudge balls in the fridge for at least 30 minutes before serving. They should be firm, shiny, and slightly chewy. Serve directly from the fridge for best texture and flavor.
How to Know It’s Done
- The mixture should be sticky enough to hold shape without crumbling.
- Fudge balls should be firm but still tender when pressed gently.
- They should have a glossy appearance after chilling and optional chocolate drizzle.
No-Bake Chocolate Fudge Balls
Ingredients
Equipment
Method
- Finely chop the pitted Medjool dates on a chopping board; they should be sticky and small enough to blend easily.
- In a large mixing bowl, combine the chopped dates, creamy peanut butter, sifted cocoa powder, honey, and vanilla extract. Use a spoon to mix everything together until the mixture is thick, sticky, and well incorporated.
- Stir in the quick oats and chocolate chips, folding until evenly distributed. The mixture should be cohesive and slightly sticky, but easy to shape.
- Dampen your hands slightly with water and scoop about a tablespoon of the mixture. Roll it between your palms to form a smooth, round ball about 2.5 cm (1 inch) in diameter. Repeat until all the mixture is used.
- Place the formed fudge balls onto a parchment-lined baking sheet, spacing them evenly. Chill in the refrigerator for at least 30 minutes to firm up and develop better flavor.
- Once cooled and firm, remove the fudge balls from the fridge. Optionally, melt a few chocolate chips and drizzle over the top for extra richness and a glossy finish.
Pro tips for perfect fudge balls
- Chill the mixture thoroughly—this helps it firm up, making rolling easier and neater.
- Use slightly damp hands when rolling—prevents sticking and gives a smoother finish.
- Sift the cocoa powder—avoids clumps and creates a velvety, even coating on your fudge balls.
- Add a pinch more honey if the mixture feels crumbly—keeps everything sticky and manageable.
- Freeze the balls briefly after shaping—this tightens their shape and enhances flavor meld.
- Drizzle melted chocolate at the end—adds a glossy finish and extra richness, but do it quickly before it sets.
- Store in airtight containers—keeps them fresh, chewy, and prevents fridge odors from seeping in.
Common mistakes and how to fix them
- FORGOT to chill the mixture if too sticky, resulting in difficult rolling.
- DUMPED too many oats, making fudge balls dry and crumbly—add more honey to fix.
- OVER-TORCHED the chocolate drizzle, causing a bitter, burnt flavor—use low heat next time.
- MISSED the consistency test; mixture should be sticky but not runny—adjust with more dates or oats.
Quick fixes and pantry swaps
- When mixture is too sticky, splash in a little water and knead—makes rolling easier.
- If fudge balls crumble, dump in a teaspoon of honey or nut butter—rest 10 minutes then reshape.
- Over-torched chocolate drizzle? Patch with a fresh layer of melted chocolate—add a pinch of sea salt for depth.
- Forgot to chill fully? Splash cold water on hands to handle sticky mixture without mess.
- Dumped too many oats? Swap with crushed nuts or seeds for different crunch and flavor.
Prep, store, and reheat tips
- Prepare the mixture ahead of time by chopping dates and mixing ingredients; it firms up better when chilled overnight.
- Store the unrolled mixture in an airtight container in the fridge for up to 24 hours; it remains sticky and easy to work with.
- Fudge balls can be made a day in advance, stored covered in the fridge; flavors meld and texture becomes more cohesive.
- Refrigerated fudge balls stay fresh for about a week; for longer storage, freeze in an airtight container for up to a month.
- To reheat or soften straight from the fridge, let them sit at room temperature for 10–15 minutes until slightly softer and more pliable.
Top questions about no bake fudge balls
1. How do I keep the fudge balls from crumbling?
Use dates that are soft and pitted; they blend into a sticky paste that holds the mixture together. If they’re dry, soak them briefly in warm water first.
2. Can I skip chilling the mixture?
Chill the mixture for at least 30 minutes until firm. This makes rolling easier and helps the balls hold their shape.
3. Can I use a different sweetener?
Yes, you can substitute honey with maple syrup or agave nectar. They add sweetness and stickiness but may slightly alter the flavor.
4. My mixture is too sticky—what now?
If the mixture feels too sticky, dust your hands with a bit of cocoa powder or oats to make rolling easier.
5. How should I store leftover fudge balls?
Store fudge balls in an airtight container in the fridge for up to a week, or freeze for up to a month. Thaw briefly before eating.
6. Can I customize the ingredients?
Add chopped nuts or chocolate chips for texture and flavor. Press them into the balls before chilling if you want a crunchy surprise.
7. What nut butters work best?
Use natural peanut butter for richer flavor, or almond butter for a nuttier twist. Ensure it’s creamy for easier mixing.
8. They’re dry—how do I fix it?
If your fudge balls are too dry, add a tiny splash of water or more honey and mix again until sticky.
9. How do I add chocolate topping?
Feel free to drizzle melted chocolate over the chilled fudge balls for an extra decadent finish and glossy look.
10. Can I prepare these ahead of time?
Make the mixture the night before; it will meld flavors and be easier to shape the next day.
These fudge balls are a reminder that sometimes, the simplest treats are the most satisfying. Their nostalgic charm makes them perfect for quick cravings or when you want a little sweet comfort without fuss. Plus, they’re so easy to tweak—playing with ingredients keeps the process fun and personal.
Whenever I make a batch, I think about how effortless joy can come from just a handful of pantry staples. Whether they’re for a last-minute snack or a casual gift, they always seem to bring a little extra happiness in the moment.