
These no bake Rice Krispie bites are my go-to when I need a quick, satisfying snack that feels like a little treat but doesn’t require turning on the oven. There’s something about that crispy, gooey texture that instantly transports me back to childhood afternoons, sticky fingers and all. But I’ve added a touch of sea salt and dark chocolate to make them feel a bit more grown-up, perfect for sharing—or not.
What I love most is how flexible this recipe is. You can swap in peanut butter or coconut oil, toss in dried fruit or nuts, and still end up with something that’s both nostalgic and customizable. It’s the kind of recipe that’s forgiving—once you get the basics down, it’s just about playing around with what you’ve got in the pantry. It’s honest, simple, and surprisingly addictive.
In a world of complicated desserts, these bites remind me that sometimes the best things are the simplest. No baking, no fuss, just a handful of ingredients coming together in a sticky, crispy, sweet-salty mess. Perfect for those moments when you want something sweet but don’t want to spend time fussing in the kitchen.
This recipe is a nostalgic throwback to childhood, but I’ve tweaked it for adult tastes with a hint of bourbon and sea salt, turning a simple treat into a sophisticated snack.
Childhood Treats with a Grown-Up Twist
- Making these bites feels like a small act of rebellion—no oven, just good old stovetop magic.
- I get oddly proud when I see how quickly these come together, especially when friends start asking for the recipe.
- There’s a nostalgic rush every time I bite into one—reminds me of lazy afternoons and messy fingers.
- Sometimes I sneak an extra pinch of salt just to see if I can heighten that perfect sweet-salty contrast.
- These bites have become my go-to when I need a quick comfort, especially during hectic weekdays.
Childhood Treats with a Grown-Up Twist
This recipe was born out of a moment of chaos in my kitchen. I needed a quick treat that wouldn’t add to the mess, and somehow, I remembered those childhood Rice Krispie treats I used to make with my mom. But I wanted something more portable, less sticky, and perfect for snacking on the go. So I started experimenting with bite-sized portions and no bake magic, and here we are—simple, honest, and just the right kind of messy fun for grown-ups. It’s funny how a little crunch and sweetness can bring back a flood of memories, even on the busiest days.
Historical & Cultural Roots
- These bites trace back to the early 20th century, when Rice Krispies first became a household staple for quick treats.
- Originally, the recipe was a clever way to turn breakfast cereal into a snack, making it popular among busy families.
- During wartime shortages, this no-bake method gained popularity because it required minimal ingredients and no oven time.
- The combination of crispy cereal and sticky marshmallow binds was seen as a symbol of comfort and simplicity in post-war America.
- Today, variations with added nuts, chocolate, or sea salt reflect how home cooks have personalized this nostalgic classic.
Key Ingredients Breakdown
- Marshmallows: I love how they melt into a gooey, sweet glue—perfect for binding. Use the mini ones for quicker melting, or regular size if you prefer a thicker texture.
- Rice Krispies: They’re the crispy backbone here. Fresh, not stale, or they’ll turn chewy. For a different crunch, try adding a handful of toasted nuts or granola.
- Butter: It’s the silky, rich base that makes everything smoother. Salted butter adds a subtle salty note, but unsalted works if you want more control over saltiness.
- Sea Salt: Just a pinch heightens the sweetness and adds a subtle crunch. Don’t skip it—unless you’re making a sweeter, dessert-like version.
- Vanilla Extract: A splash brightens the flavor with a fragrant warmth. Skip if you want a more neutral, cereal-focused taste.
- Optional Add-ins: Dried fruits or chocolate chips can turn these bites into a personalized treat, adding texture and bursts of flavor.
Spotlight on key ingredients
Marshmallows:
- I love how they melt into a gooey, sweet glue—perfect for binding. Use the mini ones for quicker melting, or regular size if you prefer a thicker texture.
- Rice Krispies: They’re the crispy backbone here. Fresh, not stale, or they’ll turn chewy. For a different crunch, try adding a handful of toasted nuts or granola.
Rice Krispies:
- They’re the crispy backbone here. Fresh, not stale, or they’ll turn chewy. For a different crunch, try adding a handful of toasted nuts or granola.
- Butter: It’s the silky, rich base that makes everything smoother. Salted butter adds a subtle salty note, but unsalted works if you want more control over saltiness.
Notes for ingredient swaps
- Dairy-Free: Swap butter for coconut oil or vegan butter—will add a subtle coconut aroma and slightly different melt-in-mouth texture.
- Marshmallows: Use vegan marshmallows or rice paper treats—expect a less gooey, more delicate binding, but still sweet and satisfying.
- Sweetener: Honey or maple syrup can replace marshmallows—introduces moisture and a different, richer sweetness, but may affect crunch.
- Cereal: Quinoa flakes or puffed millet—offer a different texture and nutty flavor, keep an eye on moisture levels when mixing.
- Add-ins: Dark chocolate chips or chopped nuts—bring extra flavor and crunch, but might need slight adjustment in binding or sweetness.
- Flavor Enhancers: Almond extract or cinnamon—use sparingly to add warmth or depth without overpowering the cereal’s crunch.
- Salt: Sea salt flakes or Himalayan pink salt—use in small pinches for a more complex salty contrast, especially with sweet add-ins.
Equipment & Tools
- Large mixing bowl: For mixing the cereal and marshmallow mixture.
- Saucepan: To melt butter and marshmallows gently.
- Spatula: For folding ingredients and pressing mixture into tray.
- Parchment paper: To prevent sticking and make cutting easier.
- Knife: For cutting the set bites into portions.
Step-by-step guide to no bake bites
- Gather your equipment: a large mixing bowl, a saucepan, a spatula, and a parchment-lined tray. The bowl is for mixing, the saucepan melts the marshmallows, and the tray is for setting the bites.
- In the saucepan over low heat (about 120°C / 250°F), melt 3 tablespoons of butter. Stir constantly to prevent burning. Once melted, add 4 cups of mini marshmallows. Continue stirring until fully melted and smooth, about 3 minutes. The smell should be sweet and buttery with a marshmallow aroma.
- Remove from heat. Immediately add 6 cups of Rice Krispies cereal. Gently fold with the spatula until evenly coated. The mixture will be sticky and puffy. If it starts to cool and harden, rewarm briefly over low heat.
- Quickly transfer the mixture to the prepared parchment-lined tray. Using a spatula or buttered hands, press the mixture evenly into a 20×20 cm (8×8 inch) square. Don’t pack too tightly; aim for a light, even layer. If it sticks, lightly oil your hands or spatula.
- Let it rest at room temperature for at least 30 minutes, or until firm. If in a hurry, pop it in the fridge for 15 minutes to speed up setting. The bites should be firm but still chewy, with a slight crunch on the edges.
- Once set, use a sharp knife to cut into 12-16 bites. For clean cuts, wipe the knife with a damp cloth between slices. The bites should hold their shape with a slight snap when broken apart.
- Serve immediately or store in an airtight container at room temperature for up to 3 days. For longer storage, refrigerate for up to a week. Resting helps the bites develop their chewy yet crispy texture.
Let the bites rest at room temperature for at least 30 minutes until firm. Cut into desired sizes and serve immediately or store in an airtight container.
How to Know It’s Done
- Marshmallow mixture is smooth and fully melted, with a sweet, buttery aroma.
- Cereal is evenly coated and mixture is sticky but manageable.
- Bites hold their shape and are firm yet chewy after resting.
No Bake Rice Krispie Bites with a Grown-Up Twist
Ingredients
Equipment
Method
- Gather all your tools: a large mixing bowl, a saucepan, a spatula, parchment paper, and a sharp knife for cutting.
- In the saucepan over low heat, melt the butter gently, stirring constantly until it’s just melted and smells buttery and sweet.
- Add the mini marshmallows to the melted butter and stir slowly until they melt completely, creating a smooth, sticky mixture with a sweet aroma and bubbly surface.
- Remove the saucepan from heat and immediately pour in the vanilla extract and a pinch of sea salt, stirring to combine the flavors.
- Quickly fold in the Rice Krispies cereal with your spatula, gently mixing until all the cereal is evenly coated with the sticky marshmallow mixture. The mixture will be thick and slightly glossy.
- Transfer the mixture onto a parchment-lined tray and press it down evenly with the back of your spatula or lightly oiled hands, forming a compact layer about 1 inch thick.
- Let the mixture rest at room temperature for at least 30 minutes, or chill in the refrigerator for 15 minutes, until it’s firm and easy to cut.
- Use a sharp knife to cut the set mixture into 12-16 squares or bars, wiping the blade with a damp cloth between cuts for clean slices.
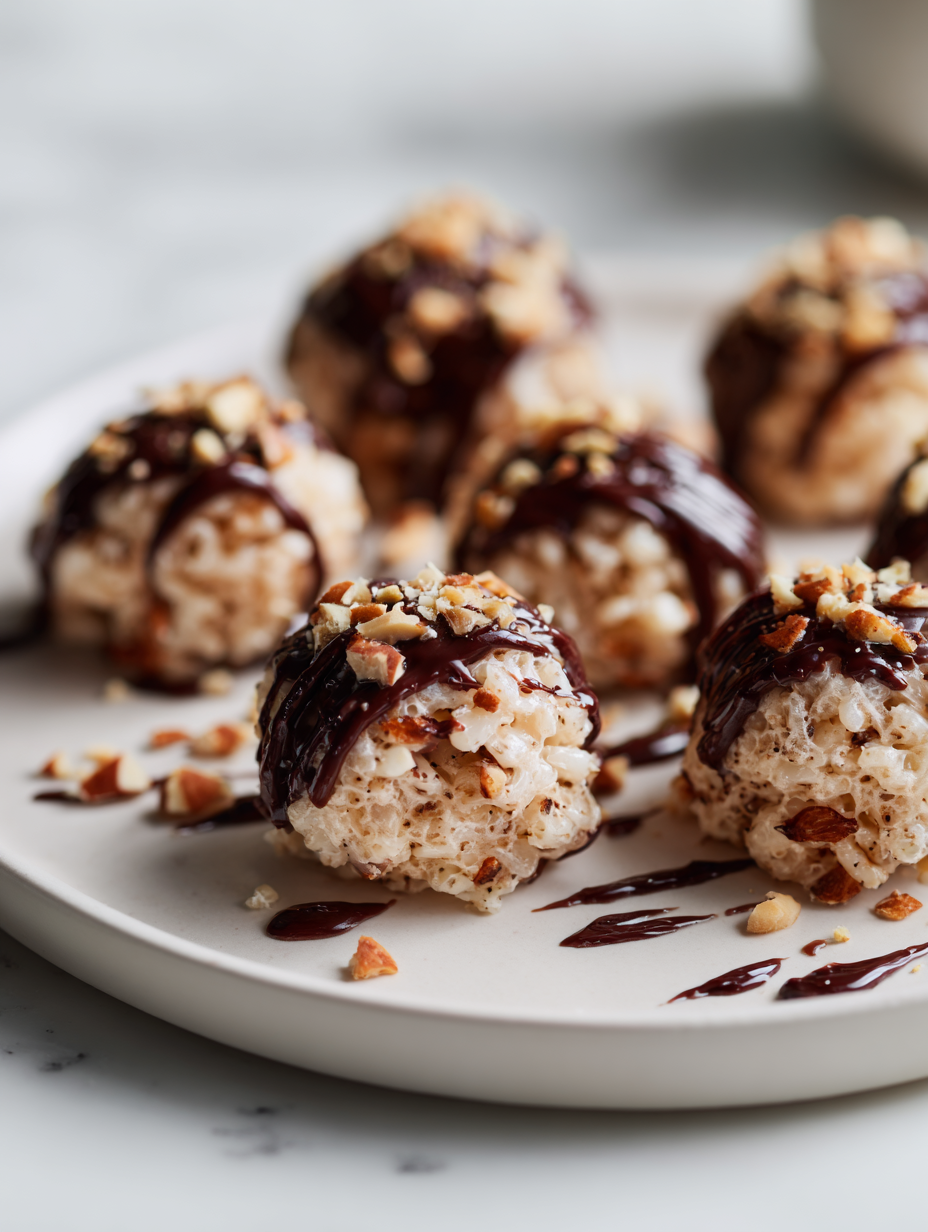
- If desired, melt some dark chocolate chips and drizzle over the bites for an extra indulgence or mix some into the cereal before pressing.
- Serve immediately or store in an airtight container at room temperature for up to 3 days for a chewy, crispy snack that’s perfect for on-the-go munching.
Notes
Pro tips for perfect bites
- Bolded Mini-Head: Use fresh marshmallows for maximum gooeyness and quick melting, avoiding clumps.
- Bolded Mini-Head: Toast your cereal lightly before mixing to boost flavor and add a subtle nutty aroma.
- Bolded Mini-Head: Melt butter and marshmallows over low heat; high heat can cause burning and a bitter taste.
- Bolded Mini-Head: Press the mixture into the tray with lightly oiled hands to prevent sticking and ensure even thickness.
- Bolded Mini-Head: Let the bites rest at room temperature until fully set—rushing can make them crumbly or sticky.
Common mistakes and how to fix them
- FORGOT to stir: Burnt marshmallows. Fix by lowering heat and stirring constantly.
- DUMPED too much cereal: Bites are crumbly. Adjust by reducing cereal or increasing marshmallows.
- OVER-TORCHED mixture: Dark, bitter flavor. Remove from heat immediately and start over.
- MISSED salt pinch: Bites are bland. Add a small pinch of salt to enhance sweetness and flavor.
Quick fixes and pantry swaps
- When mixture is too sticky, splash a little water on hands before pressing.
- If bites are crumbly, patch with a tiny drizzle of melted marshmallow and press again.
- DUMPED too much cereal? Swap some for toasted oats for a lighter crunch.
- Over-torched marshmallow mix? Shield with a splash of milk, then stir quickly to salvage flavor.
- If marshmallows aren’t melting smoothly, rescue with a gentle reheating over low heat for 30 seconds.
Prep, store, and reheat tips
- You can prepare the mixture a day in advance; keep it covered in the fridge to prevent drying out, the aroma of melted marshmallows and butter will intensify overnight.
- Once cut into bites, store them in an airtight container at room temperature for up to 3 days; they stay chewy and delightful, with a slight crunch on the edges.
- For longer storage, refrigerate for up to a week, but expect the texture to soften slightly—best enjoyed at room temp for that perfect chew.
- Reheat bites briefly in the microwave (about 10 seconds) if they get too firm; they’ll warm up with a melty, marshmallow aroma and a softer bite.
Top questions about Rice Krispie Bites
1. Can I use large marshmallows instead of mini ones?
Use mini marshmallows for quicker melting and smoother texture, but regular marshmallows work fine if chopped small.
2. My marshmallow mixture is burning. What now?
Stir constantly on low heat to prevent burning. If it catches, lower the heat and add a splash of milk to loosen.
3. Can I flavor these bites with anything else?
Yes, add a teaspoon of vanilla extract or a pinch of sea salt to boost flavor before mixing in the cereal.
4. Are there gluten-free options for this recipe?
Use gluten-free rice cereal or puffed quinoa if you need a gluten-free version. They provide a similar crunch.
5. How do I speed up the setting process?
Refrigerate the bites for 15-20 minutes if you want them firmer or quicker to set. Just watch that they don’t get too hard.
6. How long do these bites stay fresh?
Store in an airtight container at room temperature for up to 3 days or in the fridge for a week. Keep them covered to avoid drying out.
7. My bites are too crumbly or too sticky. What can I do?
If they’re too sticky, lightly oil your hands or spatula when pressing into the tray. For crumbly bites, add a bit more melted marshmallow.
8. Can I add other ingredients to these bites?
Yes, you can add chopped nuts, dried fruit, or chocolate chips to customize your bites. Just fold them in after mixing the cereal.
9. How do I cut the bites without crumbling them?
Use a sharp, warmed knife for clean cuts. Wipe the blade with a damp cloth between slices for neat portions.
10. My mixture feels dry and crumbly, what now?
When mixture is too dry, add a small splash of melted marshmallow or a teaspoon of honey to moisten it.
These no bake Rice Krispie bites are unexpectedly versatile, especially when you want something quick and satisfying. They remind me that simple ingredients, when handled honestly, can create the most comforting snacks. Sometimes, it’s the familiar crunch and sweet aroma that make all the chaos worth it.
In these moments, I appreciate how a humble recipe can bring a little joy without fuss—perfect for busy days or when nostalgia hits hard. They’re a reminder that good things don’t always need to be complicated, just honest, straightforward, and a little bit fun to make.