
This recipe is born from those afternoons in my grandmother’s kitchen, where she’d pull out a jar of sticky dates and a handful of rough-chopped nuts. No fuss, just simple ingredients that come together quickly, no oven needed. It’s funny how something so straightforward can feel like a small act of love, especially when I need a quick snack or a little sweet fix without the hassle of baking.
I love that these bites are raw and real—no melting, no baking, just a little chopping and pressing. They remind me of childhood summers, when everything was about crisp mornings and sticky fruit, wrapped in the comfort of familiar flavors. Plus, they’re perfect for those moments when I want something nourishing, but don’t want to mess with the stove.
This recipe is inspired by my late grandmother’s secret stash of dates and nuts, which she kept in an old tin on her kitchen shelf. It’s a reminder of that one summer when she taught me how to make simple, no-bake treats that tasted like childhood comfort—no fuss, pure flavor, and a little bit of nostalgia in every bite.
Nostalgic Sweet Simplicity
- Making these bites feels like a small rebellion against complicated desserts—simple, honest, no-fuss.
- They remind me of lazy summer afternoons at my grandma’s, where everything tasted like pure, ripe fruit.
- There’s a quiet kind of joy in pressing these into a pan, knowing how quickly they come together.
- Whenever I snack on one, I’m transported back to childhood’s carefree sweetness, no matter how busy today gets.
- Sharing these with friends always sparks stories of favorite childhood treats and simpler times.
Inspiration Behind These Bites
This recipe came about quite spontaneously during a hectic week when I needed something quick, satisfying, and wholesome. I was rummaging through my pantry, finding dates that had turned a little sticky and nuts that needed using up. Instead of the usual baking, I just threw everything together—no fuss, no oven, just raw, natural ingredients pressed into shape. It’s a reminder that sometimes the best treats are born from necessity and a bit of improvisation, turning simple pantry staples into something unexpectedly delightful.
Historical and Cultural Roots
- These bites draw inspiration from traditional Middle Eastern date treats, where natural sweetness was celebrated with nuts and minimal fuss.
- Historically, no-bake confections like these have roots in resourcefulness—using pantry staples to create satisfying snacks without heat.
- Dates have been a dietary staple in many ancient cultures, valued not just for sweetness but for their energizing qualities, making these bites a modern homage.
- The idea of pressing ingredients into shape is a technique dating back centuries, used across many cultures to craft quick, portable nourishment.
- Modern versions of these bites gained popularity in the health food movement, emphasizing raw, wholesome ingredients that require no oven.
Ingredient breakdown: key components
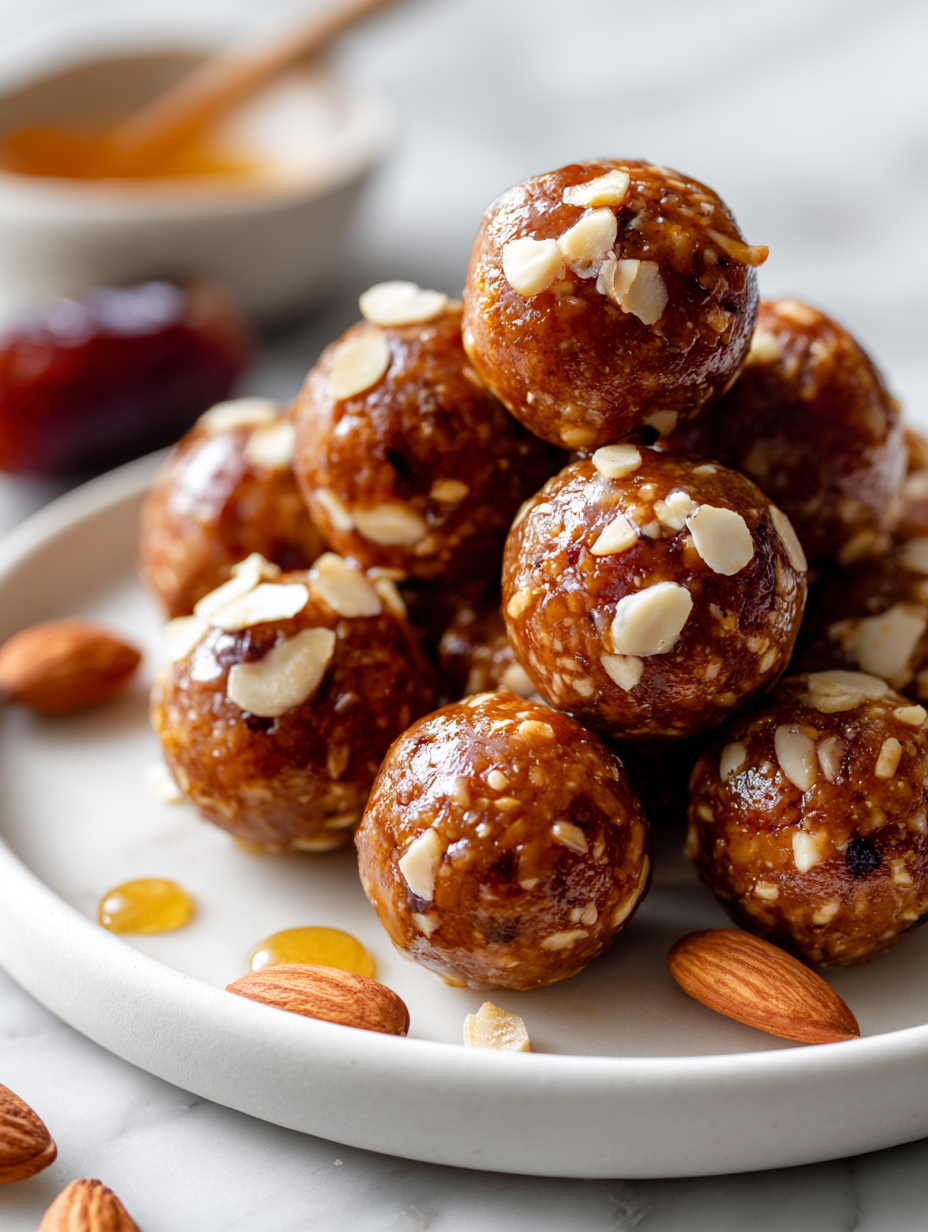
- Dates: I love how their natural caramel sweetness makes these bites rich and chewy—so sticky and luscious. Swap with dried figs if you want a different fruitiness, but the flavor won’t be quite the same.
- Nuts: I use rough-chopped almonds for crunch, but walnuts or cashews work well too—just watch for their oiliness. Toast them lightly first for a deeper, smoky flavor.
- Binder (honey or maple syrup): I prefer honey for a floral note, but maple syrup gives a milder sweetness—adjust based on your preferred stickiness and flavor profile.
- Coconut flakes: They add a subtle tropical aroma and help hold everything together. Toast lightly for a toasted aroma, or skip if you prefer more chew.
- Sea salt: Just a pinch brightens all the flavors—don’t skip it, even if you think it’s too salty at first. It amplifies the sweetness of the dates and nuts.
- Optional add-ins (like cocoa or spices): I like a dash of cinnamon or cacao nibs for extra depth—start small, then add more if you’re feeling adventurous.
- Chocolate (if using): Melts into the nuts and dates, adding a velvety finish. Use dark chocolate for a bittersweet contrast, or skip for a purely fruit-nut bite.
Spotlight on key ingredients
Dates:
- I love how their natural caramel sweetness makes these bites rich and chewy—so sticky and luscious. Swap with dried figs if you want a different fruitiness, but the flavor won’t be quite the same.
- Nuts: I use rough-chopped almonds for crunch, but walnuts or cashews work well too—just watch for their oiliness. Toast them lightly first for a deeper, smoky flavor.
Nuts and Coconut Flakes:
- Nuts: I use rough-chopped almonds for crunch, but walnuts or cashews work well too—just watch for their oiliness. Toast them lightly first for a deeper, smoky flavor.
- Coconut flakes: They add a subtle tropical aroma and help hold everything together. Toast lightly for a toasted aroma, or skip if you prefer more chew.
Notes for ingredient swaps
- Dairy-Free: Use coconut oil instead of butter if a recipe calls for it, but expect a slightly different richness and texture.
- Sweeteners: Maple syrup can replace honey for a milder, more caramel-like sweetness—keep in mind it’s a bit thinner and less floral.
- Nuts: Swap almonds for walnuts or cashews—each brings a different oiliness and flavor profile, so choose based on your preference.
- Dried Fruits: Figs or apricots can replace dates—offer different fruitiness, but may require a slight increase in sticky binding.
- Coconut Flakes: Use toasted for extra aroma or skip for a more subdued, chewy bite—either way, they add a subtle tropical note.
- Chocolate: Dark or milk chocolate can be swapped depending on your taste—dark for bitterness, milk for creaminess, or skip altogether.
- Spices & Add-ins: Cinnamon, cacao nibs, or vanilla—feel free to experiment for more depth or a different aroma, adjusting quantities to taste.
Equipment & Tools
- Food processor: To finely chop nuts and blend ingredients into a sticky mixture.
- Skillet: For lightly toasting the nuts to deepen flavor.
- Baking dish (8×8 inch): To press and set the mixture into a firm slab.
- Parchment paper: To prevent sticking and for easy removal of the set mixture.
- Sharp knife: To slice the chilled mixture into bites.
Step-by-step guide to no-bake bites
- Gather your equipment: a food processor, a small spatula, a baking dish (8×8 inch works), and parchment paper.
- Pit the dates if they have pits. Roughly chop the dates into smaller pieces to help them blend evenly.
- Toast the nuts lightly in a dry skillet over medium heat (about 3-4 minutes), stirring often until fragrant and golden. Let cool slightly.
- In the food processor, pulse the nuts until coarsely chopped but not powdery, about 10 seconds.
- Add the chopped dates, honey or maple syrup, a pinch of sea salt, and any optional spices or cacao nibs. Blend until the mixture starts to clump together, about 30-40 seconds. If too dry, add a tiny splash of water or more honey.
- Check the mixture: it should be sticky and hold together when pressed. If it’s crumbly, blend a few more seconds or add a little more sweetener.
- Line your baking dish with parchment paper. Transfer the mixture into the dish and press firmly with a spatula or your fingers to even out the surface. Compress well to ensure it sticks together.
- Once pressed, refrigerate uncovered for at least 2 hours, or until firm. For best results, leave it overnight.
- After chilling, lift the slab out of the dish using the parchment paper. Slice into 12-16 bite-sized pieces using a sharp knife.
- Serve immediately or store in an airtight container in the fridge for up to a week. For longer storage, freeze for up to a month, thawing slightly before serving.
Refrigerate the pressed mixture for at least 2 hours or overnight until firm. Slice into bites, then serve or store in an airtight container. For best texture, keep refrigerated and serve chilled.
How to Know It’s Done
- Mixture is sticky and holds shape when pressed.
- Nuts are fragrant and slightly toasted.
- Bites are firm but not hard, with a glossy surface after chilling.
No-Bake Date & Nut Bites
Ingredients
Equipment
Method
- Start by toasting the almonds in a dry skillet over medium heat for about 3-4 minutes, stirring often until fragrant and golden. Let them cool slightly before proceeding.
- Place the toasted almonds in your food processor and pulse until they are coarsely chopped, about 10 seconds. Transfer to a bowl and set aside.
- Add the roughly chopped dates into the food processor. Pulse until the dates break down into a sticky paste, about 20 seconds.
- Transfer the date mixture into a mixing bowl. Add the toasted almonds, honey, coconut flakes, and a pinch of sea salt. If using, sprinkle in cinnamon or cacao nibs for extra flavor.
- Mix everything together with a spatula or your hands until well combined and sticky. The mixture should hold together when pressed; if too dry, add a tiny splash of water or more honey and mix again.
- Line your baking dish with parchment paper. Transfer the mixture into the dish and use a spatula or your fingers to press it firmly into an even layer, making sure to compact it well.
- Refrigerate the pressed mixture uncovered for at least 2 hours, or until firm to the touch. For best results, leave it overnight to let the flavors meld and the bites set completely.
- Once chilled and firm, lift the slab out of the dish using the parchment paper and place on a cutting board. Use a sharp knife to slice into 12-16 bite-sized pieces.
- Serve immediately or store in an airtight container in the fridge for up to a week. For longer storage, freeze the bites and thaw slightly before enjoying.
Pro Tips for Perfect Bites
- Bolded mini-head: Chill the mixture thoroughly → Ensures bites hold together without crumbling.
- Bolded mini-head: Use slightly warm nuts → Toasted nuts bring out richer, smoky flavors and better texture.
- Bolded mini-head: Press firmly into the pan → Compacting the mixture prevents gaps and ensures even bites.
- Bolded mini-head: Add a splash of water if too dry → Helps blend ingredients smoothly without over-processing.
- Bolded mini-head: Refrigerate for at least 2 hours → Firms up the bites for clean slicing and a better bite.
- Bolded mini-head: Use a sharp knife for slicing → Cuts cleanly through chilled mixture, avoiding squishing.
- Bolded mini-head: Store in airtight containers → Keeps bites fresh, chewy, and prevents drying out.
Common mistakes and how to fix them
- FORGOT to adjust sweetener → Use less honey if mixture is too sticky.
- DUMPED too many nuts → Use chopped nuts for better texture and binding.
- OVER-TORCHED nuts → Toast nuts at lower heat, watch closely to prevent bitterness.
- MISSED chilling time → Chill at least 2 hours, or bites won’t set properly.
Quick fixes and pantry swaps
- When mixture is too dry → Splash with a tiny bit of water and pulse briefly.
- If bites are crumbly → Patch with a drizzle of honey and re-chill before slicing.
- Splash melted chocolate for a shiny finish → Shield with a light dusting of cocoa powder.
- When nuts turn bitter → DUMP and toast new ones at lower temperature, stirring often.
- If bites stick to parchment → Slip a thin spatula underneath to lift cleanly.
Prep, store, and reheat tips
- You can prepare the mixture a day in advance; keep it covered in the fridge to let flavors meld and nuts soften slightly, enhancing chewiness.
- Store the sliced bites in an airtight container in the fridge for up to a week; they stay chewy and fresh, with a slight caramel aroma intensifying over time.
- For longer storage, freeze the bites in a single layer, then transfer to a sealed container—thaw in the fridge until slightly soft before serving.
- Reheating isn’t necessary, but if you prefer slightly warmer bites, microwave for 10-15 seconds until just soft, with a warm, nutty aroma filling the air.
Top questions about no bake bites
1. Can I substitute dates with other dried fruits?
Yes, you can use dried figs or apricots if dates are unavailable, but the flavor and sweetness profile will change slightly.
2. Can I use raw nuts instead of roasted ones?
Absolutely. Using roasted nuts adds a deeper flavor and crunch, but raw nuts work fine if you prefer a milder taste.
3. Can I swap honey for maple syrup?
Yes, honey makes the bites stickier and adds floral notes. Maple syrup gives a milder sweetness without overpowering the nutty flavor.
4. Can I omit the sweetener?
You can, but expect a different texture—less sticky and slightly drier—so add a touch more syrup or water if needed.
5. How should I store these bites?
To keep them fresh, store in an airtight container in the fridge for up to a week, or freeze for longer storage.
6. How long do I need to chill the mixture?
Chilling the mixture for at least 2 hours helps it set properly, making slicing easier and the bites firmer.
7. What if the mixture is too dry or crumbly?
If the mixture is too crumbly, add a tiny splash of water or honey and pulse again to help it come together.
8. How do I get clean slices?
Use a sharp knife and press down firmly when slicing to prevent the bites from squishing or crumbling.
9. Can I prepare these in advance?
You can prep the mixture ahead of time and refrigerate it overnight to save time and improve flavor melding.
10. How do I soften the bites if they get too firm?
If the bites become too hard after refrigeration, let them sit at room temperature for a few minutes before serving.
These no-bake date nut bites are more than just a quick treat; they carry a piece of my childhood and my grandmother’s gentle touch. Every time I make them, I remember those lazy summer afternoons filled with the warm aroma of toasted nuts and sweet dates, simple moments I cherish. They’re a little reminder that sometimes, the best things are straightforward, honest, and homemade.
In a world of complicated desserts and overly processed snacks, these bites serve as a grounding, nourishing option. They’re perfect for when I need a quick boost of energy or a nostalgic taste of simpler times—no fuss, just real ingredients and a little bit of love.