
These no-bake coconut date bars are my go-to when mornings are a scramble or I need a quick, natural energy lift. They come together fast, no oven required, which is a relief on busy days when I just want something sweet and satisfying without the fuss. Plus, they’re packed with wholesome ingredients that keep me fueled without that sugar crash.
What I love most is how adaptable they are—throw in a handful of nuts, a sprinkle of sea salt, or a dash of vanilla. It’s a recipe born from necessity, but it’s also become a small act of self-care in my hectic routine. They’re sticky, chewy, with just enough coconut aroma to make you smile before you even take a bite.
These bars remind me of childhood snacks—simple, honest, and made from real food. They’re perfect for grabbing on the go, slipping into my bag, or keeping in the fridge for a quick pick-me-up. Once you get the hang of it, they feel less like a recipe and more like a little ritual for busy mornings.
Focusing on how these bars serve as a quick, no-fuss energy boost for busy mornings or post-workout snacks, emphasizing their simplicity and natural sweetness.
The story behind this recipe
- This recipe was born out of a late-night craving for something sweet but wholesome, without turning on the oven. I was tired but wanted to make something that felt nourishing and quick, almost like a little ritual to unwind after a busy day. The idea of combining dates and coconut came from memories of childhood treats—simple, sticky, and naturally sweet.
- One evening, I had a pile of leftover dates and a bag of shredded coconut sitting on the counter. I started blending, pressing, and tasting, and suddenly, these bars took shape. They’re honest, straightforward, and remind me that sometimes, the best recipes are the ones you throw together in a moment of inspiration, no fuss needed.
- paragraph
Ingredient breakdown: key components
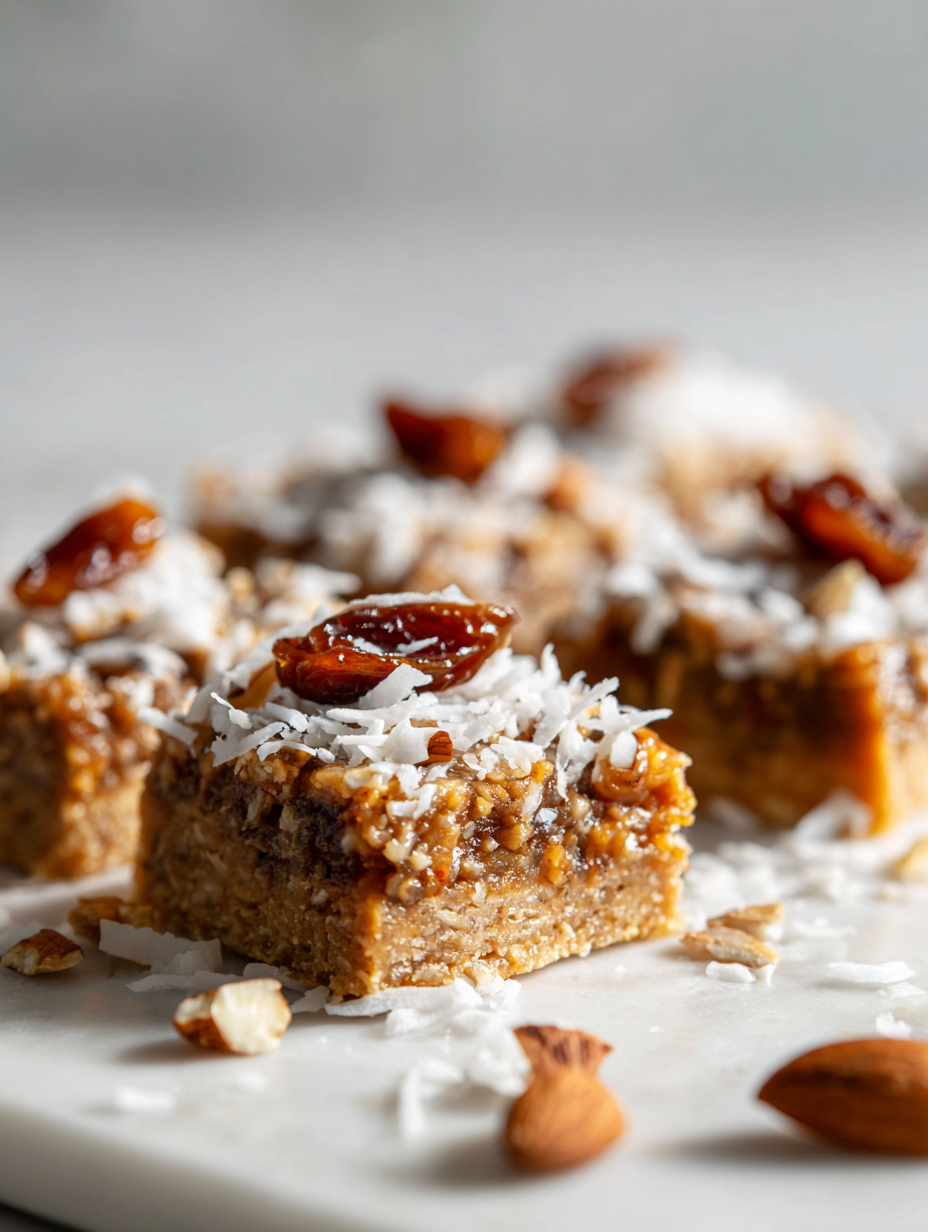
- Dates: They’re the naturally sweet backbone of these bars, sticky and soft. If yours are dry, soak for 10 minutes to soften up.
- Coconut: I love the aroma of toasted shredded coconut, but for a milder flavor, use untoasted. Adds a chewy texture and a tropical punch.
- Almond Butter: It helps everything hold together and adds a rich, nutty flavor. Swap with peanut butter if you prefer a more robust taste.
- Shredded Coconut: The key to that chewy bite. Fresh or dried works, but fresh gives a slightly more fragrant, moist feel.
- Sea Salt: Just a pinch enhances all the sweetness. If you love a salty-sweet combo, sprinkle a little extra on top before chilling.
- Vanilla Extract: A splash deepens the flavor. Skip if you want a more straightforward coconut-date profile, but don’t skip it if you want warmth.
- Optional Add-ins: Nuts, seeds, or chocolate chips can turn these into your perfect energy bites—play with textures and flavors!
Spotlight on key ingredients
Dates:
- They’re the sticky, sweet core—soft, caramel-like, and slightly chewy. If dry, soak them to unlock their natural sweetness.
- Coconut: Shredded coconut adds a tropical aroma and chewy bite. Toasted for nuttiness, or untoasted for softer texture—your call.
Coconut & Almond Butter:
- Shredded Coconut: It’s the chewy anchor—fights off dryness with a moist, fragrant punch. Fresh lends a softer bite, dried boosts sweetness.
- Almond Butter: Creates cohesion with a nutty richness. It’s creamy, slightly salty, and helps everything stick together—swap with peanut for a bolder flavor.
Notes for ingredient swaps
- Dates: Medjool dates are my favorite for their caramel-like sweetness and soft texture. If yours are dry, soak them in warm water for 10 minutes to soften before blending.
- Coconut: Toasted shredded coconut adds a nutty aroma and crunch, but untoasted coconut keeps it milder and softer—choose based on your texture preference.
- Almond Butter: It provides a rich, nutty flavor and helps hold everything together. Swap with peanut butter for a more robust, slightly saltier taste.
- Shredded Coconut: Fresh shredded coconut offers a moist, fragrant bite, while dried shredded coconut intensifies sweetness and chewiness—use what you prefer.
- Sea Salt: Just a pinch enhances sweetness and adds depth. If you love a salty-sweet combo, sprinkle a little extra on top before chilling.
- Vanilla Extract: Deepens the overall flavor profile with warmth. Skip if you prefer a more straightforward coconut-date flavor, but don’t skip it if you want complexity.
- Optional Add-ins: Nuts, seeds, or chocolate chips can be stirred in for texture and extra flavor—play with what you love!
Equipment & Tools
- Food processor: To blend dates and ingredients into a sticky paste.
- 20x20cm (8×8 inch) baking dish: To press and set the mixture into bars.
- Spatula or silicone scraper: To evenly press mixture into the dish.
- Sharp knife: To cut the set bars into neat squares.
- Parchment paper: For easy removal and cleanup.
Step-by-step guide to no bake coconut date bars
- Gather all ingredients: dates, shredded coconut, almond butter, vanilla, sea salt, optional nuts or chocolate chips. Prepare a 20x20cm (8×8 inch) baking dish by lining it with parchment paper for easy removal.
- In a food processor, combine 1 ½ cups pitted dates and ½ teaspoon sea salt. Blend until very sticky and smooth, about 1-2 minutes. If the dates are dry, soak in warm water for 10 minutes, then drain before blending.
- Add ½ cup shredded coconut, ¼ cup almond butter, and 1 teaspoon vanilla extract to the processor. Pulse until the mixture starts to come together but remains slightly chunky—about 30 seconds. Scrape down sides as needed.
- Transfer the mixture to your prepared dish. Using a spatula or your fingers, press firmly into an even layer, about 1 inch thick. Smooth the top and ensure corners are packed well.
- For a more textured bar, sprinkle additional shredded coconut or chopped nuts on top and gently press them in. Chill in the fridge for at least 2 hours, or until firm and set.
- Once firm, lift out the block using the parchment paper. Cut into 12 even bars or squares with a sharp knife. If the mixture sticks, briefly run your knife under hot water then dry before slicing.
- Serve immediately or store in an airtight container in the fridge for up to 1 week. For longer storage, freeze for up to 3 months, letting them thaw slightly at room temperature before eating.
- To finish, drizzle with melted chocolate or sprinkle sea salt on top for extra flavor, if desired. Keep chilled until ready to serve.
Chill the assembled mixture in the fridge for at least 2 hours until firm. Slice into bars and serve immediately or store in an airtight container. Optional: drizzle with melted chocolate or sprinkle sea salt for added flavor. Keep refrigerated to maintain texture.
How to Know It’s Done
- Mixture is sticky and holds together when pressed.
- Bars are firm and set after chilling, not crumbly.
- Top surface is smooth and slightly glossy before cutting.
No-Bake Coconut Date Bars
Ingredients
Equipment
Method
- Line your baking dish with parchment paper to make removing the bars easier later.
- If your dates are dry, soak them in warm water for about 10 minutes to soften, then drain thoroughly.
- Add the pitted dates and sea salt to your food processor, and blend until the mixture is sticky, smooth, and caramel-like, about 1-2 minutes. You should see a thick, cohesive paste.
- Scrape down the sides of the processor, then add the shredded coconut, almond butter, and vanilla extract. Pulse a few times until the mixture starts to come together but still has some small bits of coconut for texture.
- Transfer the sticky mixture to your prepared dish. Using a spatula or your fingers, press it down firmly and evenly into the dish, about an inch thick. This helps it set into a compact, chewy bar.
- If desired, sprinkle additional shredded coconut or chopped nuts on top and gently press them in for added texture and flavor.
- Place the dish in the fridge and chill for at least 2 hours until the mixture is firm and set.
- Once chilled, lift the mixture out of the dish using the parchment paper and place on a cutting board. Use a sharp knife to cut into 12 even bars or squares.
- Serve immediately or store the bars in an airtight container in the fridge for up to a week. For longer storage, freeze the bars and thaw slightly before enjoying.
Notes
Tips and tricks for perfect bars
- Use fresh dates for the best sticky texture and natural sweetness.
- Toast shredded coconut lightly for added aroma and crunch, but keep an eye to avoid burning.
- When blending, pulse in short bursts to prevent over-processing and heat buildup.
- Press mixture firmly into the pan to ensure clean cuts and compact bars.
- Chill thoroughly—at least 2 hours—to help bars set and hold their shape, not crumble.
- Use a hot knife to slice through chilled bars for cleaner edges and less sticking.
- Store in an airtight container in the fridge for up to a week or freeze for longer freshness.
Common mistakes and how to fix them
- DUMPED too much liquid: drain excess water from dates before blending, or mixture becomes runny.
- FORGOT to press firmly: ensure mixture is tightly packed in dish for even setting.
- OVER-TORCHED coconut: toast on low heat, stirring constantly, until golden—avoid burnt aroma.
- MISSED chill time: refrigerate at least 2 hours until bars are firm, not crumbly.
Quick fixes and pantry swaps
- When mixture is too sticky, splash in a teaspoon of warm water and blend briefly.
- If bars crumble, patch with a bit more melted coconut oil and press firmly again.
- DUMPED too much coconut oil? Patch with extra chopped dates for better hold.
- Over-torched coconut: turn down heat immediately and stir constantly to stop burning smell.
- Splash a few drops of water on the knife before slicing for clean, smooth cuts.
Prep, store, and reheat tips
- Prepare the mixture ahead of time by blending dates and coconut; keeps in the fridge for up to 2 days, ready to press into the pan.
- The bars store well in an airtight container in the fridge for up to a week, with flavors mellowing slightly and coconut aroma intensifying.
- For longer storage, freeze the bars wrapped in parchment or foil for up to 3 months; thaw at room temperature for 10-15 minutes before serving.
- Reheat slightly in the fridge or at room temperature; they may become softer but still maintain chewy goodness. No microwave reheating needed—just enjoy at room temp for best texture.
- To keep them fresh, avoid leaving them out at room temperature for more than a day, especially in warm, humid weather. Keep chilled for optimal texture and flavor.
Top questions about no bake coconut date bars
1. Can I use dried dates instead of fresh ones?
Yes, soaking dried dates in warm water for about 10 minutes softens them, making blending easier and smoother.
2. Can I substitute shredded coconut with something else?
Absolutely, you can swap shredded coconut with chopped nuts or seeds for more crunch and variety.
3. My mixture is too sticky, what now?
If the mixture feels too sticky, try adding a little more shredded coconut or a tiny splash of water to help it come together.
4. How should I store these bars?
Store these bars in an airtight container in the fridge for up to a week, or freeze for longer storage, about 3 months.
5. How do I get clean slices each time?
Using a hot knife when slicing chilled bars helps create clean cuts without crumbling or sticking.
6. Should I toast the coconut, and how?
To toast shredded coconut, do it on low heat, stirring constantly, until lightly golden and fragrant—avoid burning.
7. Can I add salt to these bars?
Yes, you can add a pinch of sea salt on top before chilling to enhance the sweetness and add depth.
8. What if my dates are dry or tough?
If your dates are dry or hard, soak them in warm water for about 10 minutes, then drain thoroughly before blending.
9. Can I add chocolate or salt?
These bars are naturally sweet, but you can drizzle melted chocolate or sprinkle sea salt on top for extra flavor.
10. Can I customize the recipe?
Yes, these bars are quite forgiving. You can customize with nuts, dried fruit, or even a dash of vanilla for variety.
These no-bake coconut date bars are more than just a quick snack; they’re a little reminder to keep things simple and honest in the kitchen. When I make them, it’s almost like a small act of grounding, a way to connect with the natural sweetness of dates and coconut. They’re perfect for those busy days when you need something nourishing fast, without sacrificing flavor or texture.
In the end, they’re a testament to how a handful of good ingredients can come together effortlessly. No fuss, just honest, chewy, coconut-scented bites that satisfy a craving and fuel the day. Sometimes, the simplest treats are the most memorable.