
This recipe is my secret weapon for busy afternoons when I need something quick, satisfying, and nostalgic. It’s the kind of treat that comes together in minutes but feels like a little victory every time. No Bake Chocolate Rice Bars are my go-to for impromptu snacks and sharing with kids or friends.
There’s something about the crunch of rice cereal combined with the rich, melty chocolate that just hits the right spot. No fuss, no oven required—just a bowl, a spoon, and a moment to enjoy simple ingredients turned special.
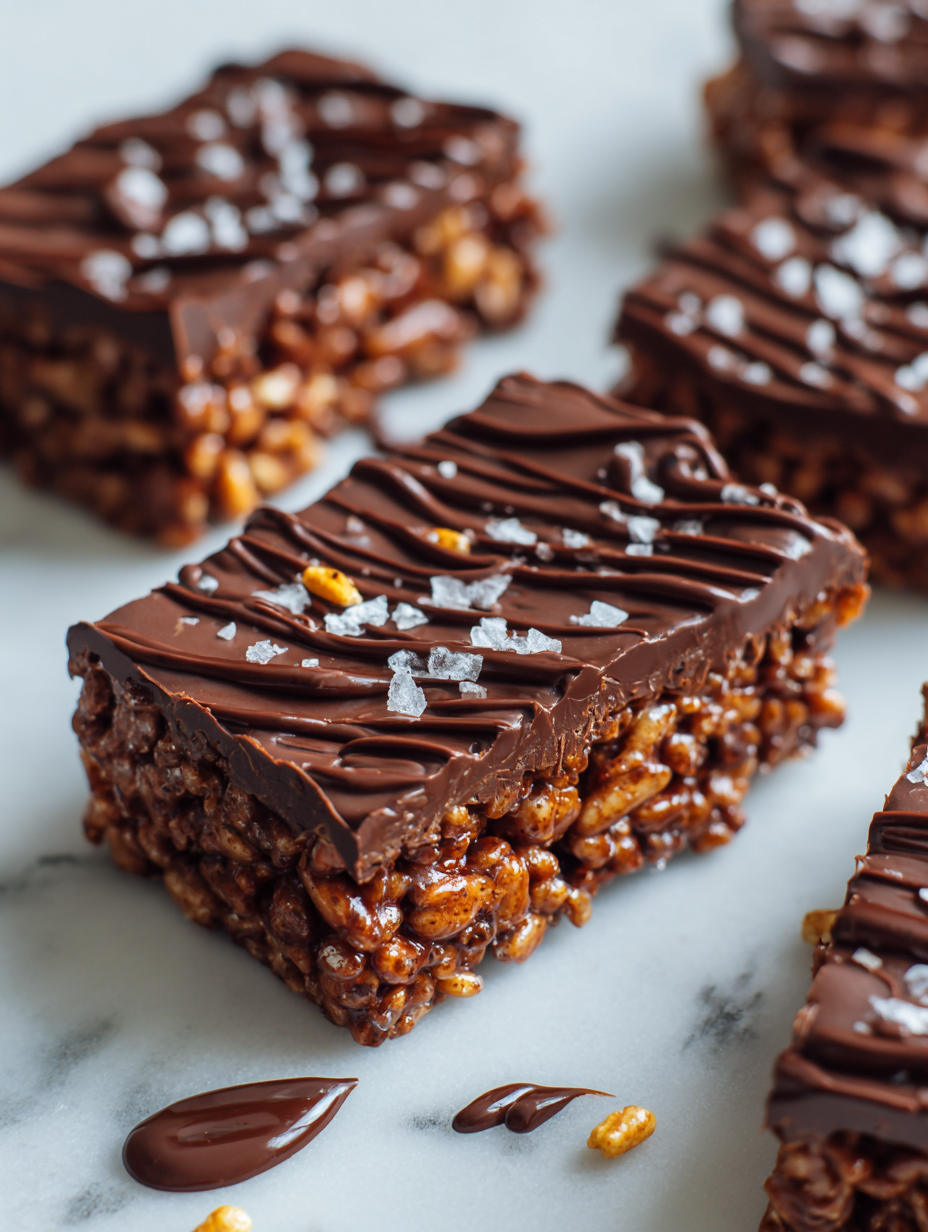
I love how these bars can be customized with a handful of nuts or a sprinkle of sea salt on top. They’re imperfect, easy, and always remind me of carefree afternoons in the kitchen, making something sweet without the fuss.
This recipe is my secret weapon for busy afternoons when I need something quick, satisfying, and nostalgic. It’s the kind of treat that comes together in minutes but feels like a little victory every time. No Bake Chocolate Rice Bars are my go-to for impromptu snacks and sharing with kids or friends.
The story behind this recipe
- This recipe came together one chaotic afternoon when I needed a quick sweet fix that didn’t involve turning on the oven. I remember rummaging through my pantry, spotting the rice cereal and a block of chocolate that was just about to lose its freshness. The crunch and melt-together feeling instantly took me back to childhood snacks, but with a grown-up twist.
- It’s become my go-to for those moments when I want something simple, satisfying, and a little nostalgic. No fuss, no oven, just a handful of ingredients and a bit of patience for cooling—that’s all it takes to bring a bit of joy into my day.
- heading: ‘The story behind this recipe’
Ingredient breakdown: key components
- Dark chocolate: I love the richness of good quality dark chocolate, it melts smoothly and gives a deep cocoa flavor. If you prefer sweeter, go for milk chocolate instead.
- Rice cereal: The crunch is everything. I use classic puffed rice, but if you want a little more chew, try adding some toasted rice puffs for extra texture.
- Butter: It makes the chocolate glossy and helps it set firm. Using salted butter adds a subtle savory note—skip this if you want pure sweetness.
- Honey or corn syrup: I add a touch for chewiness and slight sweetness. If you want a less sticky bar, cut back a bit or try maple syrup for a different flavor profile.
- Vanilla extract: Just a splash enhances the chocolate flavor and adds warmth. Skip if you prefer a more straightforward chocolate punch, but don’t skip the aroma!
- Optional extras: Nuts, dried fruit, or sea salt flakes can elevate these bars. I love a sprinkle of sea salt for a sweet-salty contrast that makes everything pop.
Spotlight on key ingredients
Dark chocolate:
- I love the richness of good quality dark chocolate, it melts smoothly and gives a deep cocoa flavor. If you prefer sweeter, go for milk chocolate instead.
- Rice cereal: The crunch is everything. I use classic puffed rice, but if you want a little more chew, try adding some toasted rice puffs for extra texture.
- Butter: It makes the chocolate glossy and helps it set firm. Using salted butter adds a subtle savory note—skip this if you want pure sweetness.
Rice cereal:
- The crunch is everything. I use classic puffed rice, but if you want a little more chew, try adding some toasted rice puffs for extra texture.
- Butter: It makes the chocolate glossy and helps it set firm. Using salted butter adds a subtle savory note—skip this if you want pure sweetness.
- Optional extras: Nuts, dried fruit, or sea salt flakes can elevate these bars. I love a sprinkle of sea salt for a sweet-salty contrast that makes everything pop.
Notes for ingredient swaps
- Dairy-Free: Swap regular butter for coconut oil or vegan butter. Expect slightly different richness and a subtle coconut aroma.
- Vegan Chocolate: Use dairy-free dark chocolate or cacao nibs blended with coconut oil. Keep an eye on melting points for a smooth finish.
- Sweeteners: Replace honey with maple syrup or agave nectar. The bars will be just a tad less chewy but still sweet and satisfying.
- Rice Cereal: Try toasted rice puffs or millet puffs for a nuttier flavor or extra crunch. They hold up well in the chocolate coating.
- Add-ins: Nuts or dried fruit can be omitted or swapped. Dried cranberries or chopped almonds add texture and a flavor twist.
- Flavor Boost: A pinch of sea salt or a dash of espresso powder can deepen the chocolate flavor—add sparingly for best effect.
- Chocolate Type: Switching to milk or white chocolate changes the flavor profile and sweetness level significantly. Use sparingly if you prefer less sweetness.
Equipment & Tools
- Medium saucepan: Melts chocolate evenly over low heat
- Spatula: Stirs and folds ingredients smoothly
- Parchment-lined pan: Holds the mixture and prevents sticking
- Butter knife: Cuts the set bars cleanly
Step-by-step guide to no bake bars
- Gather your equipment: a medium saucepan, a spatula, a parchment-lined 20×20 cm (8×8 inch) pan, and a butter knife for cutting. Have everything ready before you start melting.
- In the saucepan, melt 200g (7 oz) of dark chocolate over low heat, stirring constantly. Keep the heat gentle—around 30°C (86°F)—to avoid scorching. You want a glossy, smooth melt with no lumps.
- Once melted, remove from heat and stir in 50g (1/4 cup) of butter and 1 tbsp honey or corn syrup. Mix until fully combined and shiny. The mixture should smell rich and sweet, with no sticky pockets.
- Add 3 cups of puffed rice cereal to the chocolate mixture. Gently fold until evenly coated. Look for an even distribution, with some crispy bits peeking through.
- Transfer the mixture into your prepared pan. Use the spatula or a piece of parchment to press it down firmly, spreading it evenly. The surface should be smooth, with no gaps or loose rice.
- Let the bars set at room temperature for about 1 hour, or refrigerate for 30 minutes if you’re in a rush. The mixture will firm up and become easier to cut.
- Once firm, use a butter knife to cut into squares or rectangles. For clean edges, wipe the knife with a damp cloth between cuts. The bars should crack cleanly with a satisfying snap.
- Finish with a light sprinkle of sea salt or chopped nuts if you like. Serve immediately or store in an airtight container.
Let the bars rest at room temperature for about an hour until firm. Slice into squares with a sharp, damp knife. Finish with a sprinkle of sea salt or nuts. Serve directly from the pan or transfer to a plate.
How to Know It’s Done
- Chocolate is fully melted and glossy before mixing.
- Cereal is evenly coated and no dry patches remain.
- Bars feel firm and crack when cut, with no stickiness.
No-Bake Chocolate Rice Bars
Ingredients
Equipment
Method
- Chop the dark chocolate into small pieces for easy melting.
- Place the chopped chocolate and butter into a medium saucepan and melt over low heat, stirring constantly until smooth and glossy. You'll smell a rich cocoa aroma as it melts.
- Remove the saucepan from heat and stir in the honey and vanilla extract until fully incorporated. The mixture should be smooth and shiny.
- Gently fold in the puffed rice cereal, ensuring each piece is coated with the chocolate mixture. The cereal should become evenly glossy and slightly sticky.
- Transfer the mixture into a parchment-lined pan and press down firmly with the back of a spatula or your fingers to create an even layer. This helps the bars hold together once set.
- Let the bars cool at room temperature for about an hour, or refrigerate for 30 minutes until they are firm and set. You'll hear a satisfying crack when you press on them once they're ready.
- Using a sharp, damp knife, cut the set mixture into squares or rectangles. Wipe the knife with a damp cloth between cuts for clean edges.
- Optional: sprinkle a pinch of sea salt or chopped nuts on top of the cut bars for extra flavor and texture, then serve and enjoy!
Notes
Tips and tricks for perfect bars
- Use high-quality chocolate for a richer, smoother melt and deeper flavor.
- Gently fold the rice cereal into the melted chocolate to keep the crunch intact.
- Press firmly into the pan to ensure the bars hold together when set—keep it compact.
- Chill in the fridge for at least 30 minutes to speed up setting and make cutting easier.
- Wipe your knife with a damp cloth between cuts to achieve clean, neat edges.
- Slightly under-melt the chocolate; it will finish melting off heat without risking burning.
- Add a pinch of sea salt on top before setting for a flavor contrast that elevates the bars.
Common mistakes and how to fix them
- TOO MUCH BUTTER: Use less butter to prevent greasy bars; adjust slightly for texture.
- OVER-MELTING CHOCOLATE: Remove from heat early if it starts to smell burnt or looks dull.
- NOT PRESSING DOWN: Firmly press mixture into pan to avoid crumbling edges after setting.
- SKIPPING RESTING TIME: Let the bars cool completely; cutting too early causes squishy textures.
Quick fixes and pantry swaps
- If chocolate seizes, splash in a teaspoon of hot water and stir gently to loosen.
- When rice bars crumble, press them back into the pan and chill briefly to firm up.
- Dumped too much butter? Next time, cut back slightly for less greasiness.
- Over-torched chocolate? Remove from heat immediately and start melting anew with fresh chocolate.
- Splash a little more honey if bars are too dry, for better stickiness and chew.
Prep, store, and reheat tips
- You can prepare the mixture up to a day ahead; keep it covered in the fridge to prevent drying out and absorb fridge odors.
- Store the finished bars in an airtight container at room temperature for up to 3 days, or in the fridge for up to a week, where they stay firm and the chocolate remains glossy.
- Refrigeration enhances the chocolate’s shine and helps the bars stay intact longer; let them sit at room temp for 10 minutes before serving for optimal texture.
- For longer storage, freeze the bars wrapped tightly in plastic wrap and foil for up to a month. Thaw at room temperature for 15–20 minutes, observing for a firm, shiny chocolate surface.
Top questions about no bake bars
1. Can I use different types of chocolate?
Use high-quality chocolate for a smoother melt and richer flavor. Cheaper chocolate can seize or be grainy.
2. Can I substitute honey with something else?
Yes, you can swap honey for maple syrup or agave. The texture stays chewy, but the flavor shifts slightly.
3. How should I store these bars?
Store these bars in an airtight container at room temp for up to 3 days or in the fridge for longer. They stay firm and glossy.
4. How do I keep the cereal crunchy?
To avoid uneven coating, gently fold the cereal into the melted chocolate instead of stirring vigorously.
5. Why did my chocolate seize or become dull?
If the chocolate looks dull or starts to seize, remove from heat early and stir in a teaspoon of hot water to loosen it.
6. My bars are crumbly, what went wrong?
Press the mixture firmly into the pan to avoid crumbly edges and ensure the bars hold together when set.
7. Can I speed up the setting process?
Chilling in the fridge for about 30 minutes helps the bars set faster and makes cutting easier with clean edges.
8. What optional toppings can I add?
You can add nuts, dried fruit, or sea salt on top before chilling for extra flavor and texture contrast.
9. Are there dairy-free options?
For a dairy-free version, replace butter with coconut oil or vegan margarine, which will slightly alter the richness.
10. How do I get neat cuts?
Always wipe your knife with a damp cloth between cuts to get clean, sharp edges and prevent sticking.
These no-bake chocolate rice bars are more than just a quick treat; they’re a reminder that simplicity can lead to comfort. The familiar crunch paired with the rich chocolate makes them a nostalgic favorite that’s easy to whip up at the last minute.
Whenever I make these, I’m reminded of carefree afternoons and the joy of turning pantry staples into something satisfying. They’re perfect for sharing, and honestly, I find myself reaching for another even after I’ve had my fill.