
These no bake chocolate oat cookies are like a warm hug from childhood, simple and honest, made with just a few pantry staples. There’s something about mixing melted chocolate with oats that feels both rebellious and comforting, especially when you just want something sweet without turning on the oven.
I’ve made these hundreds of times, usually when I need a quick fix or a little moment of nostalgia. No fancy ingredients, no fuss, just a bowl, a spoon, and the satisfying crackle of melting chocolate. They’re proof that sometimes, the best treats are the simplest ones.
Focusing on the nostalgic comfort and simplicity of no bake cookies, this recipe is a reminder of childhood treats made with just a handful of pantry staples, perfect for when you crave something sweet without the fuss.
Nostalgic Pantry Comforts
- Making these cookies always takes me back to lazy afternoons with my grandma, who’d let me help stir the pot.
- There’s a chaotic joy in watching the chocolate melt, knowing I can’t really mess it up—just a bit of patience and a good stir.
- I love how these cookies come together in under 20 minutes, perfect when I need a quick sweet fix without the oven fuss.
- Every batch reminds me that simple ingredients, combined with a bit of love, create the most satisfying treats.
The story behind this recipe
This recipe came from a moment of desperate pantry rummaging during a rainy afternoon. I was craving chocolate but didn’t want to turn on the oven or bother with complicated steps. Stirring melted chocolate into oats, I realized how nostalgic and easy it was to whip up something sweet in just minutes. It’s my go-to when I need a quick, honest treat that doesn’t ask for much but always delivers that familiar, comforting sweetness.
Historical and Cultural Trivia
- These cookies likely emerged during wartime shortages, where simple, no-fuss treats made from pantry staples kept spirits up.
- The combination of chocolate and oats was popularized in mid-20th-century home kitchens, as a quick, satisfying sweet that didn’t require baking.
- Many families passed down their own versions of these cookies, each adding personal twists like peanut butter or coconut.
- They gained popularity in the 1950s and 60s as a no-bake solution to satisfy sweet cravings without heating up the house.
- Today, they’re a nostalgic reminder of childhood, made in countless kitchens when time and ingredients were limited.
Ingredient breakdown: key components
- Rolled oats: I love the chewy texture they bring; for a softer bite, go for quick oats, but regular rolled oats hold up better in texture.
- Dark chocolate: I prefer a semi-sweet bar, the deeper cocoa flavor makes the cookies richer; if you want more sweetness, toss in some milk chocolate chunks.
- Butter: It melts into the chocolate smoothly, creating a glossy, luscious mixture; for a dairy-free version, coconut oil works but gives a slightly different sheen.
- Brown sugar: It adds a subtle caramel note and richness; if you’re out, a splash of honey or maple syrup can work but alters the flavor slightly.
- Vanilla extract: Just a teaspoon enhances everything with a warm, fragrant note; skip it if you want a purer chocolate flavor, but I recommend including it.
- Cocoa powder: I use unsweetened to deepen the chocolate flavor and add a slight bitterness; Dutch-processed gives a smoother, less acidic taste, if that’s your preference.
- Optional add-ins: Nuts or coconut flakes—add crunch or texture; toast nuts first for extra aroma and flavor, but skip if you want a softer bite.
Spotlight on key ingredients
Rolled oats:
- I love the chewy texture they bring; for a softer bite, go for quick oats, but regular rolled oats hold up better in texture.
- Dark chocolate: I prefer a semi-sweet bar, the deeper cocoa flavor makes the cookies richer; if you want more sweetness, toss in some milk chocolate chunks.
- Butter: It melts into the chocolate smoothly, creating a glossy, luscious mixture; for a dairy-free version, coconut oil works but gives a slightly different sheen.
Dark chocolate:
- I prefer a semi-sweet bar, the deeper cocoa flavor makes the cookies richer; if you want more sweetness, toss in some milk chocolate chunks.
- Cocoa powder: I use unsweetened to deepen the chocolate flavor and add a slight bitterness; Dutch-processed gives a smoother, less acidic taste, if that’s your preference.
Notes for ingredient swaps
- Dairy-Free: Swap butter for coconut oil. It melts into the chocolate nicely, but expect a slightly coconutty aroma.
- Sweetener Variations: Use honey or maple syrup instead of brown sugar for a different depth of sweetness and a hint of floral or caramel notes.
- Chocolate Options: Substitute dark chocolate with milk or vegan chocolate for a sweeter, creamier, or dairy-free experience.
- Oats: Replace rolled oats with quick oats for a softer texture, though they may break down a bit more during melting.
- Add-ins: Nuts or coconut flakes can be skipped or replaced with dried fruit for different texture and flavor bursts.
- Vanilla: If out of vanilla extract, a splash of almond or coconut extract can add a fragrant twist, but use sparingly.
- Cocoa Powder: Dutch-processed cocoa gives a smoother, less acidic taste; natural cocoa offers a brighter, more intense chocolate flavor.
Equipment & Tools
- Medium saucepan: To melt butter, sugar, and cocoa mixture evenly.
- Mixing spoon: Stir ingredients thoroughly and combine everything smoothly.
- Parchment-lined baking sheet: To prevent sticking and make cleanup easier.
- Spatula: To shape and lift the cookies without sticking.
Step-by-step guide to no bake cookies
- Gather your equipment: a medium saucepan, a mixing spoon, a parchment-lined baking sheet, and a spatula for shaping. These tools are your best friends here.
- Combine butter, sugar, and cocoa powder in the saucepan. Heat over medium (160°C/320°F) until the butter melts and the mixture begins to crackle with a gentle simmer, about 2-3 minutes. Stir constantly to prevent sticking.
- Once melted, remove from heat. Quickly stir in the vanilla extract and oats. Mix thoroughly until the oats are evenly coated and the mixture feels cohesive, about 1-2 minutes.
- Using a spoon or small ice cream scoop, drop spoonfuls of the mixture onto the prepared parchment paper. Shape into rustic rounds with the back of the spoon if desired.
- Let the cookies sit at room temperature for about 15-20 minutes, or until they firm up and develop a slightly shiny, crackled surface. If you’re in a rush, pop them in the fridge for 10 minutes to speed this up.
- Check for doneness: the cookies should feel firm but still have a slight give when pressed, with a glossy surface. They’ll set further as they cool.
- Once cooled and firm, transfer to an airtight container. These cookies keep well at room temperature for up to 3 days, or freeze for longer storage.
- Enjoy the chewy, chocolaty bite with that perfect balance of sweetness and oat texture. They’re best enjoyed slightly chilled or at room temp.
Allow the cookies to rest at room temperature until set, about 15-20 minutes. Transfer to an airtight container for storage. Serve directly from the fridge for a firmer bite or at room temp for a softer, chewier texture.
How to Know It’s Done
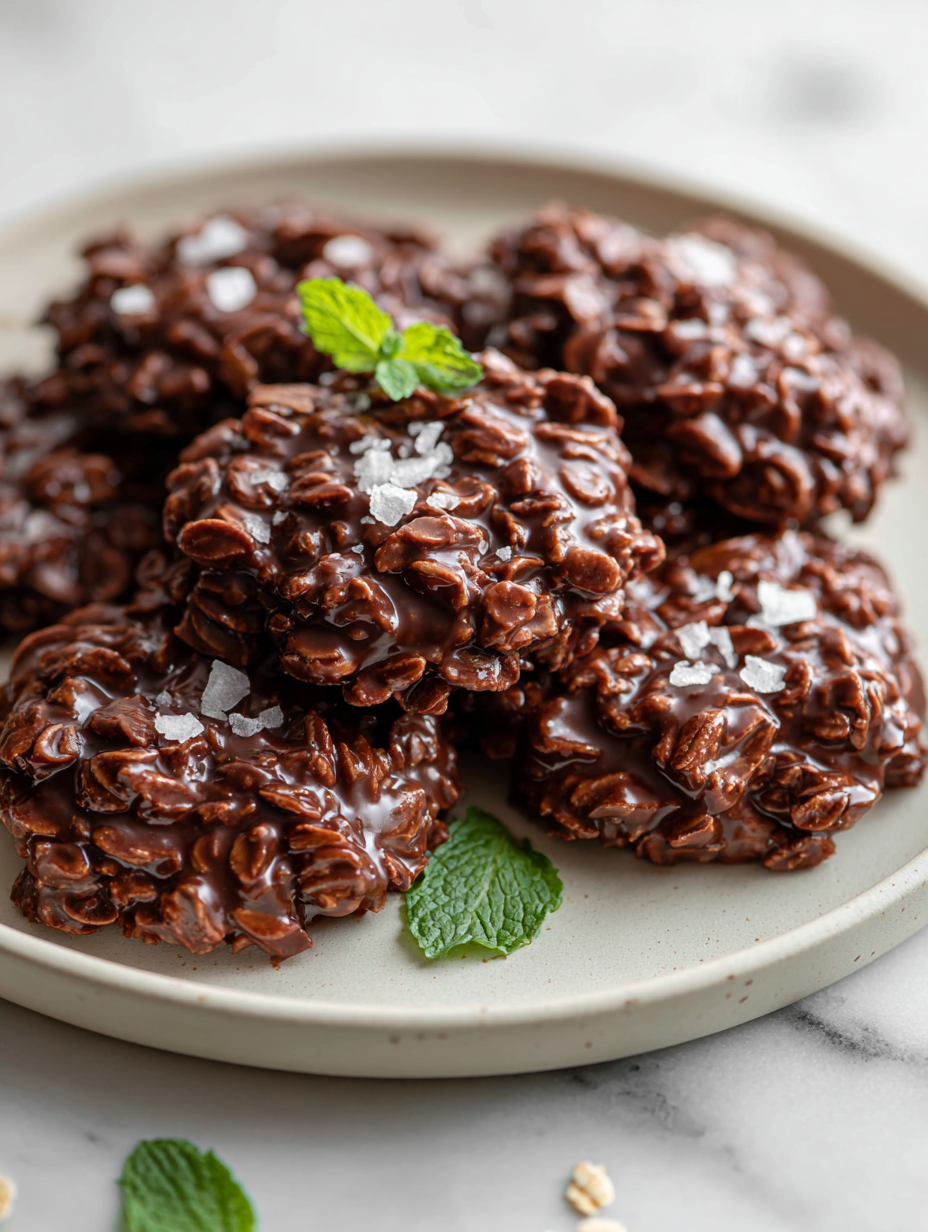
- Surface of cookies is glossy and crackled.
- Cookies are firm but give slightly when pressed.
- Chocolate aroma is rich and inviting.
No Bake Chocolate Oat Cookies
Ingredients
Equipment
Method
- Place a medium saucepan on the stove and add the butter, sugar, and cocoa powder. Turn the heat to medium and cook, stirring constantly, until the butter melts and the mixture begins to bubble gently, about 2-3 minutes. You'll hear a soft bubbling sound and see the mixture turn glossy and smooth.
- Remove the saucepan from the heat and stir in the vanilla extract. Then, quickly add the oats and stir vigorously with a spoon until the oats are fully coated with the chocolate mixture. The mixture will become thick and sticky, pulling away from the sides of the pan.
- Using a spoon or small cookie scoop, drop spoonfuls of the mixture onto the prepared parchment-lined baking sheet. Shape each cookie into a rustic round with the back of the spoon if desired. Leave some space between each cookie as they will spread slightly.
- Let the cookies sit at room temperature for about 15-20 minutes, or until they firm up and develop a shiny, crackled surface. For faster setting, place the tray in the fridge for about 10 minutes. You’ll notice the cookies become firmer and more cohesive as they cool.
- Once set, transfer the cookies to an airtight container. They stay chewy and chocolatey at room temperature for up to 3 days or can be frozen for longer storage. Enjoy these nostalgic treats whenever you crave a quick, satisfying chocolate fix.
Tips for perfect no bake cookies
- Use high-quality chocolate for a richer, glossy finish that melts smoothly.
- Warm the mixture gently; avoid boiling to keep the oats from becoming mushy.
- Stir vigorously after adding oats to evenly coat and prevent clumping.
- Chill the cookie mixture slightly before shaping for easier handling and cleaner edges.
- Use a spoon or cookie scoop to ensure uniform size and quick shaping.
- Let the cookies cool completely to set their shape and develop that crackled surface.
- Store in an airtight container at room temperature for soft cookies, or fridge for crunchier bites.
Common mistakes and how to fix them
- FORGOT to stir continuously → Stir constantly to prevent burning and ensure smooth melting.
- DUMPED all ingredients together → Combine ingredients step-by-step for even texture and flavor.
- OVER-TORCHED the chocolate mixture → Remove from heat promptly when it just begins to crackle.
- MISSED the setting point → Cookies should be glossy, firm but slightly soft when pressed.
Quick fixes and pantry swaps
- When mixture is too thick, splash a bit of hot water to loosen it.
- If cookies crackle too much, reduce the cooling time for softer texture.
- Splash a tiny bit of milk if the mixture feels dry before shaping.
- Patch over cracks with a warm spoonful of melted chocolate for a seamless look.
- Shield from humidity—store in an airtight container to prevent sogginess.
Prep, store, and reheat tips
- You can prep the cookie mixture a few hours ahead; just keep it covered in the fridge to prevent drying out. The flavors meld better after resting.
- Store the finished cookies in an airtight container at room temperature for up to 3 days. They stay chewy and chocolatey, with a slight sheen that indicates freshness.
- For longer storage, freeze the cookies for up to a month. Wrap individually in plastic wrap, then in foil for best preservation. Thaw at room temperature before enjoying.
- Reheat refrigerated or frozen cookies briefly in the microwave—about 10 seconds—until just warm and gooey. The aroma of melted chocolate should shimmer through, perfect for a quick indulgence.
Top questions about no bake cookies
1. Can I use quick oats instead of rolled oats?
Use quick oats if you want a softer, more crumbly cookie, but regular rolled oats give a chewier texture and hold up better in melting. The difference is in the chew and how much they break apart.
2. Can I substitute dark chocolate with other types?
Yes, you can swap out dark chocolate for milk or vegan chocolate, which will make the cookies sweeter and creamier, but also slightly softer.
3. Is there a dairy-free option for butter?
Coconut oil works well as a dairy-free substitute for butter, melting smoothly into the chocolate and creating a glossy finish, but it might add a subtle coconut aroma.
4. Can I use honey or maple syrup instead of brown sugar?
You can replace brown sugar with honey or maple syrup, which will add different floral or caramel notes but also change the texture slightly.
5. What if my mixture is too thick or too runny?
If the mixture is too thick to scoop, warm it slightly or chill it for a few minutes. If it’s too runny, add a bit more oats or let it cool longer.
6. How do I speed up or control the setting process?
To speed up setting, pop the cookies in the fridge for about 10 minutes. For a softer, chewier texture, let them rest at room temperature longer.
7. How should I store or freeze these cookies?
Storing the cookies in an airtight container at room temperature keeps them chewy for up to 3 days. For longer storage, freeze wrapped cookies for up to a month.
8. How do I reheat or warm the cookies?
When reheating, microwave for about 10 seconds until warm and gooey, releasing a rich chocolate aroma. Be careful not to overheat, or the chocolate may seize.
9. What if my cookies crack or don’t set?
If your cookies crack or don’t set properly, chill the mixture longer before shaping or reduce the cooling time after shaping. A quick re-melt of chocolate can fix surface cracks.
10. Any tips for melting chocolate perfectly?
Use high-quality chocolate for a glossy, smooth finish, and stir constantly while melting to avoid burning and ensure even melting.
These cookies are more than just a quick treat; they’re a reminder that some of the best sweets come from simple, honest ingredients. When I make them, I’m transported to lazy afternoons and spontaneous kid giggles that still echo in my kitchen.
In times when baking feels like a mountain, these no bake cookies offer a moment of relief—and a sweet, chocolatey reward. They’re imperfect, nostalgic, and honestly, just right for whenever you need a little comfort in a bite.