
These no-bake chocolate biscuit bars are my go-to for when I want something sweet but don’t want to heat up the kitchen. There’s something about the simple act of mixing crushed biscuits with melted chocolate that feels like a small, satisfying victory, especially on busy afternoons. It’s a mess-free treat that comes together quick, and I love how forgiving it is—no perfect slices needed.
I grew up sneaking bites of a similar treat in my mom’s kitchen, the smell of cocoa and buttery biscuits filling the air. Now, I keep this recipe close for those days when I need a little comfort or a quick dessert that doesn’t demand much planning. It’s honest, unpretentious, and perfect for sharing, whether with friends or just a quiet moment of indulgence.
This recipe is my secret weapon for quick, satisfying treats when I need a sweet fix without turning on the oven. It’s a no-fuss, no-melt mess that’s perfect for busy days or impromptu gatherings. I love how it’s a nostalgic throwback to childhood snacks, but with a rich chocolate twist that feels a little indulgent, even in chaos.
The story behind this recipe
- This recipe came from a lazy afternoon in my childhood kitchen, where my grandma’s jar of crushed biscuits was always ready for a quick sweet fix. It’s funny how such simple ingredients can create something so satisfying, especially when you’re in a rush or craving comfort without the fuss of baking. I still remember that smell—rich cocoa mingling with the buttery crunch—how it made everything feel a little easier, even on hectic days.
- Over the years, I’ve tweaked it to suit my taste, adding a pinch more cocoa or a dash of sea salt to balance the sweetness. It’s become my fallback when I want something indulgent without the wait or mess. It’s honest, imperfect, and always hits home, whether I’m craving nostalgia or just need a quick, honest treat.
- heading: The story behind this recipe
Ingredient breakdown: key components
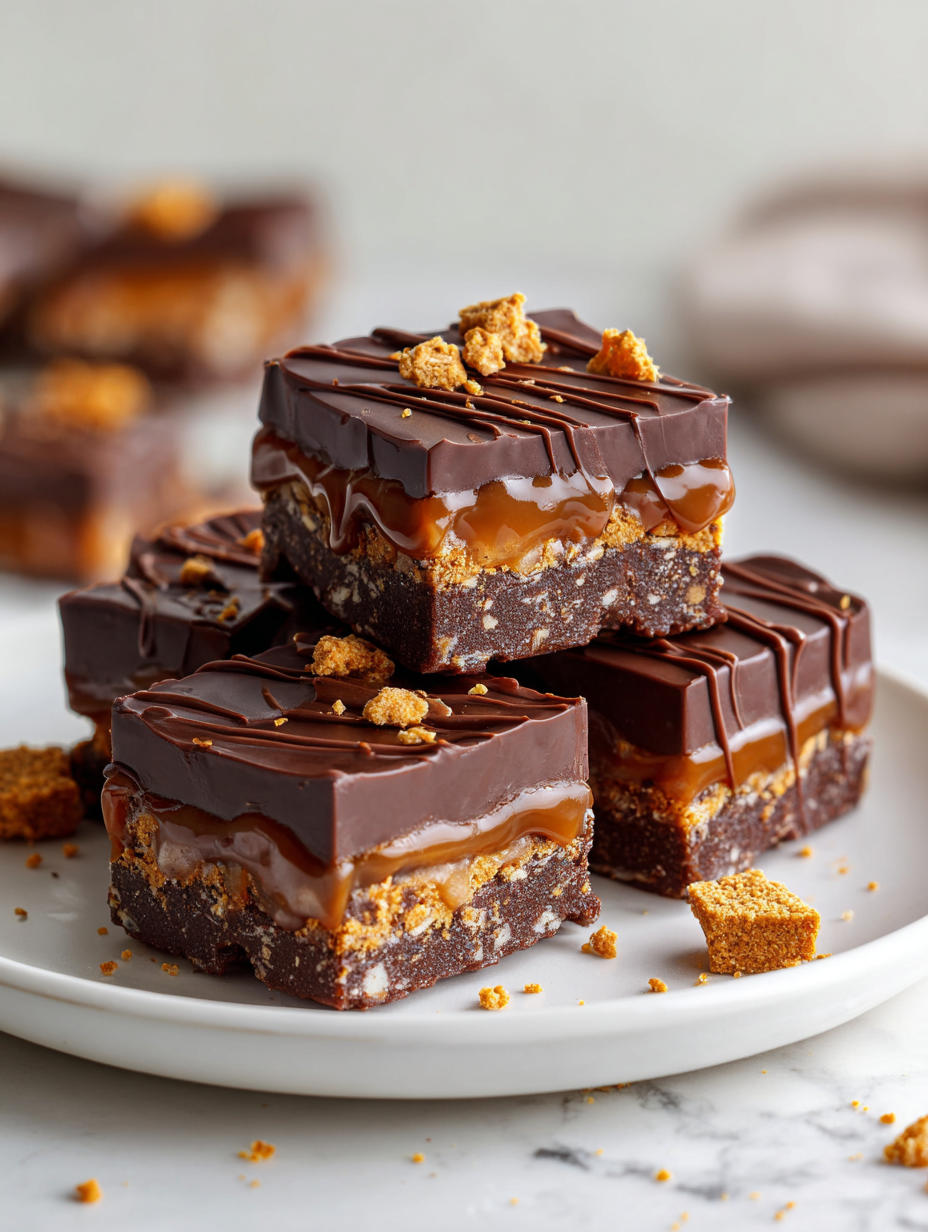
- Digestive biscuits: I like their crumbly, slightly sweet crunch—think of them as the backbone of this bar. Feel free to swap with graham crackers for a slightly grittier texture.
- Butter: Creamy, melts into the crushed biscuits, giving it a rich, velvety texture. Use salted butter for a subtle flavor boost, or go dairy-free with coconut oil if you prefer.
- Dark chocolate: I prefer a 70% cocoa bar—smooth, deep, with a touch of bitterness that balances sweetness. You can swap for milk chocolate if you want it sweeter and creamier, but watch the sugar.
- Sweetened condensed milk: It binds everything together and adds a luscious sweetness. For a lighter option, try coconut condensed milk—same gooey texture, a hint of coconut aroma.
- Cocoa powder: Unsweetened and intense, I love the depth it adds. Sift it well to avoid lumps; if you want a milder chocolate flavor, try Dutch-processed cocoa for smoother richness.
- Optional add-ins: Nuts, dried fruits, or a sprinkle of sea salt—these can add texture and contrast. Feel free to experiment based on what’s in your pantry.
- Vanilla extract: Just a splash brightens the whole thing, making the chocolate pop. You can swap with a pinch of cinnamon or espresso powder for a different twist.
Spotlight on key ingredients
Digestive biscuits:
- I love their crumbly, slightly sweet texture—think of them as the sturdy base. Swap with graham crackers if you want a coarser bite or are out of stock.
- Dark chocolate: I prefer a 70% cocoa bar—silky, deep, with a hint of bitterness that balances the sweetness. For a milder flavor, switch to milk chocolate, but reduce added sugar accordingly.
Dark chocolate and cocoa powder:
- Sweetened condensed milk: It’s the glue that keeps everything together—ultra-rich, gooey, with a sweet, milky aroma. Coconut condensed milk works well for a lighter, coconut-infused twist.
- Cocoa powder: Unsweetened and intense—adds that deep chocolate flavor. Sift it well to prevent lumps, or swap with Dutch-processed cocoa for a smoother, mellower taste.
Notes for ingredient swaps
- Digestive biscuits: I prefer their crumbly, slightly sweet crunch—think of them as the backbone of this bar. Feel free to swap with graham crackers for a slightly grittier texture.
- Butter: Creamy, melts into the crushed biscuits, giving it a rich, velvety texture. Use salted butter for a subtle flavor boost, or go dairy-free with coconut oil if you prefer.
- Dark chocolate: I prefer a 70% cocoa bar—smooth, deep, with a touch of bitterness that balances sweetness. You can swap for milk chocolate if you want it sweeter and creamier, but watch the sugar.
- Sweetened condensed milk: It binds everything together and adds a luscious sweetness. For a lighter option, try coconut condensed milk—same gooey texture, a hint of coconut aroma.
- Cocoa powder: Unsweetened and intense, I love the depth it adds. Sift it well to avoid lumps; if you want a milder chocolate flavor, try Dutch-processed cocoa for smoother richness.
- Optional add-ins: Nuts, dried fruits, or a sprinkle of sea salt—these can add texture and contrast. Feel free to experiment based on what’s in your pantry.
- Vanilla extract: Just a splash brightens the whole thing, making the chocolate pop. You can swap with a pinch of cinnamon or espresso powder for a different twist.
Equipment & Tools
- 20cm (8-inch) square baking pan: To hold and shape the bars.
- Mixing bowl: To combine and coat the ingredients.
- Spatula: To mix, spread, and press the mixture.
- Parchment paper: To prevent sticking and make removal easier.
- Heatproof bowl: To melt the chocolate safely.
- Saucepan: To create a gentle simmer for melting.
Step-by-step guide to no-bake bars
- Gather your equipment: a 20cm (8-inch) square baking pan, a mixing bowl, a spatula, and parchment paper. Line the pan with parchment for easy removal.
- Crush the biscuits: use a rolling pin or pulse in a food processor until you get small, uneven crumbs. Aim for about 2 cups of crushed biscuits. Set aside.
- Melt the chocolate: chop 200g (7oz) of dark chocolate into small pieces. Set a heatproof bowl over a pot of simmering (about 90°C/194°F) water. Stir until smooth and shiny, about 3-5 minutes. Be careful not to let water touch the chocolate.
- Add butter and cocoa: stir in 50g (1/4 cup) butter and 2 tablespoons of unsweetened cocoa powder into the melted chocolate. Mix well until fully incorporated and glossy.
- Combine ingredients: in a large bowl, mix the crushed biscuits with 1/3 cup of sweetened condensed milk and a teaspoon of vanilla extract. Pour the warm chocolate mixture over and stir until everything is evenly coated.
- Adjust texture: if the mixture feels too stiff, add a splash more condensed milk. If too loose, sprinkle in a few extra crushed biscuits. It should be thick but spreadable.
- Transfer to pan: pour the mixture into your prepared pan. Use a spatula to spread evenly, pressing down gently to compact. Smooth the top.
- Chill the bars: cover with plastic wrap or foil. Refrigerate for at least 2 hours, or overnight for best flavor and firm texture.
- Check for readiness: the mixture should be firm but still slightly fudgy. It should hold together when pressed, with a shiny, crackly surface when set.
- Slice and serve: lift out of the pan using the parchment, cut into squares, and serve. Keep leftovers refrigerated in an airtight container for up to 5 days.
Refrigerate the assembled mixture for at least 2 hours until firm. Slice into squares with a sharp knife. Serve directly from the fridge for best texture. Keep leftovers refrigerated in an airtight container for up to 5 days.
How to Know It’s Done
- Chocolate is fully melted and smooth, not grainy.
- Mixture holds together when pressed, not crumbly.
- Bars are firm and shiny after chilling, not sticky.
No-Bake Chocolate Biscuit Bars
Ingredients
Equipment
Method
- Line your square pan with parchment paper to make removal easy, then set aside.
- Crush the digestive biscuits into small, uneven crumbs using a rolling pin or pulse in a food processor—aim for about 2 cups of crushed crumbs. This gives the bars their sturdy base.
- Chop the dark chocolate into small pieces and set aside. Place it in a heatproof bowl.
- Set a saucepan with a couple of inches of water over low heat and bring to a gentle simmer. Place the bowl with chocolate on top, ensuring the water doesn't touch the bowl's bottom.
- Stir the chocolate constantly as it melts, until it’s smooth, shiny, and completely melted—this takes about 3-5 minutes. Remove from heat once glossy.
- Stir in the butter and sifted cocoa powder into the melted chocolate, blending until the mixture is glossy and smooth. This adds richness and depth to the chocolate.
- In a large mixing bowl, combine the crushed biscuits with the sweetened condensed milk and vanilla extract. Mix until evenly coated and sticky.
- Pour the warm, melted chocolate mixture over the crushed biscuits and stir thoroughly, ensuring every crumb is coated in glossy chocolate. The mixture should be thick and cohesive.
- Transfer the mixture into the prepared pan. Use a spatula to press it down firmly and spread evenly, creating a smooth top. Pressing helps eliminate air pockets and ensures clean slices.
- Cover the pan with plastic wrap or foil and refrigerate for at least 2 hours, or overnight, until the mixture is firm and shiny.
- Once set, lift the bars out of the pan using the parchment paper. Use a sharp knife dipped in hot water to cut clean, even squares.
- Serve immediately or store in an airtight container in the fridge for up to 5 days, enjoying their fudgy, crumbly texture and rich chocolate flavor.
Pro tips for perfect bars
- Use good quality chocolate for a glossy finish and rich flavor.
- Sift cocoa powder to avoid lumps and ensure a smooth mixture.
- Chill the mixture in the fridge until it’s just firm for clean slices.
- Press the mixture firmly into the pan to prevent air pockets and uneven bars.
- Use a sharp knife dipped in hot water for cleaner cuts through firm bars.
- Add a pinch of sea salt on top before chilling to enhance chocolate depth.
- Melt chocolate slowly over low heat or in short bursts to prevent burning.
Common mistakes and how to fix them
- FORGOT to line pan: Use parchment paper to prevent sticking and easy removal.
- DUMPED too much chocolate: Keep an eye on melting; stir until smooth, avoid overheating.
- OVER-TORCHED chocolate: Remove from heat immediately if it starts to smell burnt or thins out.
- MISSED cooling time: Refrigerate for at least 2 hours for proper setting and texture.
Quick fixes and pantry swaps
- When the chocolate seizes, splash in a little warm cream to smooth it out.
- If mixture is too crumbly, add a teaspoon of hot water or more condensed milk.
- DUMPED too many biscuits? Add a splash of milk to loosen the mixture.
- Over-torched chocolate? Patch with a small amount of melted butter for shine and smoothness.
- Shield delicate layers from drafts while chilling to prevent cracking and shimmer loss.
Prep, store, and reheat tips
- Prepare the crushed biscuits and melt the chocolate mixture a day in advance to save time and reduce stress.
- Store the uncut, wrapped bars in an airtight container in the fridge for up to 5 days, preserving the fudgy texture.
- For longer storage, freeze the bars wrapped tightly in plastic, maintaining freshness for up to 2 months.
- Refrigerate or thaw frozen bars in the fridge for at least an hour before serving to regain their firm, chewy consistency.
- Chilled bars develop a richer chocolate aroma, but serve slightly warmer for a softer, more melt-in-your-mouth experience.
Top questions about no bake bars
1. Can I use milk chocolate instead of dark?
Yes, you can swap dark chocolate for milk chocolate if you prefer a sweeter, creamier flavor. Just note it will be less bitter and richer in sugar.
2. Can I make this gluten-free?
Absolutely. Using gluten-free biscuits works fine; just pick a variety you like and crush them as usual.
3. Can I melt chocolate in the microwave?
Yes, melting chocolate over low heat or in short bursts in the microwave works. Just keep stirring and avoid overheating.
4. How long do I need to chill the bars?
Refrigerate the bars for at least 2 hours until they are firm and shiny. For faster setting, you can chill in the freezer for 30 minutes.
5. Can I add toppings?
Add a pinch of sea salt on top before chilling to enhance the chocolate flavor. You can also sprinkle chopped nuts or dried fruits for extra texture.
6. Can I make it dairy-free?
Yes, for a dairy-free option, substitute butter with coconut oil or a dairy-free margarine. The texture may be slightly different but still delicious.
7. My mixture is crumbly, what do I do?
To prevent the mixture from being crumbly, ensure the chocolate is fully melted and mixed well with the condensed milk. Press firmly into the pan.
8. Can I freeze the bars?
Yes, these bars freeze well. Wrap them tightly and store in the freezer for up to 2 months. Thaw in the fridge before slicing.
9. How do I get clean slices?
Use a sharp knife dipped in hot water for cleaner cuts. Wipe the blade between slices to prevent sticking.
10. What if my chocolate seizes?
If the chocolate seizes or becomes grainy, add a small splash of warm cream and stir until smooth.
These no-bake chocolate biscuit bars are a reminder that simplicity can be deeply satisfying. They come together fast, with just a handful of ingredients, making them perfect for spontaneous cravings or last-minute gatherings. Sharing them feels like passing on a quiet, sweet comfort that never gets old.
In a world where desserts often demand effort, these bars prove that sometimes, the simplest pleasures are the most memorable. They’re a little nostalgic, a little indulgent, and always a welcome treat when time is tight or I need a quick burst of chocolatey joy.