
These no bake chocolate almond bars are my go-to when I need a quick fix of something sweet and satisfying. There’s no fuss, no oven, just melting, mixing, and chilling—honestly, I love how effortless they are but still feel indulgent. Plus, they remind me of those busy afternoons when I’d crave a little treat but didn’t want to mess up the kitchen.
What really makes these bars special is how versatile they are—so forgiving if you’re missing a nut or want to switch up the chocolate. I’ve made batches with dark chocolate, milk, or even a touch of sea salt on top, depending on what I have lying around. It’s the kind of recipe that feels like a small victory, especially when you’re craving something rich without the guilt or the mess.
This recipe is inspired by my childhood memories of sneaking into my grandma’s kitchen late at night, where she kept a secret stash of these bars. It’s about capturing that cozy, nostalgic feeling with something quick, simple, and secretly indulgent—no oven needed, just good old-fashioned mixing and chilling.
The story behind this recipe
- This recipe came about one hectic afternoon when I needed something sweet, fast, but still satisfying. I was out of oven-baked treats and wanted to avoid the usual fuss. I remembered how my grandma used to toss together simple ingredients without fuss, just enough to satisfy a craving. That memory stuck with me, and I started experimenting with a no-bake approach to combine crunch, chocolate, and that familiar warmth of almonds.
- What started as a quick fix turned into a little ritual—something I turn to when I want to feel a bit nostalgic but also keep things uncomplicated. Over the years, I’ve tweaked it to make it more adaptable, swapping ingredients and adjusting sweetness, but the core stays the same. These bars remind me that sometimes, the simplest recipes hold the most comfort, especially when you’re in a rush or just want a little treat that’s honest and straightforward.
- heading
Ingredient breakdown: key components
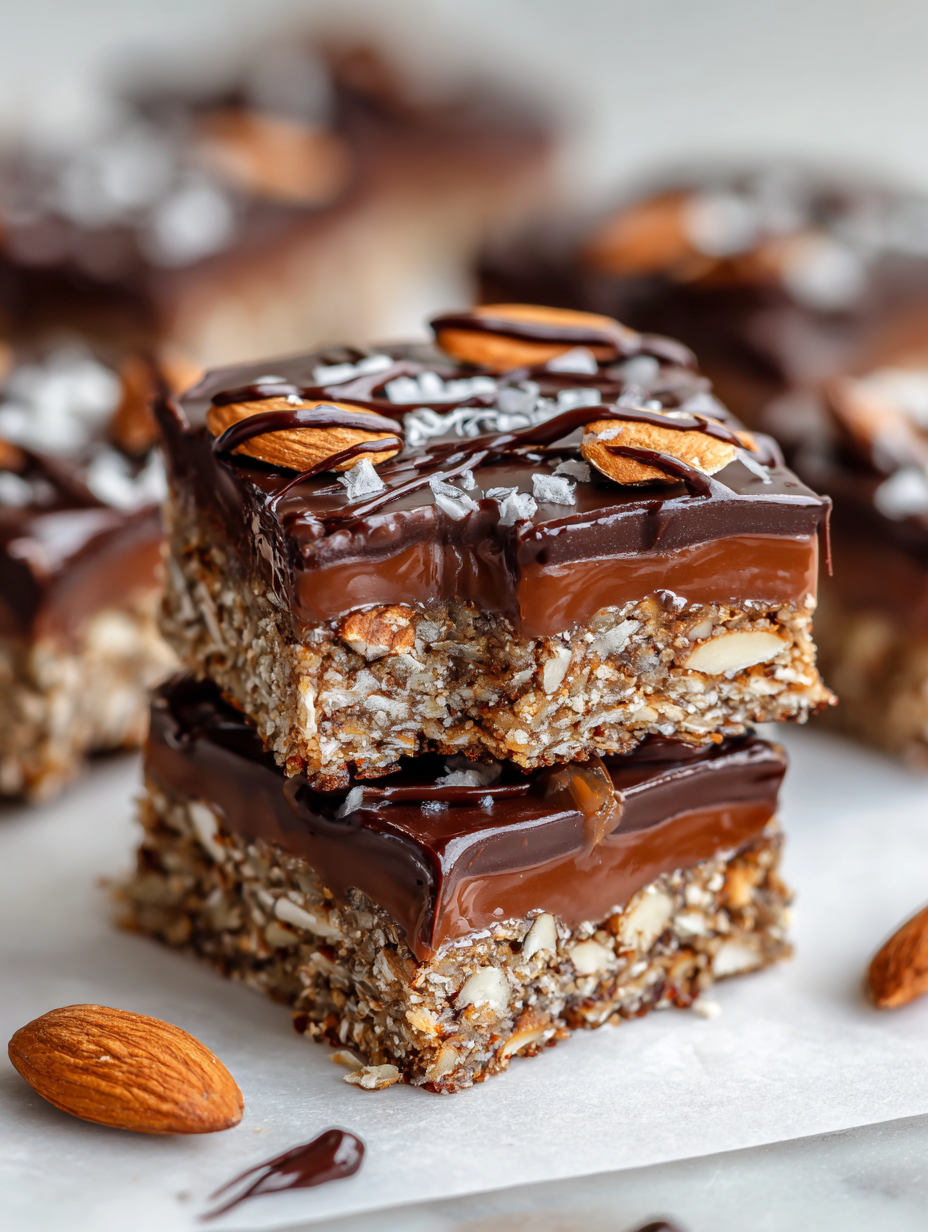
- Dark chocolate: I prefer a rich, slightly bitter dark chocolate that melts smoothly and gives a deep cocoa flavor. If you want it sweeter, swap in milk chocolate, but don’t expect the same intensity.
- Almonds: Toasted almonds bring a smoky, nutty aroma that’s hard to beat. Skip to save time, but you’ll lose some of that roasted depth and crunch.
- Sweetened condensed milk: It’s my secret to binding everything together without fuss. If you want a less sweet version, try coconut condensed milk for a hint of tropical flavor.
- Butter: I use unsalted butter for a clean, creamy base that enhances the chocolate. For a dairy-free tweak, coconut oil works but adds a subtle coconut scent.
- Sea salt: Just a pinch elevates the chocolate and almonds, making them pop. If you’re into sweeter treats, leave it out or use flaky sea salt for a burst of brine.
- Vanilla extract: A splash deepens the overall richness and balances the sweetness. Skip if you’re out—your bars will still be good, just a touch less warm.
- Optional toppings: I love sprinkling a little flaky sea salt or chopped almonds on top for texture and visual appeal. Keep it simple or go wild—your call.
Spotlight on key ingredients
Dark chocolate:
- I love a rich, slightly bitter dark chocolate that melts into a glossy, smooth layer. It’s the backbone of these bars, giving that deep cocoa hit. If you prefer sweeter, milk chocolate can be a milder, creamier choice.
- Almonds: Toasted almonds add a smoky, nutty aroma and a satisfying crunch. They behave differently when toasted—they become fragrant and a bit oily. Skip to save time, but you’ll miss that roasted depth and texture contrast.
Almonds:
- They release a warm, nutty aroma as they toast, and their crunch becomes more pronounced. During melting, they stay firm but add a delightful chew once integrated. Watch for that golden hue when toasted—it’s a sign they’re ready.
- Chocolate and almonds work together with a contrast of smooth richness and crunchy texture. Both are forgiving but benefit from gentle handling—don’t overheat the chocolate, and toast almonds until fragrant but not burnt.
Notes for ingredient swaps
- Dairy-Free: Swap regular butter with coconut oil or vegan butter. Expect a slightly different richness and a hint of coconut aroma.
- Chocolate: Use dark, milk, or white chocolate depending on your preference. White chocolate will make it sweeter and creamier, but less intense cocoa flavor.
- Nuts: If almonds aren’t available, try chopped hazelnuts or cashews. They add different textures and nutty notes, but the almond flavor is classic.
- Sweetener: Replace condensed milk with honey or maple syrup for a different sweetness profile, but expect a slightly softer, less cohesive texture.
- Add-ins: Dried cranberries, shredded coconut, or chopped pretzels can be mixed in for extra flavor and crunch. Just keep proportions in check to prevent sogginess.
- Salt: Use flaky sea salt or Himalayan pink salt for a different burst of brine; regular sea salt works fine but may be less nuanced.
- Flavoring: A dash of espresso powder or cinnamon can deepen the chocolate flavor or add warmth, respectively. Use sparingly to avoid overpowering.
Equipment & Tools
- 20cm (8-inch) square baking dish: To hold and shape the mixture
- Parchment paper: For easy removal and clean edges
- Microwave-safe bowl: To melt chocolate and butter evenly
- Spatula: For mixing and pressing the mixture
Step-by-step guide to no-bake bars
- Equipment: line a 20cm (8-inch) square baking dish with parchment paper, leaving overhang for easy removal. Use a large microwave-safe bowl for melting chocolate and butter. Have a spatula ready for mixing.
- Melt the chocolate and butter: microwave the chocolate chunks and butter in 30-second bursts, stirring well after each, until smooth and glossy. Approx 1-2 minutes total. The smell should be rich and cocoa-y.
- Mix in the sweetness: stir in the sweetened condensed milk and vanilla extract until fully combined. The mixture will be thick and velvety, with a fragrant, milky aroma.
- Add the dry ingredients: fold in the toasted almonds and a pinch of sea salt. The texture should become slightly grainy but cohesive, with a nutty aroma permeating. If it feels too stiff, add a teaspoon of milk.
- Pour and spread: transfer the mixture into the prepared dish, pressing down firmly with the back of a spatula or your fingers to spread evenly. The surface should be smooth, with a slight sheen from the melted chocolate.
- Chill to set: refrigerate uncovered for at least 2 hours, or until firm. The mixture should be firm to the touch but not brittle, with a deep chocolate scent and a slight bounce when pressed.
- Cut and serve: lift the bars out using the parchment overhang, then slice into squares. The cuts should be clean and smooth, with a shiny, crackly surface. If sticky, chill a bit longer.
- Resting & Finishing: serve directly from the fridge for best texture. For a prettier presentation, sprinkle with extra chopped almonds or a light dusting of cocoa powder. Let sit at room temperature for 5 minutes before serving for optimal flavor release.
- Checkpoints: the bars should be firm but not hard, with a glossy surface; chocolate should be fully set and no longer sticky; the aroma should be rich, cocoa, and nutty.
Refrigerate uncovered for at least 2 hours. Slice into squares, then serve chilled or at room temperature, allowing flavors to mellow. For a polished look, dust with cocoa powder or sprinkle extra almonds on top.
How to Know It’s Done
- Bars are firm and glossy, with no sticky residue.
- Chocolate is fully set and no longer shiny or tacky.
- Aromas of cocoa and toasted almonds are prominent and inviting.
No-Bake Chocolate Almond Bars
Ingredients
Equipment
Method
- Line your baking dish with parchment paper, allowing overhang for easy removal.
- Place the dark chocolate chunks and butter in a microwave-safe bowl. Microwave in 30-second bursts, stirring well after each, until the mixture is smooth and glossy with a rich aroma.
- Stir in the sweetened condensed milk and vanilla extract into the melted chocolate mixture until fully combined—this creates a creamy, velvety base.
- Fold in the toasted almonds and a pinch of sea salt, mixing until evenly distributed and the mixture becomes slightly thick and fragrant.
- Pour the mixture into your prepared dish, using a spatula to spread it out evenly and press down firmly to create a smooth, compact surface.
- Refrigerate the bars uncovered for at least 2 hours, or until the mixture is firm and glossy when touched.
- Lift the set bars out of the dish using the parchment overhang, then cut into squares with a sharp knife—wiping the blade clean between cuts for neat slices.
- Serve the bars chilled or at room temperature, garnished with a sprinkle of extra almonds or a pinch of sea salt if desired.
Pro tips for perfect bars
- Bolded mini-head: Use a microwave-safe bowl → Melt chocolate evenly, stirring every 30 seconds for a glossy finish.
- Bolded mini-head: Chill in layers → Refrigerate in stages to prevent melting or cracking when slicing.
- Bolded mini-head: Toast almonds thoroughly → Deepen flavor and aroma, watch carefully to avoid burning.
- Bolded mini-head: Spread quickly → Use the back of a spatula to press mixture smoothly into the pan before it sets.
- Bolded mini-head: Check texture → The mixture should be firm but still slightly pliable, not sticky or runny.
- Bolded mini-head: Adjust sweetness → Taste the melted chocolate and add more condensed milk if you want it sweeter.
- Bolded mini-head: Use parchment edges → For easy removal and clean cuts, lift the whole block out once set.
Common mistakes and how to fix them
- FORGOT to evenly spread the mixture? Use a spatula to press down firmly, avoiding air pockets.
- DUMPED too much salt? Keep initial pinch light; add more after tasting if needed.
- OVER-TORCHED the chocolate? Use low microwave power and stir often to prevent burning.
- MISSED the chill time? Ensure at least 2 hours to fully set for clean slicing.
Quick fixes and pantry swaps
- When mixture is too thick, splash a teaspoon of milk to loosen it.
- If chocolate seizes, patch with a teaspoon of vegetable oil and stir vigorously.
- DUMPED too much salt? Rinse briefly, then add a pinch more sugar to balance.
- When bars are sticky, refrigerate for 15 minutes to firm up before slicing.
- Splash a little hot water on the pan if chocolate doesn’t melt smoothly, then stir gently.
Prep, store, and reheat tips
- Prepare the mixture ahead of time and refrigerate for up to 24 hours; the chocolate aroma will deepen overnight.
- Store the bars in an airtight container in the fridge for up to 1 week; the texture stays firm and chocolate-rich.
- For longer storage, freeze the bars for up to 1 month; let thaw slightly at room temperature before slicing for best texture.
- Reheat slightly in the fridge for 10-15 seconds in the microwave to soften, checking for a warm, melty feel without melting completely.
- These bars develop a richer chocolate flavor after resting, so don’t rush the chilling process for best sensory payoff.
Top questions about no bake chocolate almond bars
1. Can I make these gluten-free?
Yes, using a gluten-free chocolate and gluten-free almonds keeps it safe for gluten sensitivities. Just check labels to be sure.
2. Can I substitute other nuts?
Absolutely. You can swap almonds for other nuts like walnuts or pistachios, depending on what you like or have on hand.
3. Can I melt the chocolate on the stove instead?
Yes, microwave melting is quick, but be sure to stir often to prevent burning and get a smooth texture.
4. How long should I chill the bars?
Refrigerate for at least 2 hours, but leaving them overnight helps flavors meld and makes slicing easier.
5. Can I make these dairy-free?
You can use coconut oil instead of butter for a dairy-free version. Expect a subtle coconut aroma and slightly different texture.
6. What if the mixture is too stiff?
If the mixture feels too thick, stir in a teaspoon of milk or coconut milk to loosen it up.
7. Can I add toppings after setting?
Add a pinch of sea salt on top after chilling for a flavor boost, or sprinkle extra chopped almonds for crunch.
8. How do I store these bars?
Store leftovers in an airtight container in the fridge for up to a week or freeze for longer storage.
9. What if the chocolate seizes during melting?
If the chocolate seizes or becomes grainy, stir in a teaspoon of vegetable oil to smooth it out again.
10. How do I get clean slices?
When slicing, run a warm knife under hot water and dry it for clean cuts without cracking the chocolate surface.
These bars are a little reminder that sometimes, simple ingredients and a bit of patience create something unexpectedly satisfying. They’re perfect for when you want a quick indulgence without the fuss, and the smell of melting chocolate fills the room with comfort.
I find myself reaching for these whenever I need a sweet fix that’s honest and straightforward. No matter the season, they bring a little moment of calm—crisp, rich, and just a touch nostalgic—right in the middle of a busy day.