Author: Olivia

  • Eggplant Parmesan Recipe: A Rustic Take on a Classic Comfort

    Eggplant Parmesan Recipe: A Rustic Take on a Classic Comfort

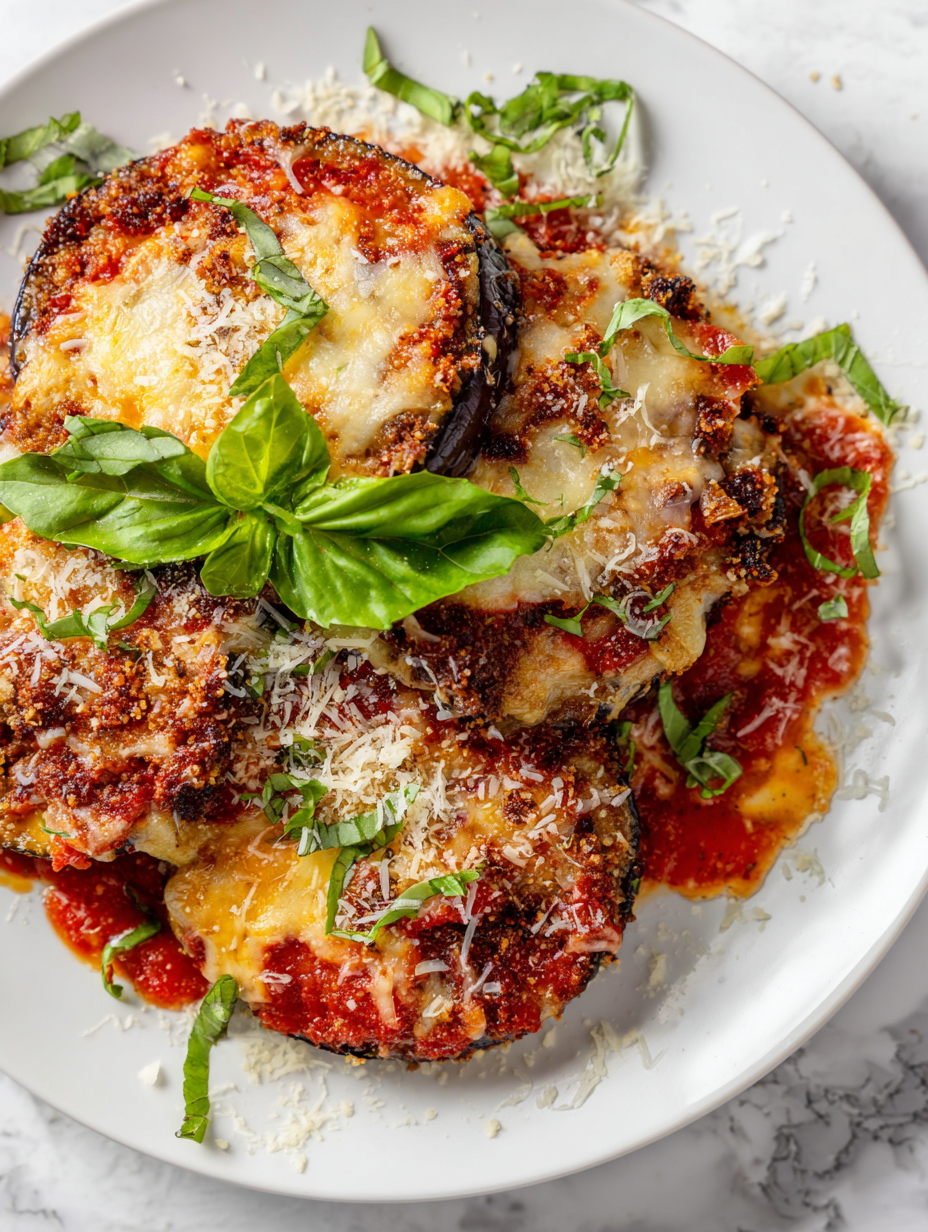
    Eggplant Parmesan always felt like a warm hug in the middle of a busy week. It’s one of those dishes that feels like a little victory—crisp, cheesy, vibrant with tomato. Making it from scratch turns a simple vegetable into something a bit more special, a comforting throwback that never really goes out of style.

    Why I keep returning to this dish

    It’s honest, unrushed comfort that fills the house with the smell of herbs and fried eggplant. Each batch reminds me that good things come from simple ingredients treated well. It’s a dish I crave when I need a reminder of home, or when I’m just too tired for fuss but still want something memorable.

    Breaking down the ingredients you need

    • Eggplant: The star, meaty and tender when cooked, with a slight bitterness that frying balances.
    • Parmesan cheese: Adds sharp, salty strength—use real for best flavor, or skip if vegan.
    • Breadcrumbs: Gives crunch, can swap for panko or crushed crackers for a different texture.
    • Marinara sauce: Bright, tangy, and slightly sweet—homemade or good-quality jarred works.
    • Mozzarella cheese: Melts into gooey pools, balancing acidity with creamy richness.
    • Olive oil: For frying—use a good extra virgin for flavor, avoid cheap blends.
    • Fresh basil (optional): Adds a fresh, aromatic lift—toss in just before serving.

    Tools of the trade for eggplant mastery

    • Large skillet: To fry the eggplant slices evenly and achieve crispiness.
    • Baking dish: To layer and bake the assembled eggplant Parmesan.
    • Three shallow dishes: For breading stations—eggs, breadcrumbs, cheese mixture.
    • Kitchen towel or paper towels: To drain excess oil from fried eggplant.
    • Oven: To bake the assembled dish to perfection.

    Step-by-step: Crafting the perfect Eggplant Parmesan

    Step 1: Preheat your oven to 200°C (392°F).

    Step 2: Slice the eggplants into 1 cm (0.4 inch) rounds. Salt them generously and set aside for 20 minutes to draw out moisture.

    Step 3: Rinse off excess salt and pat dry. Prepare three shallow dishes: one with beaten eggs, one with seasoned breadcrumbs, and one with grated Parmesan.

    Step 4: Dip each eggplant slice into the eggs, then coat thoroughly with breadcrumbs.

    Step 5: Heat a generous layer of olive oil in a large skillet over medium heat, about 160°C (320°F).

    Step 6: Fry the eggplant slices in batches, about 3-4 minutes per side, until golden and crispy.

    Step 7: Drain on paper towels, then layer in a baking dish with marinara sauce and mozzarella cheese.

    Step 8: Bake uncovered for 25-30 minutes, until bubbly and the cheese is melted and slightly browned.

    Step 9: Let rest 5 minutes before serving to settle the flavors.

    Cooking checkpoints to keep you on track

    • Eggplant slices should be golden and crispy, not soggy or burnt.
    • The cheese should be fully melted and slightly browned on top.
    • Sauce should be bubbling around the edges, indicating it’s hot and ready.

    Common pitfalls and how to fix them

    • Oil too hot causing burnt breading.? Use a thermometer to check oil is at 160°C (320°F). Too hot burns, too cold sogginess.
    • Soggy eggplant slices.? Pat dry eggplant slices thoroughly before breading.
    • Over-browned or burnt cheese.? Cover with foil if cheese browns too quickly.
    • Runny sauce ruining layers.? Add a splash of water or broth to thicken sauce if too watery.

    Eggplant Parmesan

    Eggplant Parmesan features tender slices of breaded eggplant layered with marinara sauce, melted mozzarella, and sharp Parmesan cheese. The dish is baked until bubbly and golden, with a crispy exterior and gooey, cheesy interior. It offers a comforting, homey texture that balances crunch, softness, and melty richness in every bite.
    Prep Time 20 minutes
    Cook Time 30 minutes
    Total Time 50 minutes
    Servings: 4
    Course: Main Course
    Cuisine: Italian
    Calories: 350

    Ingredients
      

    • 2 medium eggplants sliced into 1 cm rounds
    • 2 cups breadcrumbs seasoned or plain, for coating
    • 1/2 cup Parmesan cheese grated
    • 2 cups marinara sauce bright and tangy
    • 2 cups mozzarella cheese shredded, for layering
    • 1 cup olive oil for frying
    • 2 large eggs beaten, for breading
    • to taste salt for salting eggplant
    • to taste black pepper optional, for seasoning

    Equipment

    • Large skillet
    • Baking dish
    • Shallow dishes for breading
    • Kitchen towel or paper towels

    Method
     

    1. Begin by slicing the eggplants into 1 cm thick rounds. Sprinkle generously with salt and set aside for 20 minutes to draw out excess moisture and bitterness. Rinse off the salt and pat the slices dry with paper towels.
    2. Set up three shallow dishes: one with beaten eggs, one with seasoned breadcrumbs mixed with grated Parmesan, and keep ready for breading.
    3. Dip each eggplant slice into the beaten eggs, ensuring it’s coated evenly. Then press gently into the breadcrumb mixture, turning to coat all sides thoroughly.
    4. Heat a generous layer of olive oil in a large skillet over medium heat until shimmering. Carefully place the breaded eggplant slices into the hot oil, frying in batches if necessary.
    5. Fry the eggplant slices for about 3-4 minutes per side, or until golden brown and crispy. The sounds of gentle sizzling and the aroma of toasted breadcrumbs will fill the air.
    6. Transfer the fried eggplant onto paper towels to drain excess oil. Continue frying remaining slices, maintaining heat and avoiding overcrowding.
    7. Preheat your oven to 200°C (392°F). Spread a thin layer of marinara sauce in the bottom of a baking dish.
    8. Layer the fried eggplant slices in the dish, covering with marinara sauce and sprinkling generously with shredded mozzarella and grated Parmesan. Repeat layers until all ingredients are used, finishing with a cheese layer on top.
    9. Bake uncovered in the oven for 25-30 minutes, or until bubbling around the edges and the cheese is melted and slightly browned. The house will fill with a savory aroma as it bakes.
    10. Remove from the oven and let rest for 5 minutes. Garnish with fresh basil if desired, then serve hot and enjoy the hearty, crispy, cheesy layers.

    Notes

    Ensure eggplant slices are thoroughly dried before breading to prevent sogginess. Fry at moderate heat to achieve crispy coating without burning. Cover with foil if cheese browns too quickly during baking.
    Eggplant Parmesan is a dish rooted in simplicity but bursting with flavor. Its crispy edges and gooey cheese make it irresistible, especially when made with fresh, ripe eggplants. Feel free to customize the sauce or cheese to match your mood or what’s in the fridge. Each bite offers a reminder that comfort food can be both humble and deeply satisfying.

  • Serena Williams Tacos: A Personal Spin on a Classic Favorite

    Serena Williams Tacos: A Personal Spin on a Classic Favorite

    Tacos are my comfort food, but this version feels like a victory lap—quick, bold, and a little unexpected. It’s inspired by those moments on the court when everything clicks into place, and you feel unstoppable. I love how the smoky beef pairs with the punch of lime and fresh herbs—simple but so satisfying.

    Why I Keep Coming Back to This Taco Recipe

    It hits all the right notes—quick prep, bold flavors, and a little bit of chaos on the plate. I love how adaptable it is for any occasion, whether I’m craving comfort or just need something satisfying fast. Plus, it always reminds me of summer nights and good company, making every bite feel like a small victory.

    Breaking Down the Ingredients

    • Ground beef: Juicy, flavorful, and perfect for quick searing—look for 80/20 for the best balance.
    • Tortillas: Soft corn or flour, warmed to bring out their aroma—skip if they crack.
    • Fresh cilantro: Bright, herbal—adds a fresh kick, or swap with parsley for a milder touch.
    • Lime: Zesty and sharp, it cuts through richness—try lemon if you prefer a different citrus note.
    • Hot sauce: Add a smoky or tangy heat—chipotle or sriracha work well, depending on your mood.
    • Salt & pepper: Basic seasonings that bring out all the flavors—don’t skimp.
    • Onions & garlic: Sautéed until fragrant, they form the savory base—omit if you want a lighter version.

    Tools of the Trade for Taco Triumph

    • Cast-iron skillet: For a perfect sear and even heat distribution.
    • Sharp knife: Chopping cilantro, lime, and prepping toppings.
    • Tongs: Handling hot tortillas and beef without mess.
    • Microwave or dry skillet: Warming tortillas to keep them flexible.
    • Serving plates: For a clean, inviting presentation.

    Step-by-Step for Perfect Serena Williams Tacos

    Step 1: Gather your ingredients and tools before starting, to keep things smooth.

    Step 2: Heat a cast-iron skillet over medium-high heat, about 200°C/390°F, until just shimmering.

    Step 3: Cook the seasoned beef until it’s nicely browned, about 8 minutes, stirring frequently.

    Step 4: While the beef cooks, chop fresh cilantro and squeeze lime for bright finishing touches.

    Step 5: Warm your tortillas in a dry skillet or microwave to keep them pliable.

    Step 6: Assemble the tacos by laying beef on tortillas, topping with cilantro, lime, and a drizzle of hot sauce.

    Step 7: Serve immediately, and enjoy the sizzle and aroma that fills the air.

    Cooking Checkpoints & Tips for Success

    • The beef should be juicy, not dry, with a good crust—if it looks too wet, let it brown a bit longer.
    • Tortillas should be warm and soft, not brittle or cracked—reheat if necessary.
    • The cilantro and lime add freshness—don’t skip or skimp on these for balance.

    Common Taco Troubles & How to Fix Them

    • Tortillas dry and brittle.? Add a splash of water and cover to steam tortillas if they crack.
    • Overcooked, dry meat.? Let the beef rest a few minutes off heat to lock in juices.
    • Wilted, soggy herbs.? If cilantro turns soggy, serve it on the side instead.
    • Over-torched beef or tortillas.? Scrape off burnt bits promptly to avoid bitterness.

    Serena Williams-Style Beef Tacos

    These quick and bold beef tacos feature seasoned ground beef seared to a flavorful crust, nestled in warm tortillas. Topped with fresh cilantro, lime, and hot sauce, they deliver a satisfying combination of smoky, tangy, and herbaceous flavors with a tender yet crispy texture.
    Prep Time 10 minutes
    Cook Time 15 minutes
    Total Time 25 minutes
    Servings: 4
    Course: Main Course
    Cuisine: Mexican
    Calories: 350

    Ingredients
      

    • 1 lb ground beef preferably 80/20 for flavor
    • 8 small corn or flour tortillas warmed before serving
    • 1/4 cup fresh cilantro chopped
    • 1 lime lime quartered for squeezing
    • 2 dash hot sauce chipotle or sriracha for heat
    • to taste salt & pepper for seasoning
    • 1/2 cup onions, diced optional
    • 2 cloves garlic, minced optional

    Equipment

    • Cast-iron skillet
    • Sharp knife
    • Tongs
    • Microwave or dry skillet
    • Serving plates

    Method
     

    1. Gather all your ingredients and tools to keep everything at your fingertips for a smooth cooking process.
    2. Heat your cast-iron skillet over medium-high heat until it’s shimmering and hot, about 2 minutes, filling your kitchen with a toasty aroma.
    3. Add the diced onions and minced garlic to the skillet, cooking until fragrant and translucent, about 2-3 minutes, stirring constantly.
    4. Break the ground beef into rough chunks and add it to the skillet, using tongs to spread it out evenly. Let it sear undisturbed for 2-3 minutes until it develops a brown crust.
    5. Use the tongs to flip and break up the beef, cooking for another 5-7 minutes until fully browned and cooked through, with a slight crisp on the edges.
    6. Season the beef generously with salt and pepper, stirring to coat evenly, and cook for another minute to meld flavors.
    7. While the beef finishes cooking, warm your tortillas in a dry skillet or microwave until soft and pliable, about 20 seconds.
    8. Squeeze fresh lime juice over the cooked beef, stirring to incorporate the bright, tangy flavor.
    9. Assemble each taco by spooning a generous amount of beef onto a warm tortilla, then topping with chopped cilantro and a few dashes of hot sauce.
    10. Serve the tacos immediately while warm, garnished with extra lime wedges for squeezing and enjoy the bold flavors and satisfying textures.

    Notes

    For extra crunch, add some chopped radishes or shredded lettuce. Adjust hot sauce to your heat preference.
    This recipe is a celebration of flavor and simplicity. It’s flexible enough to adjust to what you have on hand—more heat, more lime, or extra cheese. The key is to keep it honest, just like a good match on the court. Dive in, taste, and make it your own.

  • Emeril Lagasse’s Jambalaya: A Deep Dive into the Soul of Creole Cooking

    Emeril Lagasse’s Jambalaya: A Deep Dive into the Soul of Creole Cooking

    Jambalaya has always felt like a celebration in a bowl—something hearty and vibrant that gathers everyone around. I love the way the smoky sausage and tender shrimp mingle with the spicy, tomato-rich rice. It’s a dish that reminds me of lazy Sunday afternoons, full of chaos and comfort.

    Why I Keep Making This Dish

    It’s a messy, loud, satisfying process—every step smells like a gathering. The smoky, spicy flavors hit different every time, depending on my mood or the ingredients I find. It’s also forgiving enough to adapt, which means I can make it feel fresh and personal each round.

    Breaking Down the Core Ingredients

    • Andouille sausage: Smoky, spicy sausage adds depth and richness. Use chorizo if you prefer a milder touch.
    • Shrimp: Fresh, firm shrimp bring a sweet, briny burst. Frozen is fine, just thaw and pat dry.
    • Long-grain rice: Keeps the dish fluffy and separate. Skip instant rice for authenticity.
    • Canned diced tomatoes: Oozy with bright acidity, balancing spice and smoke.
    • Bell peppers and onions: Base aromatics that create a sweet, savory foundation.
    • Creole spices: A mix of paprika, cayenne, thyme—think layered warmth, not overwhelming heat.
    • Chicken stock: Rich, savory liquid that makes rice flavorful and tender.

    Tools & Equipment for Authentic Jambalaya

    • Large heavy-bottomed pot: Ensures even heat distribution for simmering and prevents sticking.
    • Wooden spoon: Stirs ingredients gently, helping flavors meld.
    • Measuring cups and spoons: Keeps seasoning and liquids balanced.
    • Sharp knife: Prepares vegetables and meats efficiently.

    Mastering the Art of One-Pot Flavor

    Step 1: Heat a large heavy-bottomed pot over medium heat, about 175°C (350°F).

    Step 2: Add oil, then onions, bell peppers, and celery. Cook until softened, about 8 minutes.

    Step 3: Stir in smoked sausage slices, cook until browned, about 5 minutes.

    Step 4: Add garlic, cook until fragrant, 1-2 minutes.

    Step 5: Pour in crushed tomatoes, chicken stock, and spices. Bring to a simmer.

    Step 6: Add chicken and shrimp, cook until chicken is no longer pink and shrimp is opaque, about 10 minutes.

    Step 7: Stir in cooked rice, mix well, and cook for another 5 minutes.

    Step 8: Taste and adjust seasoning with salt and hot sauce.

    Cooking Checkpoints & Tips for Perfect Jambalaya

    • Vegetables should be soft but not mushy, with a fragrant aroma.
    • Rice should be tender and slightly creamy, not sticky or undercooked.
    • Seafood must be opaque and firm, not rubbery or raw.

    Common Mistakes & How to Fix Them

    • Dry rice or burnt bottom.? Add more liquid if rice is too firm or dry.
    • Undercooked seafood.? Reduce heat and cook longer with lid on.
    • Too much oil or burnt spices.? Stir more frequently to prevent sticking.
    • Overcooked seafood, rubbery texture.? Don’t rush the simmering process.

    Classic Jambalaya

    This hearty dish combines smoky sausage, tender shrimp, and flavorful rice cooked in a single pot. The vibrant mix of spices, tomatoes, and vegetables creates a fragrant, colorful dish with a satisfying, slightly saucy texture. Perfect for gatherings and casual dinners alike.
    Prep Time 15 minutes
    Cook Time 30 minutes
    Total Time 45 minutes
    Servings: 4
    Course: Main Course
    Cuisine: Creole
    Calories: 520

    Ingredients
      

    • 1 lb Andouille sausage sliced
    • 1 lb shrimp peeled and deveined
    • 1 1/2 cups long-grain rice uncooked
    • 1 can (14.5 oz) diced tomatoes with their juice
    • 1 each bell pepper diced, any color
    • 1 medium onion diced
    • 3 cloves garlic minced
    • 2 teaspoons Creole spice mix paprika, cayenne, thyme blend
    • 4 cups chicken stock or broth
    • 2 tablespoons oil vegetable or olive oil
    • to taste salt and hot sauce for seasoning

    Equipment

    • Large heavy-bottomed pot
    • Wooden spoon
    • Measuring cups and spoons
    • Sharp knife

    Method
     

    1. Heat the oil in a large heavy-bottomed pot over medium heat until shimmering and fragrant.
    2. Add the diced onion, bell pepper, and a pinch of salt. Cook, stirring frequently, until the vegetables are soft and fragrant, about 8 minutes.
    3. Stir in the sliced sausage and cook until it begins to brown and releases its smoky aroma, about 5 minutes.
    4. Add the minced garlic and cook for 1-2 minutes, until fragrant and slightly golden.
    5. Pour in the diced tomatoes with their juice and stir to combine, allowing the mixture to simmer for 2-3 minutes.
    6. Pour in the chicken stock and sprinkle in the Creole spice mix, stirring well to distribute the spices evenly.
    7. Bring the mixture to a gentle simmer, then stir in the uncooked rice. Cover the pot, reduce heat to low, and cook for 15 minutes, or until the rice is tender and has absorbed most of the liquid.
    8. Uncover the pot and gently fold in the shrimp, ensuring they are submerged in the flavorful rice mixture. Cover again and cook for another 10 minutes, until the shrimp are opaque and firm.
    9. Check the seasoning, adding salt and hot sauce as desired. Stir everything together to combine the flavors.
    10. Once the shrimp are cooked through and the rice is fluffy, turn off the heat and let the jambalaya rest for a few minutes.
    11. Serve hot, garnished with chopped fresh herbs if desired, and enjoy this vibrant, comforting dish.
    This dish is about building layers of smoky, spicy goodness in a single pot—no fuss, just bold flavors. It’s a solid crowd-pleaser that gets better sitting for a bit, so don’t rush that last stir. Feel free to tweak the heat level or swap out sausages; it’s flexible enough to make your own. Enjoy it with a cold beer or just as is, straight from the pot.

  • Bobby Flay’s Burger Recipe: A Juicy, Charred Classic with a Twist

    Bobby Flay’s Burger Recipe: A Juicy, Charred Classic with a Twist

    Burgers are more than just fast food; they’re a canvas for flavor and technique. I’ve always loved how a simple patty can transform with the right heat and seasoning, revealing a smoky richness that’s hard to beat. This recipe reminds me that the best burgers aren’t about tricks—they’re about respecting the ingredients and cooking them carefully.

    Cooking burgers on the grill or skillet is a ritual that calls for attention and a little patience. It’s the kind of meal that feels both casual and special, perfect for weekends or whenever you crave honest, hearty comfort food. There’s a satisfaction in getting it just right—crusty on the outside, juicy inside, with that satisfying crackle of the sear.

    Why I Keep Returning to This Burger

    It’s simple but satisfying, with flavors that remind me of summer cookouts. The perfect crust and juicy interior make every bite memorable. It’s a comfort that’s easy to customize, always rewarding. That smoky aroma, the crackle of the sear—these moments keep pulling me back.

    Breaking Down the Burger Components

    • Ground Beef: Look for 80/20 for juiciness, fresh and not too lean.
    • Burger Buns: Soft but sturdy buns that toast well, like brioche or potato rolls.
    • Cheese: Cheddar or American, melts smoothly, adds savory richness.
    • Toppings: Lettuce, tomato, pickles—crisp, fresh, and bright.
    • Seasonings: Salt and pepper are king; a pinch of smoked paprika adds depth.
    • Oil: A little vegetable or canola oil for the grill or skillet, to prevent sticking.

    Tools of the Trade

    • Grill or Cast-Iron Skillet: Provides the high, even heat needed for a proper sear.
    • Meat Thermometer: Ensures the burger reaches a safe and perfect doneness.
    • Spatula: Helps flip the patties without breaking them.
    • Bowl: Mix and hold ingredients, or to rest the cooked burger.
    • Toothpick or Skewer: Test the doneness or hold toppings in place.

    Mastering the Art of the Perfect Burger: Step-by-Step

    Step 1: Gather your ingredients: ground beef, burger buns, cheese, toppings, and seasonings.

    Step 2: Preheat your grill or cast-iron skillet to medium-high heat, about 200°C (390°F).

    Step 3: Form the beef into patties, about ¾ inch thick, making a small indent in the center.

    Step 4: Season both sides generously with salt and pepper. Place the patties on the hot grill or skillet.

    Step 5: Cook for about 3-4 minutes per side for medium, or until they develop a deep, caramelized crust.

    Step 6: Add cheese during the last minute, cover briefly to melt.

    Step 7: Toast buns lightly on the grill, about 30 seconds, until golden.

    Step 8: Assemble burgers with toppings, then serve immediately.

    Keep an Eye on These Burger-Building Moments

    • The crust should be deep golden and slightly charred, not burnt.
    • Juices should run clear when you press the center of the patty.
    • Cheese melts smoothly without sliding off—cover the last minute.
    • Buns are toasted lightly and hold together when you bite.

    Avoid These Burger-Building Blunders

    • Flat patties puff up in the center.? Make a small indent in the center of the patty before cooking.
    • Juices escape and the crust softens.? Don’t press down on the burger while cooking.
    • Burger sticks or burns.? Use a clean, hot grill or skillet.
    • Cheese doesn’t melt properly.? Add cheese in the last minute.

    Classic Juicy Burgers

    This burger recipe focuses on grilling juicy, flavorful beef patties to a perfect crust, accompanied by toasted buns, melty cheese, and fresh toppings. The result is a hearty, satisfying meal with a crispy exterior and tender interior, ideal for casual weekends or summer cookouts.
    Prep Time 10 minutes
    Cook Time 10 minutes
    Total Time 20 minutes
    Servings: 4
    Course: Main Course
    Cuisine: American
    Calories: 650

    Ingredients
      

    • 1 pound Ground Beef (80/20) preferably fresh
    • 4 pieces Burger Buns brioche or potato rolls recommended
    • 4 slices Cheddar Cheese or American cheese slices
    • 1 large Tomato sliced
    • Lettuce leaves Lettuce crisp and fresh
    • pickles Pickles sliced
    • 1 teaspoon Salt
    • 1/2 teaspoon Black Pepper
    • 1/4 teaspoon Smoked Paprika optional, for depth of flavor
    • 1 tablespoon Vegetable Oil for cooking

    Equipment

    • Grill or Cast-Iron Skillet
    • Meat thermometer
    • Spatula
    • Bowl
    • Toothpick or Skewer

    Method
     

    1. Gather all your ingredients: fresh ground beef, buns, cheese, and toppings.
    2. Preheat your grill or cast-iron skillet over medium-high heat until it’s hot and slightly shimmering, with a faint smoky aroma in the air.
    3. Divide the beef into four equal portions and gently shape each into a ¾ inch thick patty, making a small indentation in the center of each to prevent puffing during cooking.
    4. Season both sides of each patty generously with salt, black pepper, and a pinch of smoked paprika for added depth.
    5. Place the patties on the hot grill or skillet, listening for a satisfying sizzle as they make contact.
    6. Cook for about 3-4 minutes on one side until the crust is deep golden and slightly charred, then flip carefully with a spatula.
    7. Cook the second side for another 3-4 minutes, until the juices run clear when pressed and the crust is well-developed.
    8. During the last minute of cooking, place a slice of cheese on each patty, then cover briefly to melt into a smooth, gooey layer.
    9. While the burgers cook, lightly toast the buns on the grill or skillet for about 30 seconds until golden and slightly crispy.
    10. Assemble the burgers by placing a lettuce leaf and tomato slice on the bottom bun, followed by the cheesy patty, pickles, and then the top bun.
    11. Serve immediately while hot, with the crackle of the crust and juicy interior making each bite satisfying.

    Notes

    Ensure not to press down on the patties during cooking to retain juices. Rest the burgers for a minute before serving for optimal juiciness.
    This burger is all about balance—juicy meat, a smoky char, and just enough toppings to enhance, not overwhelm. It’s a straightforward, honest cook’s approach that celebrates good ingredients. Once you’ve nailed the technique, every bite is a reminder why simple can be so satisfying. Enjoy customizing it with your favorite fixings or a spicy aioli for that extra kick.

  • Stanley Tucci’s Pasta alla Norma: A Home Cook’s Love Letter to Sicily

    Stanley Tucci’s Pasta alla Norma: A Home Cook’s Love Letter to Sicily

    Pasta alla Norma is one of those dishes that feels like a warm hug from Sicily—bright, smoky, and a little cheeky. I love how it turns simple eggplant and tomato into something that feels celebratory, even after a long day. It’s a reminder that good food doesn’t need fancy ingredients, just a little patience and a lot of love.
    Cooking this dish takes me right back to my first trip to Palermo, where I tasted it for the first time. Since then, it’s become my go-to when I want to capture that sunny, chaotic, and utterly satisfying vibe. It’s not fussed-over, just honest and deeply flavorful.

    Why I keep coming back to this dish

    It reminds me of sunny Sicilian afternoons, the kind that linger long after the plates are empty. Every time I make it, I feel connected to those vibrant streets and smoky sunsets. Plus, it’s a dish that always feels right—simple, honest, and deeply satisfying, even in the chaos of a busy week.

    Breaking down the ingredients

    • Eggplant: Creamy, slightly smoky, and tender once fried—key for that rich texture and flavor.
    • San Marzano tomatoes: Sweet, vibrant, and a little tangy—preferably canned for that authentic deep flavor.
    • Ricotta salata: Salty, crumbly cheese that balances the rich tomato sauce with a briny kick.
    • Basil: Fresh, fragrant, and bright—adds that essential herbal lift.
    • Garlic and chili: Aromatic and fiery—layering flavors from the first sizzle.
    • Olive oil: Good quality, fruity oil—what makes the whole dish sing.
    • Pasta (rigatoni or spaghetti): Al dente, it’s the canvas for all these flavors—don’t overdo it.

    Tools of the trade for pasta alla Norma

    • Large pot: Boiling water for pasta, ensuring enough room for pasta to cook evenly.
    • Frying pan or skillet: Frying eggplant slices to crispy perfection.
    • Sauté pan: Sautéing garlic, chili, and simmering the tomato sauce.
    • Slotted spoon: Removing eggplant slices from oil without excess grease.
    • Chef’s knife: Chopping basil, garlic, and eggplant efficiently.
    • Wooden spoon: Stirring the sauce gently without scratching the pan.

    Step-by-step: Making Pasta alla Norma from Scratch

    Step 1: Start by melting a good amount of salt into your water—think of it as salty as the sea, because that’s what flavor does.

    Step 2: Cook the pasta until just al dente—about 1 minute less than package directions—then drain, saving a cup of that starchy water.

    Step 3: While pasta cooks, fry eggplant slices in a generous pool of olive oil over medium heat until they’re golden and soft, about 3-4 minutes per side.

    Step 4: In a separate pan, sauté garlic and crushed red pepper in a splash of olive oil until fragrant—about 30 seconds—then toss in crushed tomatoes and simmer until thickened, about 10 minutes.

    Step 5: Combine the pasta with the tomato sauce and fried eggplant, adding a splash of reserved water to loosen it up. Finish with fresh basil and a generous grating of ricotta salata.

    Step 6: Serve immediately, with a drizzle of olive oil and more basil if you like—this dish is all about those bold, sunny flavors.

    Cooking checkpoints to keep in mind

    • The pasta should be just shy of fully cooked—remember, it will finish cooking in the sauce.
    • Eggplant slices need to be golden and slightly crispy on the edges, not soggy or burnt.
    • The sauce should be thick and vibrant, clinging to the pasta—don’t let it reduce too much or be too watery.
    • Taste the sauce before combining—adjust salt and spice levels to your preference, it’s all about balance.

    Common mistakes and how to fix them

    • Eggplant burns quickly when fried on high heat.? Use medium heat for frying eggplant, not high—prevents burning.
    • Sauce feels too thick or sticky.? Add pasta water gradually, stir, then check consistency.
    • Over-salted or bland final dish.? Taste and adjust salt before serving, not after.
    • Pasta turning to mush.? Keep an eye on pasta; don’t overcook it.

    Pasta alla Norma

    Pasta alla Norma is a hearty Sicilian dish featuring al dente pasta tossed with a rich tomato sauce, tender fried eggplant slices, and topped with salty ricotta salata and fresh basil. The dish combines smoky, sweet, and briny flavors with a satisfying texture, showcasing simple ingredients transformed through classic cooking methods. Its vibrant appearance and bold flavors make it a comforting, celebratory meal.
    Prep Time 15 minutes
    Cook Time 30 minutes
    Total Time 45 minutes
    Servings: 4
    Course: Main Course
    Cuisine: Sicilian
    Calories: 550

    Ingredients
      

    • 1 pound pasta (rigatoni or spaghetti) al dente
    • 1 large eggplant sliced into rounds
    • 2 cups San Marzano tomatoes canned, crushed or pureed
    • 1/2 cup ricotta salata grated
    • 1/4 cup fresh basil chopped
    • 3 cloves garlic minced
    • 1 teaspoon crushed red pepper flakes optional for spice
    • 1/4 cup good quality olive oil
    • 1/2 cup all-purpose flour for dredging eggplant
    • 1 cup vegetable oil for frying eggplant
    • to taste salt

    Equipment

    • Large pot
    • Frying pan or skillet
    • Sauté pan
    • Slotted spoon
    • Chef’s knife
    • Wooden spoon

    Method
     

    1. Bring a large pot of salted water to a boil and cook the pasta until just al dente, about 1 minute less than package instructions. Drain, reserving about a cup of pasta water.
    2. Slice the eggplant into rounds and sprinkle with salt. Let sit for 15 minutes to draw out excess moisture, then pat dry.
    3. Dredge the eggplant slices in flour, shaking off any excess, preparing for frying.
    4. Heat vegetable oil in a frying pan over medium heat. Fry eggplant slices until golden brown and crispy, about 3-4 minutes per side. Remove with a slotted spoon and drain on paper towels.
    5. In a sauté pan, heat olive oil over medium heat. Add minced garlic and crushed red pepper flakes, cooking until fragrant, about 30 seconds.
    6. Add crushed tomatoes to the pan and simmer the sauce until thickened and vibrant, about 10 minutes. Season with salt to taste.
    7. Combine the drained pasta with the tomato sauce, tossing gently. Add a splash of reserved pasta water if needed to loosen the sauce.
    8. Add the fried eggplant slices to the pasta and toss to coat evenly with the sauce.
    9. Stir in chopped basil and sprinkle generously with grated ricotta salata, allowing the flavors to meld.
    10. Finish with a drizzle of olive oil and an extra sprinkle of basil if desired. Serve immediately while hot and vibrant.

    Notes

    Ensure the eggplant is properly salted to avoid bitterness and excess moisture. Frying at medium heat prevents burning and helps achieve a crispy texture. Adjust salt and spice levels to your preference for perfect balance.
    This dish isn’t just about the bright, smoky eggplant or the tangy cheese—it’s a reminder of how simple ingredients can tell a story. Making it at home keeps the essence alive, in every bite, and it’s a kind of ritual that feels good in the chaos of everyday life. No matter how many times you make it, that moment when everything comes together is pure magic.

  • Rihanna’s Favorite Caribbean Dishes: A Deep Dive into Jerk Chicken’s Soulful Roots

    Rihanna’s Favorite Caribbean Dishes: A Deep Dive into Jerk Chicken’s Soulful Roots

    Caribbean dishes have a way of sneaking into your soul, especially when they carry stories of sun, sea, and spice. Rihanna’s favorite dishes aren’t just about the taste—they’re about the history and the community that comes with each bite. I’ve spent years chasing the perfect jerk marinade, trying to balance heat, sweetness, and smoky richness in a way that feels authentic.

    Why I Keep Coming Back to This Dish

    Every time I cook jerk chicken, I feel a rush of nostalgia and pride. It’s a dish that invites creativity—more heat, a sweeter marinade, or a different side. The process is meditative, and the flavors never fail to surprise me, keeping me hooked every single time.

    Inside the Spice Box: What Makes Jerk Special

    • Scotch bonnet peppers: Fiery, bright and just a bit fruity—use gloves when handling, or go mild with habaneros.
    • Allspice: Warm, sweet, with a hint of clove—this is the soul of the marinade.
    • Thyme: Fresh thyme adds a herbal, earthy note that balances the heat.
    • Lime juice: Brightens everything with a citrus pop—use fresh for the zestiest flavor.
    • Brown sugar: A touch of sweetness to counter the heat—don’t skip it.
    • Soy sauce: Adds umami depth and a salty kick—if you prefer less salt, reduce or omit.
    • Garlic: Pungent and savory—crush it fresh for maximum punch.

    Tools of the Trade for Jerk Mastery

    • Grill or barbecue: To get that smoky char and perfect sear.
    • Mixing bowls: To blend spices and marinate the chicken.
    • Tongs: To turn and baste the chicken without piercing the meat.
    • Meat thermometer: To ensure the chicken cooks to a safe internal temperature.
    • Basting brush: To apply marinade or oil evenly.

    Mastering Jerk Chicken: A Step-by-Step Guide

    Step 1: Start by gathering your spices—paprika, allspice, thyme, and Scotch bonnet peppers—these are the heartbeat of the marinade.

    Step 2: Mix the spices with lime juice, garlic, and a splash of soy sauce. Let the chicken soak in this fiery, fragrant bath for at least 2 hours, ideally overnight.

    Step 3: Preheat your grill to medium-high (around 200°C/390°F). Grill the chicken, skin side down first, until charred and smoky—about 6-8 minutes per side.

    Step 4: Use tongs to turn the chicken, basting occasionally with the marinade. Look for a deep, caramelized color and a juicy jiggle.

    Step 5: Remove from heat, let rest for 5 minutes, then serve with a side of fried plantains or rice and peas.

    Cooking Checks and Tips to Keep It Real

    • The marinade should be vibrant and fragrant—if it smells dull, add more Scotch bonnet or lime.
    • The chicken skin should be charred and crispy, not burnt—adjust your heat if it’s blackening too fast.
    • Juices should run clear when pierced—if pink remains, give it a few more minutes on the grill.

    Common Pitfalls and How to Dodge Them

    • Marinade lacks punch, resulting in bland flavor.? MARINADE TOO WEAK: Boost flavor by adding more spices or a splash of soy sauce.
    • Chicken is dry and tough because it’s overcooked.? OVERCOOKED CHICKEN: Use a meat thermometer to hit 75°C/165°F—no more, no less.
    • Chicken skin blackens before the inside is cooked.? BURNED SKIN: Keep a close eye and move chicken around—reduce heat if charring too fast.
    • Lack of smoky flavor due to indirect heat only.? NOT ENOUGH CHAR: Push chicken directly over flames for a minute or two to get that real smoky crust.

    Jerk Chicken

    Jerk chicken is a flavorful Caribbean dish featuring marinated chicken grilled to smoky perfection. The marinade combines fiery Scotch bonnet peppers, allspice, thyme, and lime juice, creating a vibrant, aromatic crust with juicy, tender meat inside. The final dish boasts a charred, caramelized exterior and succulent interior, perfect for serving with sides like rice and peas or fried plantains.
    Prep Time 15 minutes
    Cook Time 20 minutes
    Total Time 2 hours 15 minutes
    Servings: 4
    Course: Main Course
    Cuisine: Caribbean
    Calories: 450

    Ingredients
      

    • 4 pieces bone-in chicken thighs or drumsticks skin-on preferred for flavor and char
    • 2 scotch bonnet peppers Scotch bonnet peppers remove seeds for milder heat if desired
    • 1 tablespoon allspice ground
    • 1 tablespoon fresh thyme leaves or 1 teaspoon dried thyme
    • 2 tablespoons lime juice freshly squeezed
    • 2 tablespoons brown sugar packed
    • 3 tablespoons soy sauce or tamari for gluten-free
    • 4 cloves garlic crushed or minced
    • 2 tablespoons vegetable oil for blending marinade

    Equipment

    • Grill or barbecue
    • Mixing bowls
    • Tongs
    • Meat thermometer
    • Basting brush

    Method
     

    1. Chop the Scotch bonnet peppers, removing seeds if you prefer less heat, and gather all marinade ingredients. In a blender or food processor, combine the peppers, allspice, thyme, lime juice, brown sugar, soy sauce, garlic, and vegetable oil. Blend until smooth and fragrant.
    2. Place the chicken pieces in a large mixing bowl or zip-top bag and pour the marinade over. Use your hands or tongs to coat the chicken evenly, making sure the marinade gets under the skin and into all crevices. Cover and refrigerate for at least 2 hours, or ideally overnight for maximum flavor.
    3. Preheat your grill to medium-high heat, about 200°C (390°F). When ready, remove the chicken from the marinade, letting excess drip off, and place it skin side down on the hot grill. Listen for a sizzle as the skin hits the grates.
    4. Grill the chicken for about 6-8 minutes on the first side, until the skin begins to char and develop a smoky aroma. Use tongs to flip the pieces carefully.
    5. Continue grilling the other side for another 6-8 minutes, basting occasionally with extra marinade or oil if desired. Keep an eye on the chicken to prevent flare-ups or burning.
    6. Check the internal temperature with a meat thermometer; it should reach 75°C (165°F). The juices should run clear when pierced, and the skin should be deep golden and slightly crispy.
    7. Once cooked, transfer the chicken to a platter and let it rest for 5 minutes. This helps the juices settle and keeps the meat tender.
    8. Serve the jerk chicken hot, with your favorite sides like fried plantains, rice and peas, or a fresh salad. Enjoy the smoky, spicy flavors and juicy texture with every bite!
    Cooking this dish reconnects me with my island roots, even when I’m miles away. It’s not just about the fiery marinade or smoky grill marks, but about the stories and memories stirred up with each bite. I encourage you to tweak the spices—add a little more heat if you like, or a dash of honey for sweetness. Making this your own keeps the spirit alive, no matter where you are.

  • Lady Gaga Pasta: A Bold, Unexpected Twist on Comfort Food

    Lady Gaga Pasta: A Bold, Unexpected Twist on Comfort Food

    Lady Gaga Pasta isn’t just a name. It’s a reminder that even the simplest ingredients can become a statement, a little act of rebellion in your kitchen. I love how it’s bold, a little unpredictable, yet honest in its flavors. It’s perfect for nights when you want to feel empowered by what you can create with your own hands.

    Why I keep making Lady Gaga Pasta

    It’s the kind of dish that feels rebellious yet familiar. It’s quick, fresh, and makes me feel like I’m throwing a little party for myself every time. The bright, acidic punch of lemon and the sweet burst of tomatoes never fail to lift my mood, no matter the day. Plus, it’s endlessly tweakable—no two plates need to be exactly the same.

    Deep dive into the ingredients of Lady Gaga Pasta

    • Cherry tomatoes: Juicy, sweet, and bursting with flavor—use ripe ones for the best pop of color and taste.
    • Garlic: Fragrant and pungent, it’s the backbone of the dish—don’t skimp on fresh cloves.
    • Olive oil: Bright, grassy, and slightly peppery—use a good quality extra virgin for richness.
    • Fresh basil: Herbal and aromatic, it adds a fresh punch—preferably torn, not chopped.
    • Lemon juice: Adds a zingy brightness—skip if you prefer a milder, more mellow flavor.
    • Pasta: Choose a good-quality spaghetti or linguine—al dente is key, so don’t overcook.
    • Parmesan cheese: Salty, umami-rich—shave fresh for best flavor, but skip if vegan.

    Tools of the trade for Lady Gaga Pasta

    • Large skillet: For sautéing and combining all flavors in one pan.
    • Colander: To drain pasta efficiently without losing heat.
    • Wooden spoon: For gentle stirring and scraping down the pan.
    • Measuring cups and spoons: To get your seasonings and pasta water just right.
    • Lemon squeezer: For extracting bright, fresh juice.

    Step-by-step for a fearless, flavorful Lady Gaga Pasta

    Step 1: Gather your ingredients and tools first. Nothing worse than realizing you forgot the garlic halfway through.

    Step 2: Heat a large skillet over medium heat (about 160°C/320°F). Add olive oil and let it shimmer—smell that bright, grassy aroma.

    Step 3: Sauté garlic until fragrant, just about 30 seconds. Watch for a slight golden hue—don’t burn it or the bitterness will take over.

    Step 4: Add sliced cherry tomatoes, a pinch of salt, and cook until they burst and release their juices—about 4-5 minutes.

    Step 5: Meanwhile, cook your pasta in boiling salted water until al dente, about 8 minutes. Save a cup of pasta water.

    Step 6: Drain the pasta, toss it into the skillet with the tomato mixture, and add a splash of pasta water to loosen everything up.

    Step 7: Finish with a handful of chopped fresh basil and a squeeze of lemon juice—brighten the whole dish.

    Step 8: Serve hot, with a sprinkle of grated Parmesan or Pecorino cheese.

    Cooking checkpoints to keep your Gaga Pasta flawless

    • Tomatoes should be bursting and juicy, not mushy or burnt.
    • Garlic aroma should be fragrant but not bitter—watch the heat carefully.
    • Pasta water should be starchy but not cloudy—add a little at a time to get the sauce just right.

    Common pitfalls and how to fix them

    • Sauce is gloopy and sticky.? Add more pasta water to loosen the sauce if it’s too thick.
    • Garlic is burnt and bitter.? Turn down the heat if garlic starts to brown too fast.
    • Tomatoes are sticking to the pan and burning.? Stir more often to prevent tomatoes from sticking and burning.
    • Pasta feels dry and clumpy.? Add a splash of olive oil if the pasta seems dry.

    Lady Gaga Pasta

    Lady Gaga Pasta is a vibrant, flavorful dish featuring a quick sauté of cherry tomatoes and garlic, tossed with al dente pasta, fresh basil, and a splash of lemon juice. The dish boasts a bright, fresh texture with juicy tomatoes and fragrant herbs, finished with a sprinkle of Parmesan cheese for richness. It’s a simple yet bold meal that celebrates honest, bold flavors with a rebellious twist.
    Prep Time 10 minutes
    Cook Time 15 minutes
    Total Time 25 minutes
    Servings: 2
    Course: Main Course
    Cuisine: Italian
    Calories: 550

    Ingredients
      

    • 200 g cherry tomatoes ripe and juicy
    • 3 cloves garlic fresh, minced
    • 2 tablespoons olive oil extra virgin recommended
    • 200 g pasta spaghetti or linguine, cooked al dente
    • 1 handful fresh basil torn, not chopped
    • 1 tablespoon lemon juice freshly squeezed
    • to taste Parmesan cheese shaved or grated, optional
    • Salt to taste for pasta water and seasoning

    Equipment

    • Large skillet
    • Colander
    • Wooden spoon
    • Measuring cups and spoons
    • Lemon squeezer

    Method
     

    1. Bring a large pot of salted water to a rolling boil, then add your pasta and cook until al dente, about 8 minutes. Drain and set aside, reserving a little pasta water.
    2. While the pasta cooks, heat a large skillet over medium heat until shimmering. Pour in the olive oil and let it warm up, releasing a bright, grassy aroma.
    3. Add the minced garlic to the skillet and sauté for about 30 seconds, until fragrant and just starting to turn golden. Be careful not to burn it, as burnt garlic turns bitter.
    4. Add the cherry tomatoes to the skillet, along with a pinch of salt. Cook for about 4-5 minutes, gently shaking the pan or stirring until the tomatoes burst and release their juices, creating a vibrant, bubbling sauce.
    5. Gently toss the drained pasta into the skillet with the tomato mixture. Add a splash of the reserved pasta water to loosen the sauce and help it cling to the noodles. Stir everything together until well coated.
    6. Remove the skillet from heat and stir in the torn basil leaves. Squeeze fresh lemon juice over the pasta, then give everything a gentle toss to combine the bright flavors.
    7. Serve the Lady Gaga Pasta hot, topped with shaved or grated Parmesan cheese if desired, for an added salty richness. Enjoy immediately for the freshest flavor and best texture.
    This pasta really flips the script on simple ingredients—turning them into something vibrant and unpretentious. It’s a dish that’s quick in the chaos of a weeknight, yet feels like a small celebration. Feel free to tweak the herbs or spice level; it’s meant to be your own little show. Enjoy the messy, imperfect magic of making it your own.

  • Snoop Dogg’s Fried Bologna Sandwich: A Retro Revival with a Smoky Twist

    Snoop Dogg’s Fried Bologna Sandwich: A Retro Revival with a Smoky Twist

    This fried bologna sandwich is a throwback that I keep coming back to, especially when I want something quick and flavorful. It’s a mix of crispy edges, smoky fat, and that satisfying crunch of toasted bread. No fancy ingredients, just honest comfort food that hits all the right notes. It’s a messy, glorious thing that makes you appreciate simple flavors.

    Why I Keep Coming Back to This Sandwich

    It’s a messy, satisfying reminder of childhood comfort. The smoky, crispy edges remind me of summer cookouts and lazy weekends. It’s quick to throw together, perfect for those nights when I want flavor fast. No matter how many fancy recipes I try, this one always calls me back for that nostalgic crunch.

    Breaking Down the Key Ingredients

    • Bologna: Rich, fatty, with a smoky flavor that crisps up beautifully in the pan. Swap for turkey or vegetarian slices if you prefer.
    • Bread: Choose sturdy bread like sourdough or brioche for good crunch and support. White bread is fine, too.
    • Mustard or mayo: Adds tang or creaminess, balancing the smoky meat. Can skip or swap for hot sauce.
    • Cheese (optional): A slice of cheddar or American melts into the hot bologna, adding gooey richness.
    • Pickles or chips: Crunchy sides that cut through the richness, adding bright acidity or salty punch.
    • Butter or oil: Used for frying—just enough to get that crispy exterior.
    • Hot sauce (optional): A splash adds fiery brightness—use as you like.

    Equipment & Tools for the Perfect Fried Bologna Sandwich

    • Cast-iron skillet: Provides even heat and a good sear on the bologna.
    • Spatula: Flips the slices and presses the sandwich.
    • Toaster or toaster oven: Gets the bread crispy and golden.
    • Knife: Slices the bread and any toppings.
    • Paper towels: Drains excess grease from the fried bologna.

    How to Make a Fried Bologna Sandwich That’s Rich in Nostalgia and Flavour

    Step 1: Heat a cast-iron skillet over medium heat, about 160°C (320°F).

    Step 2: Lay down the bologna slices, about ¼ inch thick—let them sizzle and start to curl at the edges, about 2-3 minutes.

    Step 3: Flip the slices carefully; they should be golden and slightly crispy, with a smoky aroma filling the air.

    Step 4: While bologna fries, toast your bread till golden—crisp on the outside, soft inside.

    Step 5: Once bologna is crispy, transfer to a paper towel briefly to drain excess fat.

    Step 6: Assemble your sandwich: bread, bologna, maybe a smear of mustard or a slice of cheese, then top with the second piece of bread.

    Step 7: Optional: give a quick press on the sandwich in the pan for a minute to meld the flavors and crisp up the bread.

    Step 8: Rest for a minute, then cut in half—watch the oozy juices and crispy edges.

    Step 9: Serve hot, with a side of pickles or chips, and enjoy that nostalgic, smoky crunch.

    Cooking Checkpoints & Tips for Success

    • Bologna should be sizzling with a crackle, not burning—adjust heat if needed.
    • Look for golden-brown edges; if too pale, cook a bit longer.
    • The bread should be toasted to a deep amber, not burnt.
    • If the bologna starts to curl too much, gently press it down with a spatula.

    Common Mistakes & How to Fix Them

    • Cooking on too high heat.? Reduce heat if bologna is burning before crisping.
    • Not pressing down during frying.? Press bologna slices gently to prevent curling.
    • Toasting too lightly.? Toast bread until deep golden, not just lightly browned.
    • Overcooking or uneven frying.? Keep an eye on the bologna edges for burn spots.

    Fried Bologna Sandwich

    This fried bologna sandwich features crispy, golden edges of smoky bologna layered between toasted bread, with optional melty cheese and tangy condiments. The process involves frying slices until crispy and assembling the sandwich for a satisfying, nostalgic crunch with a juicy interior. It’s a quick, comfort-food classic that highlights simple ingredients and bold flavors.
    Prep Time 5 minutes
    Cook Time 10 minutes
    Total Time 15 minutes
    Servings: 1
    Course: Main Course
    Cuisine: American
    Calories: 450

    Ingredients
      

    • 2 slices bologna about ¼ inch thick slices
    • 2 slices bread sturdy bread like sourdough or brioche
    • 1 slice cheddar cheese optional, for melting
    • 1 tablespoon mustard or mayo optional
    • 1 tablespoon butter or oil for frying

    Equipment

    • Cast-iron skillet
    • Spatula
    • Toaster or toaster oven
    • Knife
    • Paper towels

    Method
     

    1. Heat the cast-iron skillet over medium heat until a light sizzle is heard when a drop of water is added, about 160°C (320°F).
    2. Add the butter or oil to the skillet, letting it melt and coat the surface evenly. The fat should shimmer gently without smoking.
    3. Place the bologna slices into the pan in a single layer, making sure they aren’t overlapping. Let them sizzle and curl at the edges, about 2-3 minutes, until they turn golden and crispy on the underside.
    4. Flip each bologna slice carefully with the spatula, allowing the other side to crisp up for another 2-3 minutes. The slices should be golden brown and slightly crispy, filling the air with a smoky aroma.
    5. While the bologna fries, toast the bread slices in a toaster or toaster oven until deep golden brown and crisp on the outside.
    6. Transfer the fried bologna slices to a paper towel-lined plate to drain excess fat, which helps keep the sandwich from becoming greasy.
    7. If using cheese, place a slice on top of the hot bologna slices in the skillet to melt slightly, about 30 seconds.
    8. Spread mustard or mayo on one side of each toasted bread slice, adding tang or creaminess as desired.
    9. Assemble the sandwich by layering the crispy bologna (with cheese if using) on one bread slice, then top with the second slice of bread.
    10. Optionally, press the sandwich gently in the skillet for about a minute to meld the flavors and crisp the bread further, then remove and let rest for a minute.
    11. Cut the sandwich in half to reveal the crispy edges and juicy bologna. Serve immediately with pickles or chips for added crunch and flavor.
    This sandwich isn’t just about nostalgia; it’s about that perfect crispy, smoky bite that reminds you of simpler times. It’s messy, satisfying, and totally worth the grease splatter. Feel free to tweak the toppings—adds a splash of hot sauce or a slice of sharp cheddar. Whatever makes it yours, just keep that crunch and smoky richness front and center.

  • Jennifer Aniston Salad: A Fresh Take on Comfort and Style

    Jennifer Aniston Salad: A Fresh Take on Comfort and Style

    Jennifer Aniston’s salad isn’t just about health; it’s about a vibe. The way the roasted sweet potatoes bring a touch of sweetness to the leafy greens makes it feel like a treat, not just a salad. It’s a dish that’s both casual and elegant, perfect for when you want something fresh but comforting.

    Why I keep coming back to this salad

    It’s a reminder that simple, honest ingredients can craft something complex and satisfying. The balance of warm, sweet, and tangy keeps me craving it no matter the season. Plus, it’s easy to customize, making it a familiar yet ever-changing dish.

    Deep dive into the ingredients

    • Sweet potatoes: Oozy, sweet, and slightly smoky when roasted, they add warmth and substance.
    • Kale: Bold and slightly bitter, it needs good massage to soften and bring out its flavor.
    • Feta cheese: Salty and creamy, it balances the sweetness and adds a tangy bite.
    • Walnuts: Toasted until fragrant, they add crunch and depth.
    • Lemon juice: Bright and zesty, it lifts the whole dish and awakens the palate.
    • Honey: A touch of sweetness that melds the dressing together beautifully.
    • Balsamic glaze: Rich and slightly sweet, it drizzles like dark honey over the finished salad.

    Tools and equipment for this salad

    • Baking sheet: Roast the sweet potatoes evenly and get that caramelized edge.
    • Whisk: Mix the dressing smoothly and emulsify the oils and lemon.
    • Massaging gloves or hands: Massage the kale to soften and enhance flavor.
    • Chef’s knife and chopping board: Prepare all ingredients with precision.
    • Salad bowls: Combine ingredients for serving.

    Step-by-step to a vibrant, satisfying salad

    Step 1: Gather all ingredients and equipment before starting.

    Step 2: Start by roasting the sweet potatoes at 200°C (392°F) for 25-30 minutes, until caramelized.

    Step 3: While the sweet potatoes roast, prepare the dressing: whisk together olive oil, lemon juice, honey, salt, and pepper.

    Step 4: Chop the kale into bite-sized pieces, massage with a pinch of salt until tender and glossy.

    Step 5: Assemble the salad: toss kale with dressing, add roasted sweet potatoes, avocado slices, and crumbled feta.

    Step 6: Sprinkle with toasted walnuts and a drizzle of balsamic glaze for extra flavor.

    Step 7: Serve immediately to enjoy the warm sweetness of the potatoes and the crispness of the kale.

    Cooking checkpoints and tips to keep in mind

    • Sweet potatoes should be caramelized and tender, not mushy or burnt.
    • Kale must be massaged thoroughly to break down tough fibers.
    • Dressing should be balanced — tart, sweet, and slightly oily, not overpowering.
    • Taste the salad before serving and adjust seasoning or acidity as needed.

    Common mistakes and how to fix them

    • Roasting sweet potatoes too short.? UNDERRIPE SWEET POTATOES — Roast longer or cut smaller for quicker caramelization.
    • Dressing looks oily and separates.? DRESSING SEPARATES — Whisk well and add a tiny bit of warm water if needed.
    • Kale remains tough and chewy.? KALE NOT TENDER — Massage longer or add a splash of lemon juice.
    • Salty dressing overpowering the salad.? SALT OVER-DOES — Use sparingly, taste, then adjust.

    Roasted Sweet Potato & Kale Salad with Feta and Walnuts

    This vibrant salad combines tender, caramelized roasted sweet potatoes with hearty massaged kale, topped with creamy feta, toasted walnuts, and a bright lemon-honey dressing. The dish balances warm, sweet, and tangy flavors, resulting in a fresh yet comforting plate with varied textures that look as inviting as they taste.
    Prep Time 15 minutes
    Cook Time 30 minutes
    Total Time 45 minutes
    Servings: 4
    Course: Main Course
    Cuisine: Healthy, Vegetarian
    Calories: 320

    Ingredients
      

    • 2 sweet potatoes peeled and cubed
    • 4 cups kale stems removed, chopped
    • ½ cup feta cheese crumbled
    • ½ cup walnuts toasted and chopped
    • 1 lemon juiced
    • 1 tablespoon honey
    • 3 tablespoons olive oil
    • to taste salt and pepper
    • balsamic glaze for drizzling

    Equipment

    • Baking sheet
    • Whisk
    • Massaging gloves or hands
    • Chef’s knife
    • Chopping board
    • Salad bowls

    Method
     

    1. Preheat your oven to 200°C (392°F). Peel and cube the sweet potatoes, then spread them evenly on a baking sheet. Roast for 25-30 minutes until they are golden and caramelized around the edges, filling your kitchen with a sweet, smoky aroma.
    2. While the sweet potatoes roast, toast the walnuts in a dry skillet over medium heat until fragrant, about 3-4 minutes. Chop them roughly once cooled for added crunch.
    3. Juice the lemon and whisk together the lemon juice, honey, olive oil, salt, and pepper to create a bright, slightly tangy dressing. Whisk until smooth and slightly emulsified.
    4. Remove the kale leaves from their stems and chop into bite-sized pieces. Place the chopped kale in a large bowl and massage it thoroughly with a pinch of salt until it becomes tender, glossy, and slightly darker in color.
    5. Add the prepared dressing to the massaged kale and toss well to coat every leaf evenly. This step helps soften the kale and infuses it with flavor.
    6. Once the sweet potatoes are roasted and slightly cooled, gently fold them into the kale mixture. Add crumbled feta cheese and toasted walnuts for richness and crunch.
    7. Transfer the salad to serving bowls and drizzle with balsamic glaze for a touch of sweetness and depth. Optionally, adjust seasoning with more salt or lemon juice to taste.
    8. Serve immediately to enjoy the warm sweet potatoes and crisp kale, complemented by the creamy feta and crunchy nuts. This dish is best enjoyed fresh for maximum flavor and texture.

    Notes

    For added flavor, consider adding sliced avocado or a sprinkle of pomegranate seeds. Make sure to massage the kale thoroughly for the best texture. Roasting the sweet potatoes until caramelized enhances their natural sweetness.
    This salad is a reminder that simple ingredients can come together in unexpected ways. It’s flexible, forgiving, and perfect for a quick lunch or a side that feels special. Feel free to swap in your favorite nuts or add a splash more lemon for brightness. Enjoy making it your own, every time.

  • Meghan Markle’s Zucchini Bolognese: A Gentle Twist on Comfort Food

    Meghan Markle’s Zucchini Bolognese: A Gentle Twist on Comfort Food

    Once I stumbled on the idea of using zucchini as the base for a meaty sauce, it felt like a quiet revelation. It’s a way to sneak more vegetables into a comfort dish without losing its soul. Plus, it’s an easy, forgiving method that lets the ingredients shine in simplicity.

    Why This Recipe Calls Me Back

    It’s a reminder that simplicity can be profound. The gentle, fresh flavor of zucchini feels like a quiet hug, especially when I need something nourishing but light. Plus, it’s a flexible, forgiving recipe that adapts to what’s in the fridge, making dinner feel less like a chore and more like a small act of kindness.

    Breaking Down the Ingredients

    • Zucchini: Fresh, slightly sweet, and tender when cooked, it replaces ground meat and adds moisture.
    • Crushed tomatoes: Bright, slightly tangy base that forms the sauce’s heart. Use good quality for depth.
    • Garlic: Intensely fragrant and pungent, it boosts the sauce’s warmth and complexity.
    • Basil: Vivid, aromatic herb that brightens the dish with a lemony, peppery note.
    • Olive oil: Rich and fruity, it coats the zucchini and helps develop flavors.
    • Red pepper flakes: Add a subtle heat that makes each bite lively, not overwhelming.
    • Onion: Sweet and savory, it forms the foundation of the sauce’s flavor.

    Tools & Equipment for Zucchini Bolognese

    • Box grater: To finely grate the zucchini to mimic ground meat texture.
    • Large skillet: To cook the zucchini and sauce evenly.
    • Wooden spoon: For stirring and scraping the pan.
    • Chef’s knife: To chop onions, garlic, and basil.
    • Measuring spoons: To measure seasonings accurately.

    Step-by-Step: Making Zucchini Bolognese

    Step 1: Start by grating 2 medium zucchinis finely, almost like a pulp, to mimic the texture of ground meat.

    Step 2: Heat a splash of olive oil in a large skillet over medium heat, about 160°C / 320°F.

    Step 3: Add the grated zucchini to the pan, stirring often. Cook for 5-7 minutes until it releases a subtle, fresh aroma and softens.

    Step 4: Push the zucchini to the side of the pan, then add chopped onions and minced garlic. Sauté until translucent, about 3-4 minutes.

    Step 5: Pour in a can of crushed tomatoes, stir well, and bring to a gentle simmer. Cook uncovered for 15-20 minutes, stirring occasionally, until thickened.

    Step 6: Taste and adjust seasoning with salt, pepper, and a pinch of red pepper flakes for a slight kick.

    Step 7: Finish with a handful of chopped fresh basil and a drizzle of good olive oil. Serve hot over your favorite pasta or even zucchini noodles.

    Cooking Checkpoints & Tips

    • The zucchini should be soft but not mushy; it still needs to hold some texture.
    • The sauce should be vibrant and slightly thickened, not watery or overly reduced.
    • The aroma of garlic and basil should be fragrant, not burnt or muted—adjust heat if needed.

    Common Mistakes & How to Fix Them

    • Cooking at too high a heat, causing the sauce to burn.? Use a gentle simmer to avoid burning the tomato base.
    • Sauce sticking to the pan and drying out.? Add a splash of water or stock if the sauce gets too thick.
    • Overcooking zucchini, leading to a watery, limp texture.? Don’t overcook the zucchini, keep it tender but not mushy.
    • Adding salt too early, which can make the sauce bitter.? Adjust seasoning at the end for best flavor.

    Zucchini Bolognese

    This zucchini bolognese uses finely grated zucchini as a stand-in for ground meat, creating a light yet hearty sauce. The dish combines fresh vegetables, crushed tomatoes, and aromatic herbs to develop a vibrant, slightly thickened sauce with a tender, vegetable-rich texture. It’s a comforting, adaptable meal that’s perfect over pasta or zucchini noodles.
    Prep Time 10 minutes
    Cook Time 30 minutes
    Total Time 40 minutes
    Servings: 4
    Course: Main Course
    Cuisine: Italian
    Calories: 150

    Ingredients
      

    • 2 medium zucchini finely grated
    • 1 can crushed tomatoes preferably good quality
    • 1 small onion finely chopped
    • 3 cloves garlic minced
    • 2 tablespoons olive oil extra virgin preferred
    • 1 handful fresh basil chopped
    • 1/4 teaspoon red pepper flakes adjust to taste
    • to taste salt and pepper

    Equipment

    • Box grater
    • Large skillet
    • Wooden spoon
    • Chef’s knife
    • Measuring spoons

    Method
     

    1. Using a box grater, finely grate the zucchinis until they resemble a pulp, then set aside.
    2. Heat olive oil in a large skillet over medium heat until it shimmers and starts to gently bubble.
    3. Add the grated zucchini to the skillet and cook, stirring often, for about 5-7 minutes until it releases a fresh aroma and softens slightly.
    4. Push the zucchini to one side of the pan and add the chopped onion and minced garlic to the cleared space, sautéing until the onion becomes translucent and fragrant, about 3-4 minutes.
    5. Pour in the crushed tomatoes, stirring everything together, then bring the mixture to a gentle simmer.
    6. Let the sauce simmer uncovered for 15-20 minutes, stirring occasionally, until it thickens slightly and the flavors meld.
    7. Stir in red pepper flakes and season with salt and pepper to taste, adjusting for your preferred spice level and saltiness.
    8. Remove the skillet from heat and fold in the chopped fresh basil, allowing its aroma to infuse the sauce.
    9. Serve the zucchini bolognese hot over your favorite pasta or zucchini noodles, garnished with extra basil if desired.
    This dish feels like a quiet rebellion against the usual. The zucchini’s subtle sweetness and the bright acidity of tomatoes make it feel both familiar and new. It’s a good reminder that comfort can come from the simplest ingredients, prepared with care. Enjoy it with a sprinkle of cheese or a squeeze of lemon, and savor that moment of simplicity.