
Cheese balls are the kind of appetizer that instantly takes me back to family gatherings and potlucks. But I’ve always felt they could use a little twist—something unexpected to make them stand out on the table. That’s where experimenting with fresh herbs and a secret ingredient comes in, transforming this humble snack into something memorable.
The best part? You can make this cheese ball ahead of time, letting flavors meld and intensify overnight. When served, the crust crackles slightly as you cut into it, revealing a creamy, herb-studded center that’s both nostalgic and surprisingly complex. It’s a little bit of comfort, with a splash of culinary mischief.
Focusing on the nostalgic charm of a classic cheese ball, but with a twist—using unexpected herbs and a secret ingredient for a surprising depth of flavor that elevates this comfort food into a memorable appetizer.
Nostalgic Cheese Ball with a Twist
- This cheese ball reminds me of childhood holidays, but with a grown-up twist that makes me smile every time.
- I love how the herbs add a fresh burst that cuts through the richness—it’s unexpectedly lively.
- There’s a chaos in the kitchen when I roll it, but seeing it come together makes me proud every time.
- It’s a relief to have a crowd-pleasing appetizer that I can prepare ahead and forget about until crunch time.
- The secret ingredient always sparks curiosity among friends, and I get to feel like a little culinary magician.
The story behind this recipe
- This cheese ball recipe was born out of a lazy Sunday afternoon, when I rummaged through my fridge and found a block of aged cheddar, some cream cheese, and a bunch of fresh herbs that needed using up. I wanted something simple, but with a little something extra—like a whisper of nostalgia and a touch of mischief. Ever since, it’s become a go-to for impromptu gatherings, where everyone’s surprised by how much flavor can come from such humble ingredients.
- Making this cheese ball feels like a small act of culinary rebellion—taking something classic and giving it a fresh twist. The herbs lend a bright, fragrant punch, while the secret ingredient (a splash of hot sauce) keeps everything lively. It’s a reminder that even simple comfort foods can shine with a bit of creative thinking—and that a good cheese ball can turn an ordinary moment into a little celebration.
- heading: ‘The story behind this recipe’
Cheese Ball Trivia & Origins
- Cheese balls gained popularity in mid-20th century America as a party staple, especially during the 1950s and 60s.
- They likely originated from European cheese spreads, but American hosts made them more portable and festive by shaping into balls.
- Originally, cheese balls were coated with nuts, herbs, or paprika, depending on regional tastes and available ingredients.
- The classic cheese ball became a symbol of casual gatherings, often served with crackers, bread, or sliced vegetables.
- Modern twists, like adding herbs, spices, or even secret ingredients, have kept cheese balls relevant in contemporary parties.
Ingredient breakdown: key components
- Cream cheese: I love how soft and spreadable it becomes, giving that luscious, creamy base. Swap with Greek yogurt for a tangier, lighter feel—just be prepared for a slightly different texture.
- Cheddar cheese: Sharp and gooey when melted, it’s the backbone of flavor. If you want milder, try Monterey Jack—smoother, less pungent but still rich and satisfying.
- Herbs (parsley, chives): Fresh, bright, and fragrant, they cut through the richness. Dried herbs work in a pinch, but fresh herbs add that crisp, vibrant pop that really wakes up the palate.
- Secret ingredient (hot sauce): A splash adds a sneaky kick and depth. Skip if you prefer milder, or replace with smoked paprika for a smoky undertone that adds warmth.
- Breadcrumbs or crushed nuts: I use toasted pecans for crunch, but walnuts or even crushed Ritz crackers can add a different toastiness and texture—play with what’s in your pantry.
- Seasoning (salt, pepper): I find a pinch of both enhances everything, especially if your cheeses are mild. Taste as you go—over-salt can overpower, so be gentle at first.
- Optional add-ins (bacon bits, olives): For extra flavor bursts, mix in crispy bacon or chopped olives. They lend a salty, savory punch that makes the ball even more addictive.
Spotlight on key ingredients
Herbs (parsley, chives):
- Cream cheese: I love how soft and spreadable it becomes, giving that luscious, creamy base. Swap with Greek yogurt for a tangier, lighter feel—just be prepared for a slightly different texture.
- Cheddar cheese: Sharp and gooey when melted, it’s the backbone of flavor. If you want milder, try Monterey Jack—smoother, less pungent but still rich and satisfying.
- Herbs (parsley, chives): Fresh, bright, and fragrant, they cut through the richness. Dried herbs work in a pinch, but fresh herbs add that crisp, vibrant pop that really wakes up the palate.
Notes for ingredient swaps
- Dairy-Free: Swap cream cheese for dairy-free cream cheese or mashed avocado. Expect a slightly different texture and less tang.
- Cheddar Cheese: Use Monterey Jack or mozzarella for milder, gooey results. For sharper flavor, try aged Gouda or Parmesan.
- Fresh Herbs: Dried parsley, chives, or thyme can replace fresh, but will lack the bright, crisp aroma. Use half the amount.
- Hot Sauce: Replace with a dash of smoked paprika or cayenne for warmth without the acidity. Adjust to taste for spice level.
- Nuts or Crackers: Swap toasted pecans for walnuts or sunflower seeds. For coating, crushed Ritz or saltines add a different crunch.
- Seasoning: Omit or replace black pepper with white pepper or a pinch of cayenne for extra heat. Adjust salt accordingly.
- Add-ins: Bacon bits or chopped olives can be mixed in for extra savory punch. Use sparingly to avoid overpowering the cheese.
Equipment & Tools
- Mixing bowl: Combine all ingredients thoroughly.
- Spatula: Mix ingredients and shape the cheese ball.
- Baking sheet: Bake the cheese ball evenly.
- Toasting pan or skillet: Toast nuts to bring out flavor.
- Parchment paper: Prevent sticking and easy cleanup.
- Plate: Serve and present the finished cheese ball.
Step-by-step guide to cheese ball
- Gather all equipment: mixing bowl, spatula, baking sheet, and a plate for rolling. Preheat oven to 180°C (350°F).
- In the mixing bowl, soften 8 oz cream cheese for about 30 seconds in the microwave until just pliable. Add 1 cup shredded sharp cheddar, 2 tbsp chopped fresh herbs, 1 tsp hot sauce, 1/2 tsp salt, and 1/4 tsp black pepper.
- Mix everything thoroughly with the spatula until combined. It should be smooth, with herbs evenly dispersed. Taste and adjust seasoning if needed.
- Scoop out the mixture and shape it into a tight ball about 10 cm (4 inches) in diameter. Use clean hands or a small spatula for a smooth surface.
- Place the cheese ball on the baking sheet lined with parchment paper. Pat lightly to smooth out any cracks or uneven spots.
- Bake in the preheated oven for 15–20 minutes, until the outside begins to turn golden and the cheese is slightly bubbly. The smell should be rich, cheesy, and fragrant with herbs.
- While baking, toast 1/2 cup crushed pecans or walnuts in a dry skillet over medium heat until fragrant and lightly browned, about 3–4 minutes. Set aside.
- Remove the cheese ball from the oven. Let it rest for 5 minutes to settle and firm up slightly. Meanwhile, roll the toasted nuts onto a plate.
- Carefully roll the warm cheese ball in the toasted nuts, pressing gently to coat evenly. Use a spatula or tongs for better control.
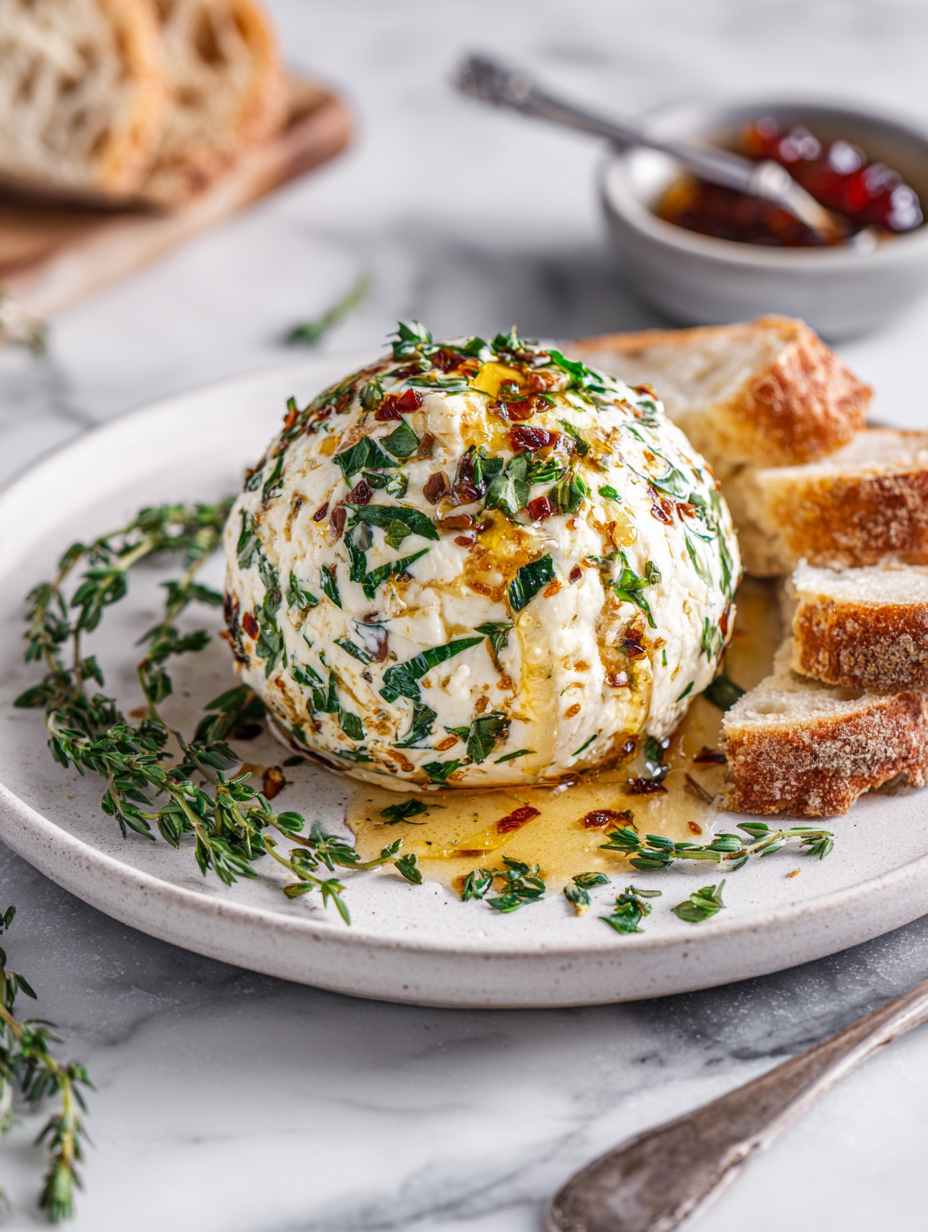
- Transfer the coated cheese ball to a serving plate. Allow it to cool slightly for 5 minutes before slicing or serving with crackers or sliced baguette.
Let the cheese ball rest for 5 minutes after baking to set. Roll in toasted nuts while still warm for better adhesion. Serve slightly warm or at room temperature with crackers or sliced bread.
How to Know It’s Done
- Golden exterior with crackling edges when baked.
- Cheese mixture feels firm but pliable when shaped.
- Nuts are toasted and fragrant, adding crunch and aroma.
Nostalgic Herb-Infused Cheese Ball with a Secret Kick
Ingredients
Equipment
Method
- In a mixing bowl, combine the softened cream cheese, shredded cheddar, chopped herbs, hot sauce, salt, and black pepper. Use a spatula to mix everything thoroughly until the mixture is smooth and the herbs are evenly distributed, filling the kitchen with a fragrant, cheesy aroma.
- Shape the cheese mixture into a tight, round ball about 10 cm (4 inches) in diameter. Press gently to smooth out any cracks and create a uniform shape, then place it on a parchment-lined baking sheet.
- Preheat your oven to 180°C (350°F). Once ready, bake the cheese ball for 15–20 minutes, until the outside turns golden and slightly bubbly, filling your kitchen with a rich, cheesy scent.
- While the cheese ball bakes, toast the crushed pecans or walnuts in a dry skillet over medium heat for about 3–4 minutes until fragrant and golden brown. This step enhances their crunch and flavor.
- Remove the cheese ball from the oven and let it rest for about 5 minutes. This helps it set and makes it easier to coat without cracking.
- Gently roll the warm cheese ball in the toasted nuts, pressing lightly to ensure an even coating. Use a spatula or tongs to help press the nuts onto the surface, creating a crunchy exterior.
- Transfer the coated cheese ball to a serving plate. Let it sit for a few minutes at room temperature to soften slightly before slicing or serving with crackers or sliced baguette, revealing its creamy, herb-studded interior encased in a crispy nut crust.
Tips and tricks for perfect cheese ball
- Chill the mixture: Keep the cheese mixture cold before shaping to prevent sticking and make rolling easier.
- Use a spatula: When coating the cheese ball with nuts, a spatula helps press and adhere the coating evenly.
- Toast nuts thoroughly: Toast until fragrant and golden for maximum crunch and flavor enhancement.
- Bake until bubbly: Ensure the exterior is golden and slightly crackling, signaling the cheese is melted through.
- Rest before serving: Let the cheese ball sit for 5 minutes after baking to firm up, making slicing cleaner.
- Add herbs at the right time: Mix fresh herbs into the cheese for vibrant flavor; add more after baking for a fresh punch.
- Serve at room temp: Allow the cheese ball to mellow and soften slightly for the best texture and flavor experience.
Common cheese ball mishaps and solutions
- FORGOT to preheat the oven → Always preheat to ensure even baking.
- DUMPED cheese mixture too quickly → Fold gently to preserve smooth texture.
- OVER-TORCHED nuts → Toast until fragrant, not burnt, for optimal crunch.
- SKIPPED resting time → Rest cheese ball for better flavor melding and easier coating.
Quick fixes and pantry swaps
- If cheese ball cracks when rolling, chill the mixture for 10 minutes before shaping.
- When nuts burn quickly, lower heat and toast in short bursts, smelling for a fragrant aroma.
- Splash a little lemon juice if mixture feels too sticky to handle; adds brightness and eases shaping.
- Patch over cracks with a bit of extra cheese mixture and smooth with a spatula.
- Shield cheese ball from drafts or cold air to prevent surface cracking during baking.
Prep, store, and reheat tips
- You can prepare the cheese mixture a day ahead; keep it chilled in the fridge and covered tightly, which allows the flavors to meld beautifully and intensify overnight.
- Assemble and shape the cheese ball up to 24 hours in advance; wrap it well in plastic wrap to prevent any fridge odors from seeping in.
- Store the coated or uncoated cheese ball in an airtight container in the fridge for up to 2 days. Expect the flavors to deepen and the texture to firm up slightly.
- Reheat gently in a 150°C (300°F) oven for about 10 minutes if you’d like it slightly warm; the exterior will crackle, and the inside will be oozy and fragrant.
- For best sensory results, bring the cheese ball to room temperature for about 15-20 minutes before serving—this enhances flavor and softens the texture without losing the crunch.
Top questions about cheese balls
1. What is a cheese ball made of?
A cheese ball is typically made from a mixture of cream cheese, shredded cheese, herbs, and seasonings, shaped into a ball, and coated with nuts, herbs, or spices. It’s creamy, cheesy, and often served as an appetizer.
2. Can I make a cheese ball in advance?
Yes, you can prepare the cheese mixture ahead of time. Keep it refrigerated in an airtight container for up to 24 hours before shaping and coating.
3. How do I know when the cheese ball is done baking?
Use room temperature cream cheese for easier mixing. When baking, watch for a golden exterior and bubbly cheese inside to ensure it’s heated through.
4. Can I substitute different cheeses?
You can substitute shredded Monterey Jack or mozzarella for a milder flavor. For a sharper taste, try aged cheddar or Gouda.
5. Can I use dried herbs instead of fresh?
Yes, you can replace fresh herbs with dried ones, but use about half the amount since dried herbs are more concentrated. Fresh herbs add a vibrant, crisp aroma.
6. What if my cheese mixture is too sticky?
If your mixture is too sticky to shape, refrigerate it for 10-15 minutes. If nuts burn quickly, toast at lower heat and watch closely.
7. Can I use different nuts or crackers for coating?
Use toasted pecans, walnuts, or crushed crackers for coating. Toasting enhances flavor and crunch, while different nuts add unique tastes.
8. What’s the role of the hot sauce in the recipe?
The secret ingredient (hot sauce) adds a sneaky spicy depth. You can omit it for milder flavor or substitute with smoked paprika for smokiness.
9. How should I serve the cheese ball?
Serve the cheese ball at room temperature for the best flavor and soft, spreadable texture. It pairs well with crackers, sliced baguette, or fresh veggies.
10. How do I fix cracks or uneven coating?
If cracks form during baking, chill the mixture before shaping or press the cracks gently to smooth out. Toast nuts evenly to avoid burnt spots.
This cheese ball isn’t just an appetizer; it’s a little piece of nostalgia with a twist that keeps things interesting. The combination of creamy cheese, fresh herbs, and that unexpected secret ingredient makes every bite memorable. It’s simple enough for a weeknight snack but special enough to serve at gatherings.
In a world full of quick bites, sometimes the best comfort comes from a familiar classic turned slightly on its head. This recipe is a reminder that comfort food can also surprise and delight, especially when you add a personal touch. Just a few minutes in the oven and a little patience, and you’ve got something truly satisfying to share.