
Focusing on the tactile joy of perfecting that crisp, caramelized crust on scallops, I’ve learned to embrace the mess and the patience it demands. This recipe isn’t about finesse alone; it’s about feeling the sizzle, hearing the crackle, and trusting your senses to guide each sear. It’s a celebration of the simple act of turning something raw into a moment of culinary satisfaction.
There’s something almost meditative about watching those scallops transform in the hot pan, their edges turning a rich amber. It’s a dance of timing and heat control, where a slight overstep can mean losing the perfect sear or ending up with rubbery seafood. But when it all lines up just right, that first bite delivers a tender, juicy interior contrasted by a satisfyingly crispy exterior.
Focusing on the tactile joy of perfecting that crisp, caramelized crust on scallops, I’ve learned to embrace the mess and the patience it demands. This recipe isn’t about finesse alone; it’s about feeling the sizzle, hearing the crackle, and trusting your senses to guide each sear. It’s a celebration of the simple act of turning something raw into a moment of culinary satisfaction.
The tactile joy of perfect searing
- I love that initial sizzle—the moment those scallops hit the hot pan and start to crackle, revealing their potential.
- There’s a quiet pride in mastering that perfect sear; it’s a small victory that feels surprisingly celebratory.
- Watching the edges turn a deep caramel while knowing I’ve kept the inside tender—that’s the real magic for me.
- Sometimes I mess up and overcook, but I’ve learned to laugh it off and keep trying, because practice makes crispy perfection.
- The best part is sharing them with someone, hearing that satisfied sigh when they get that first bite—pure joy.
The inspiration behind this dish
I first started messing around with scallops when I was trying to impress a date. I vividly remember the frantic pan-heating, the smell of melting butter, and that satisfying sizzle as the scallops met the hot surface. It’s a simple dish but one that demands attention to detail—timing, heat, patience. Over the years, I’ve learned that the real trick isn’t just in the technique but in trusting your senses and embracing the small mess-ups along the way. Each sear teaches you something new about patience and timing in the kitchen.
Trivia and historical tidbits
- Pan-seared scallops became popular in French coastal cuisine, where quick, high-heat cooking preserves their delicate texture.
- Historically, scallops were considered a luxury ingredient, often served at royal tables in Europe during the 17th century.
- The technique of searing seafood to develop a caramelized crust dates back to ancient cooking methods used in Mediterranean regions.
- In some cultures, scallops symbolize good luck and prosperity, making them a favored dish during celebrations and festivals.
Key ingredients and tips
- Sea scallops: I look for those plump, firm, slightly translucent centers—perfect for a juicy interior. Swap with bay scallops if you want a smaller, sweeter bite, but adjust cooking time accordingly.
- Kosher salt: My go-to for seasoning—brings out natural sweetness and helps with crust formation. Fine sea salt works if that’s what you have, just use a little less to avoid over-salting.
- Black pepper: Freshly cracked adds a mild heat and depth. Skip if you prefer a more delicate profile, or replace with white pepper for a subtler kick.
- Neutral oil: I use grapeseed or canola for their high smoke points, ensuring a crackling sear. Olive oil smokes too early—save it for finishing or dressings.
- Butter: Adds richness and a touch of nutty flavor. Use unsalted, so you can control the saltiness—if you want a smoky note, a splash of bacon fat can work.
- Lemon or citrus: Brightens the dish with a quick squeeze—think of it as the dish’s final wink before serving. Lime or yuzu can be fun swaps for a different zing.
- Herbs (optional): Parsley or chives add freshness. I keep them simple because the scallops shine best when paired with just a whisper of green.
Spotlight on key ingredients
Sea scallops:
- I look for plump, firm, slightly translucent centers—perfect for a juicy interior. Swap with bay scallops if you want a smaller, sweeter bite, but adjust cooking time accordingly.
- Kosher salt: My go-to for seasoning—brings out natural sweetness and helps with crust formation. Fine sea salt works if that’s what you have, just use a little less to avoid over-salting.
Lemon or citrus:
- Neutral oil: I use grapeseed or canola for their high smoke points, ensuring a crackling sear. Olive oil smokes too early—save it for finishing or dressings.
- Brightens the dish with a quick squeeze—think of it as the dish’s final wink before serving. Lime or yuzu can be fun swaps for a different zing.
Notes for ingredient swaps
- Sea scallops: I prefer the plump, firm ones with a slight translucence—swap with bay scallops for a smaller, sweeter bite, but reduce cooking time accordingly.
- Kosher salt: My top choice for seasoning—brings out natural sweetness and helps with crust formation. Fine sea salt can work if you use a bit less.
- Black pepper: Use freshly cracked for a mild heat and depth. Skip if you want a more delicate flavor, or substitute with white pepper for a softer kick.
- Neutral oil: Grapeseed or canola are my go-tos for high smoke points and crisp sears. Olive oil smokes early—save it for finishing or dressings.
- Butter: Adds richness and nutty notes. Unsalted is best for control. For a smoky twist, a splash of bacon fat works nicely.
- Lemon or citrus: Brightens the dish with a quick squeeze. Lime or yuzu can add fun, unique zing swaps.
- Herbs (optional): Parsley or chives give a fresh touch. Keep it light so the scallops remain the star.
Equipment & Tools
- Heavy skillet: Provides even heat for a crisp sear.
- Tongs: Handles the scallops without piercing the flesh.
- Paper towels: Thoroughly dries scallops to ensure proper browning.
- Small spoon: For basting with butter or citrus if desired.
Step-by-step guide to pan searing
- Gather your equipment: a heavy-bottomed skillet (preferably cast iron or stainless steel), tongs, a small spoon, and paper towels. The skillet needs to be large enough to hold the scallops without crowding, ensuring even searing.
- Pat the scallops dry thoroughly with paper towels—moisture is the enemy of that perfect crust. Season generously with kosher salt and freshly cracked black pepper on both sides.
- Preheat your skillet over medium-high heat until it just starts to shimmer, around 200°C (390°F). Add a high smoke point oil like grapeseed or canola—enough to coat the bottom thinly.
- Carefully place the scallops in the hot pan, spaced apart. They should sizzle loudly. Don’t move them for at least 2 minutes; watch for a golden-brown crust forming.
- Flip each scallop using tongs or a spoon when they release easily and have a deep amber color—about 2 minutes. Cook the other side for another 1-2 minutes, until the edges are caramelized and the center feels slightly firm but tender.
- If the scallops start to brown too quickly and risk burning, reduce the heat slightly. If they stick, lift gently and adjust your heat or oil amount before proceeding.
- Once cooked, transfer scallops to a plate. Let them rest for 1 minute—this helps juices settle. Optional: add a pat of butter and squeeze of lemon for finishing.
- Serve immediately, garnished with herbs or a drizzle of your favorite sauce. The scallops should be juicy inside, with a crisp, golden crust outside.
Transfer scallops to a warm plate. Rest for 1 minute to allow juices to redistribute. Finish with a squeeze of lemon or herbs, then serve immediately for best texture and flavor.
How to Know It’s Done
- Golden-brown crust with slight caramelization on edges.
- Center feels just firm but not rubbery when gently pressed.
- Juices are clear and slightly pooling on the plate after resting.
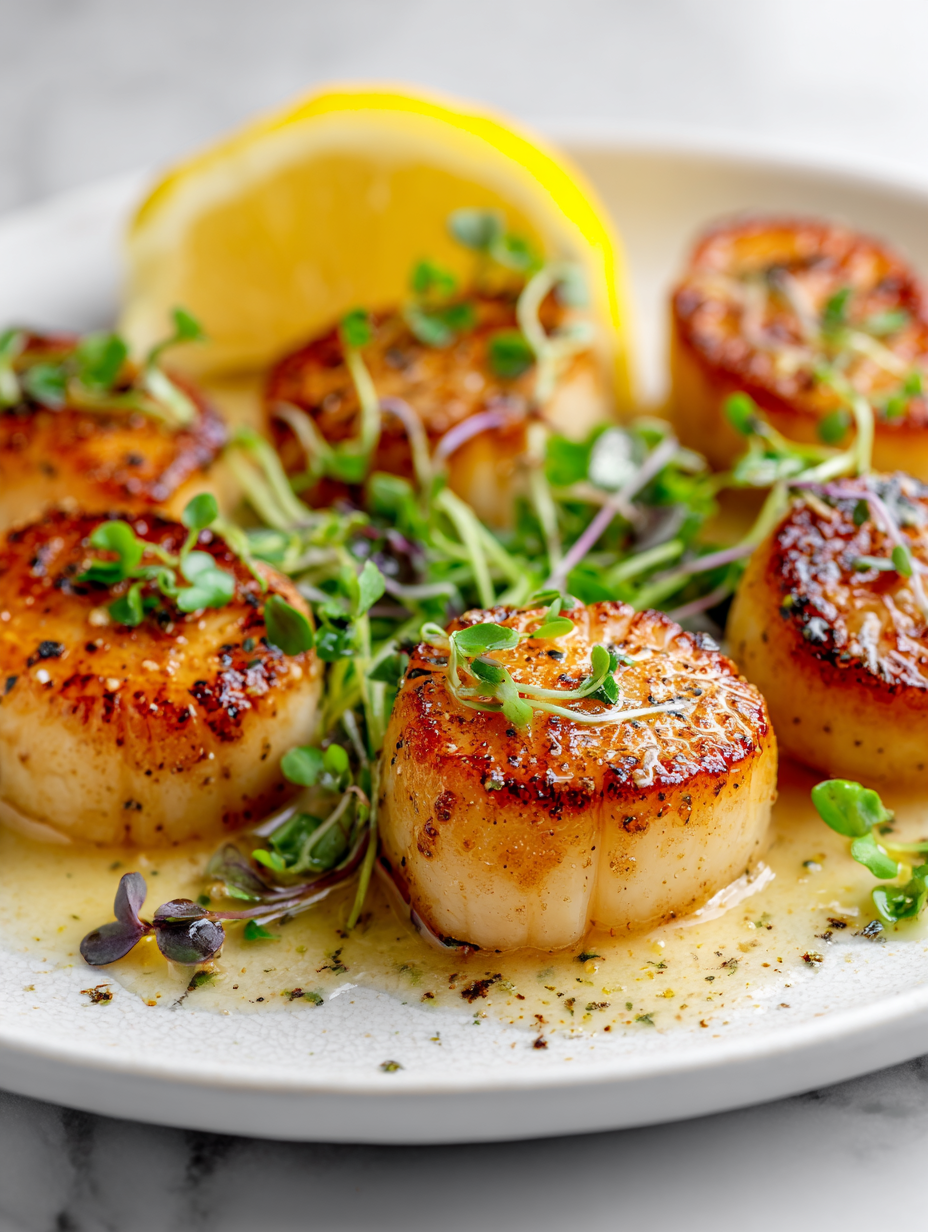
Perfect Pan-Seared Scallops
Ingredients
Equipment
Method
- Pat the scallops dry thoroughly with paper towels to remove excess moisture, which helps achieve a good sear.
- Season each scallop generously on both sides with kosher salt and freshly cracked black pepper, pressing lightly to adhere.
- Preheat your heavy skillet over medium-high heat until it just starts to shimmer, creating a hot surface for searing.
- Add the neutral oil to the pan, swirling to coat the bottom evenly. The oil should shimmer and slightly smoke, indicating it’s hot enough.
- Carefully place the scallops in the hot skillet, spacing them apart to avoid crowding. You should hear a loud sizzle as they make contact.
- Let the scallops sear without moving for about 2 minutes, until they develop a deep golden crust and release easily from the pan.
- Use tongs to flip each scallop and cook for another 1-2 minutes, until the edges are caramelized and the center is just opaque.
- Add the butter to the pan and spoon it over the scallops, basting them for additional richness and shine.
- Squeeze fresh lemon juice over the scallops for brightness, then remove them from the pan and transfer to a serving plate.
- Garnish with chopped herbs if desired, and serve immediately while they are hot, crispy outside and tender inside.
Notes
Tips for perfect scallops
- Preheat the pan: Make sure your skillet is hot enough—just shy of smoking—for that perfect sear and crackle.
- Dry scallops thoroughly: Pat them with paper towels until no moisture remains—moisture is your crust’s enemy.
- Don’t move too soon: Let the scallops sit undisturbed for at least 2 minutes to develop a deep golden crust before flipping.
- Use high smoke point oil: Grapeseed or canola keeps the surface sizzling without burning, giving you that crispy exterior.
- Baste with butter: During the last minute, spoon melted butter over the scallops to add richness and a shiny, caramelized surface.
- Rest briefly after cooking: Let the scallops sit for a minute off heat—this helps juices settle and keeps them tender inside.
- Finish with acid: A squeeze of lemon or citrus brightens the dish instantly and cuts through the richness for a balanced bite.
Common mistakes and how to fix them
- FORGOT to dry scallops thoroughly → they won’t sear properly, so pat dry well.
- DUMPED oil into hot pan too quickly → add oil gradually to prevent splattering and control heat.
- OVER-TORCHED the scallops → reduce heat immediately if crust burns, and sear in shorter bursts.
- UNDER-SEARED the scallops → leave undisturbed until a deep caramel crust forms, about 2 minutes.
Quick fixes for perfect scallops
- If scallops release too much water, pat them dry thoroughly to achieve a crisp crust.
- Splash a small amount of oil if the pan starts to smoke excessively during searing.
- Shield scallops with foil if they brown too quickly, then lower heat and continue cooking.
- Dumped scallops in cold oil? Turn up the heat and sear in batches to prevent steaming.
- When scallops turn rubbery, rescue by removing from heat immediately and serving with a squeeze of lemon.
Prep, store, and reheat tips
- You can dry and season the scallops a few hours ahead; keep them covered in the fridge to preserve freshness and prevent moisture buildup, which affects searing quality.
- Store cooked scallops in an airtight container in the fridge for up to 2 days. Reheat gently in a hot skillet for a quick, crisp finish—watch for overcooking and reheating until just warmed through with a slight shimmer on the surface.
- Raw scallops are best used within 24 hours for peak freshness. Keep them cold, wrapped tightly in plastic, and pat dry just before cooking to ensure a crispy crust.
- Reheating cooked scallops can cause them to become rubbery. To avoid this, briefly sauté over medium-high heat until just warmed and re-crisp the exterior—listen for that satisfying crackle.
- Flavors may dull slightly after storage; a squeeze of fresh lemon or a quick drizzle of hot butter just before serving can restore brightness and juiciness.
Top questions about pan seared scallops
1. How do I choose the best scallops?
Look for scallops that are plump, firm, and slightly translucent in the center for the juiciest results. Bay scallops are smaller and sweeter but need less cooking time.
2. Should I dry the scallops before cooking?
Pat the scallops dry with paper towels thoroughly before searing. Moisture on the surface prevents proper browning and crisping.
3. What oil should I use for searing?
Use a high smoke point oil like grapeseed or canola. Olive oil can burn early and create smoke, so it’s better for finishing.
4. How hot should the pan be?
Preheat your skillet over medium-high heat until it just starts to shimmer. The pan should be hot enough to sizzle the scallops immediately.
5. How long do I cook scallops on each side?
Cook each side for about 2 minutes until they develop a deep golden crust. Flip when they release easily and are caramelized.
6. Should I let the scallops rest after cooking?
Let the scallops rest for a minute after cooking to allow juices to settle. Serve immediately for the best texture and flavor.
7. How do I avoid overcooking scallops?
Overcooking makes scallops rubbery and tough. Keep an eye on them and remove from heat as soon as they are opaque and slightly firm.
8. When should I add lemon or citrus?
A squeeze of fresh lemon or citrus brightens the flavor and balances the richness of the buttery sear. Add just before serving.
9. What if scallops stick to the pan?
If scallops stick to the pan, increase the heat slightly or add a bit more oil. Ensure the pan is hot enough before adding scallops.
10. Any tips for a perfect sear?
For a crisp exterior and juicy interior, sear in a hot, well-oiled pan without crowding. Use tongs to turn them carefully.
There’s something deeply satisfying about mastering that perfect sear on scallops. It’s a simple dish, but when done right, it elevates a quick meal into a moment of real culinary confidence. Sometimes, it’s the small victories in the kitchen that stick with you long after the plate is cleared.
In the end, it’s about trusting your senses—listening for that crackle, seeing that deep amber, feeling the right firmness. These scallops remind me that patience and attention to detail turn a humble ingredient into something truly memorable. And honestly, that’s what keeps me coming back for more, each time aiming for that crisp, tender bite.