
These no-bake peanut oat bars are my shortcut to childhood afternoons, where the smell of peanut butter and toasted oats filled the kitchen. There’s something honest and satisfying about mixing simple ingredients into a sticky, nutty dough that’s ready in minutes, no oven required. It’s that perfect little treat you can whip up when the pantry’s low but you’re craving a comforting snack.
What makes these bars special isn’t just their nostalgic charm but how adaptable they are for busy mornings or last-minute cravings. They’re a reminder that sometimes, the simplest recipes are the most rewarding—no fuss, no waiting, just good, honest flavors coming together. Plus, they keep well, which means you can stash a batch for whenever the mood hits.
Focusing on the art of creating a no-bake treat that doubles as a nostalgic childhood comfort and a quick, satisfying snack for busy mornings.
The story behind this recipe
- I stumbled into this recipe one rainy afternoon, looking for something quick to satisfy a sweet craving without turning on the oven. The smell of toasted oats mixed with peanut butter instantly took me back to childhood snack times, where simplicity reigned. It’s funny how a handful of pantry staples can become a moment of comfort, even on the busiest days.
- This recipe is born from those chaotic mornings when I need a treat fast but still want it to feel homemade. It’s a little rebellion against the fancy, overly complicated snacks that often steal the spotlight. Plus, I love that I can tweak it with whatever nuts or dried fruit I have lying around—no fuss, just flavor and texture in every bite.
- heading: The story behind this recipe
Key ingredients at a glance
- Creamy peanut butter: I love the richness it adds, but natural peanut butter gives a more intense, oozing flavor—try it if you want a deeper peanut hit.
- Old-fashioned oats: They’re chewy and toasty, giving texture; blitzing some into smaller pieces can help bind the bars better if you prefer a smoother bite.
- Honey or maple syrup: I use honey for that golden, sticky sweetness, but maple syrup adds a smoky note—swap depending on your flavor mood.
- Dark chocolate chunks: I prefer chunks for their melty pockets, but chopped milk chocolate works too—just watch it melt faster.
- Sea salt: A pinch instantly brightens the nutty sweetness, but if you’re salt-sensitive, start small and build up to your taste.
- Vanilla extract: A splash heightens the overall aroma—you can skip it if you want a more straightforward peanut flavor, but I find it rounds out everything nicely.
- Optional add-ins: Dried cranberries, chopped nuts, or shredded coconut—add these for bursts of flavor or crunch, but don’t overload the mixture to keep it firm.
Spotlight on key ingredients
Peanut Butter:
- Creamy peanut butter: I love the richness it adds, but natural peanut butter gives a more intense, oozing flavor—try it if you want a deeper peanut hit.
- Old-fashioned oats: They’re chewy and toasty, giving texture; blitzing some into smaller pieces can help bind the bars better if you prefer a smoother bite.
Chocolate & Sweetener:
- Dark chocolate chunks: I prefer chunks for their melty pockets, but chopped milk chocolate works too—just watch it melt faster.
- Honey or maple syrup: I use honey for that golden, sticky sweetness, but maple syrup adds a smoky note—swap depending on your flavor mood.
Notes for ingredient swaps
- Dairy-Free: Use coconut or almond butter instead of peanut butter for a nutty flavor without dairy, but expect a slightly different texture and less creaminess.
- Sweetener Swap: Maple syrup or agave nectar can replace honey; they add a different floral or neutral sweetness, which may alter the overall richness.
- Oats: Swap old-fashioned oats for quick oats if you’re in a rush; they’ll make the bars softer but may reduce chewiness slightly.
- Chocolate: Use carob chips or white chocolate chunks for a different flavor profile; expect less bitterness or a sweeter, milky taste.
- Add-ins: Dried fruit, chopped nuts, or coconut flakes can be adjusted freely; just keep in mind that too many may make the mixture harder to set.
- Salt: Use sea salt flakes or Himalayan pink salt for a more pronounced salty crunch or a milder finish, respectively.
- Extracts: Swap vanilla with almond or coconut extract for a more distinctive aroma, which can brighten or deepen the flavor.
Equipment & Tools
- 20×20 cm (8×8 inch) square pan: Holds the mixture and shapes the bars.
- Mixing bowls: Combine ingredients smoothly.
- Spatula: Mix and press the mixture into the pan.
- Parchment paper: Prevents sticking and makes removal easy.
- Knife: Slice the set mixture into bars.
Step-by-step guide to no bake peanut oat bars
- Gather your equipment: a 20×20 cm (8×8 inch) square pan, mixing bowls, spatula, and parchment paper. Line the pan with parchment, leaving overhang for easy removal.
- In a large bowl, combine 1 1/2 cups (150g) old-fashioned oats and 1/2 cup (125g) honey or maple syrup. Stir until evenly coated and slightly sticky.
- Add 1 cup (250g) peanut butter and 1 teaspoon vanilla extract to the oats mixture. Mix well until the peanut butter is fully incorporated and the mixture is cohesive.
- Fold in 1/2 cup (90g) dark chocolate chunks and a pinch of sea salt. Adjust sweetness or saltiness to taste.
- Transfer the mixture to the prepared pan. Using a spatula or your hands, press it firmly into an even layer, ensuring no air pockets. The mixture should be compact.
- Place the pan in the fridge for at least 2 hours, or until the mixture is firm and set. If you’re in a rush, pop it in the freezer for about an hour.
- Once firm, lift the entire block out using the parchment overhang. Place on a cutting board and slice into bars or squares.
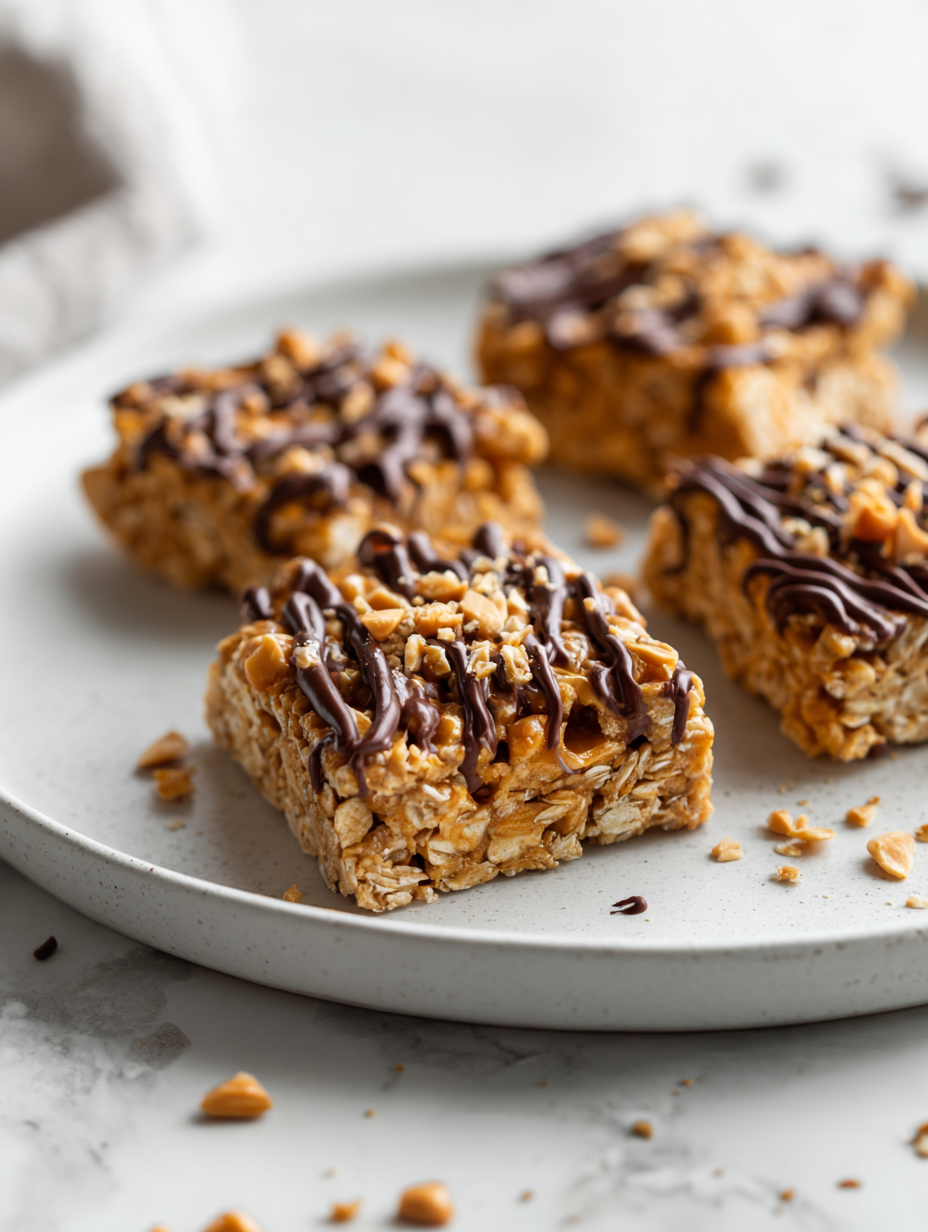
- For a cleaner cut, wipe your knife with warm water between slices. Optional: drizzle melted chocolate or sprinkle sea salt on top before serving.
- Serve immediately or store in an airtight container in the fridge for up to a week. For longer storage, freeze the bars for up to a month.
Chill the bars until firm, then lift from the pan using parchment. Slice into squares, serve immediately, or store in an airtight container in the fridge.
How to Know It’s Done
- The mixture is evenly pressed and compact in the pan.
- The bars are firm and set after chilling.
- Chocolate chunks are slightly melty and integrated without oozing out.
No-Bake Peanut Oat Bars
Ingredients
Equipment
Method
- Line your square pan with parchment paper, leaving overhang for easy lifting later.
- In a large mixing bowl, combine the oats and honey or maple syrup. Stir well until the oats are coated and the mixture feels slightly sticky—this starts building the base for your bars.
- Add the peanut butter and vanilla extract to the bowl. Mix thoroughly until everything is well combined and the mixture is smooth, with a chewy, cohesive texture.
- Fold in the dark chocolate chunks and a pinch of sea salt, distributing them evenly throughout the mixture. The chocolate will start to melt slightly as you mix, creating melty pockets in the bars.
- Transfer the mixture into the prepared pan. Using a spatula or your hands, press it firmly into an even layer, ensuring the mixture is compact and smooth on top. This helps the bars hold together nicely.
- Place the pan in the fridge for at least 2 hours, or until the mixture is firm and set. If you're in a hurry, pop it in the freezer for about an hour to speed up the process.
- Once chilled and firm, lift the entire block out of the pan using the parchment overhang. Place it on a cutting board and use a sharp knife to cut into equal squares or bars.
- If desired, melt a little extra chocolate and drizzle over the bars or sprinkle with a few more sea salt flakes for added flavor and visual appeal.
- Serve the bars immediately for a chewy, chocolatey treat or store them in an airtight container in the fridge for up to a week. For longer storage, freeze the bars and enjoy whenever craving hits.
Pro tips for perfect no-bake bars
- Use a warm spatula to press the mixture evenly into the pan, ensuring no air pockets.
- Chill the bars for at least 2 hours—this helps them set and become easier to cut.
- Check chocolate chunks frequently during melting—stir often to prevent burning and achieve a smooth finish.
- When pressing mixture into the pan, use the back of a spatula or a piece of parchment to get an even layer.
- For cleaner slices, wipe your knife with warm water between cuts to prevent sticking and crumbs.
- If the mixture feels too dry, add a splash of extra honey or peanut butter to help it bind.
- For a more textured bar, sprinkle chopped nuts or dried fruit on top before chilling, pressing them in slightly.
Common mistakes and how to fix them
- FORGOT to line pan with parchment → Use parchment to prevent sticking.
- DUMPED ingredients too quickly → Mix thoroughly for even distribution.
- OVER-TORCHED chocolate → Melt on low heat or in short bursts, stir often.
- MISSED chilling time → Chill until bars are firm and set, at least 2 hours.
Quick fixes for common issues
- When mixture is too dry → Splash in a little extra honey or peanut butter and stir well.
- If bars don’t set → Chill longer, at least 2 hours, for firmer texture and easier slicing.
- Splash melted chocolate with a tiny bit of coconut oil → Keeps it shiny and smooth, prevents cracking.
- Patch over cracks with a thin layer of melted chocolate → Adds a glossy finish and hides imperfections.
- Shield edges from drying out → Cover with plastic wrap or foil if storing overnight, to keep moisture in.
Prep, store, and reheat tips
- Prepare the mixture in advance and keep it refrigerated for up to 24 hours; the flavors meld and it firms up nicely.
- Store the cut bars in an airtight container in the fridge for up to a week, maintaining their chewy texture and fresh peanut aroma.
- For longer storage, freeze the bars for up to a month; let thaw at room temperature for 10-15 minutes before slicing for best texture.
- Reheat slightly in the microwave for 10-15 seconds if you prefer softer, melty chocolate pockets, but enjoy them chilled for firm bites.
Top questions about peanut oat bars
1. Can I use natural peanut butter?
Use natural peanut butter for a richer, more oozing flavor, but regular creamy works fine too.
2. Can I substitute honey?
Yes, you can swap honey for maple syrup or agave nectar, which will alter the sweetness and flavor a bit.
3. Can I use quick oats instead?
Old-fashioned oats give the best chew and texture, but quick oats can work if you’re in a rush.
4. What if I don’t have dark chocolate chunks?
Chopped milk or white chocolate can be used for a sweeter, creamier melt, but dark chocolate adds depth.
5. How should I store the bars?
Store these bars in the fridge for up to a week or freeze for longer, just let them sit at room temp before eating.
6. How long do I chill the mixture?
Chill the mixture for at least 2 hours until firm, or pop in the freezer for about an hour to speed things up.
7. Do I need to line the pan?
Use parchment paper to line your pan; it helps lift the bars out easily without sticking.
8. My mixture is too dry, what do I do?
If the mixture feels too dry, stir in a little more peanut butter or honey to help it come together.
9. How can I get neat slices?
For cleaner cuts, wipe your knife with warm water between slices to prevent sticking and crumbling.
10. My chocolate is burning, what now?
If the chocolate melts too quickly, melt it slowly over low heat or in short bursts in the microwave, stirring often.
These no-bake peanut oat bars are more than just a quick snack; they’re a little pocket of nostalgia wrapped in chewy, nutty goodness. Whenever I need a moment of comfort or a simple treat to toss in my bag, I turn to this recipe. It’s honest, straightforward, and always satisfying, especially when the aroma of peanut butter and toasted oats fills the kitchen.
Sometimes, the simplest recipes hold the most meaning, especially when they bring back memories or fit into busy days without fuss. Keeping a batch in the fridge means I have a homemade, wholesome bite ready at a moment’s notice. They’re imperfect, practical, and exactly what I need—no oven required.