
This no-bake chocolate crunch bars recipe is my go-to for whenever I need a sweet fix without turning on the oven or getting caught up in complicated steps. It’s honestly my secret stash for quick, satisfying treats that come together in no time—perfect for those lazy afternoons when the craving hits hard and I don’t want to wait.
What I love most is how adaptable it is. You can tweak the crunchy bits—peanuts, crispy rice, or even a handful of dried fruits—to match whatever’s in the pantry. It’s a recipe that feels like a little win every time, especially when I’m juggling work, kids, and the chaos of everyday life.
This recipe is my secret weapon for quick, satisfying treats when I need a break from baking chaos. No heat, no fuss, just rich chocolate and crispy crunch that come together in minutes, perfect for lazy afternoons or last-minute cravings.
The story behind this recipe
- This recipe harks back to lazy weekends at my grandma’s house, where she’d whip up these crunchy, chocolatey bars with whatever she had in the pantry. I remember the smell of melting chocolate mingling with the crackle of cereal and nuts, filling the kitchen with a cozy chaos I still chase today.
- It’s one of those recipes that’s as much about the memories as it is about the sweet, crispy crunch. I’ve tweaked it over the years, but the essence remains: simple ingredients, quick assembly, and that satisfying snap with every bite.
- Whenever I need a quick fix, this no-bake treat feels like a little rebellion against the busy, heat-filled world outside my kitchen. It’s honest, unpolished, and always hits the spot—no fuss, just pure, crunchy chocolate comfort.
Ingredient breakdown: key components
- Chocolate: I use good-quality dark chocolate for a rich, slightly bitter kick that balances the sweetness. You can swap in milk chocolate if you prefer a milder, creamier flavor.
- Crispy rice cereal: It gives that satisfying crunch and lightness. If you’re out, crushed cornflakes work fine, but the texture will be slightly denser and less airy.
- Butter: I melt unsalted butter to help everything stick together smoothly. For a dairy-free version, try coconut oil—just expect a slight coconut aroma that pairs nicely with the chocolate.
- Sweetener: I often add a touch of honey or maple syrup to deepen the flavor. If you prefer it less sweet, just cut back; the bars will still hold together well.
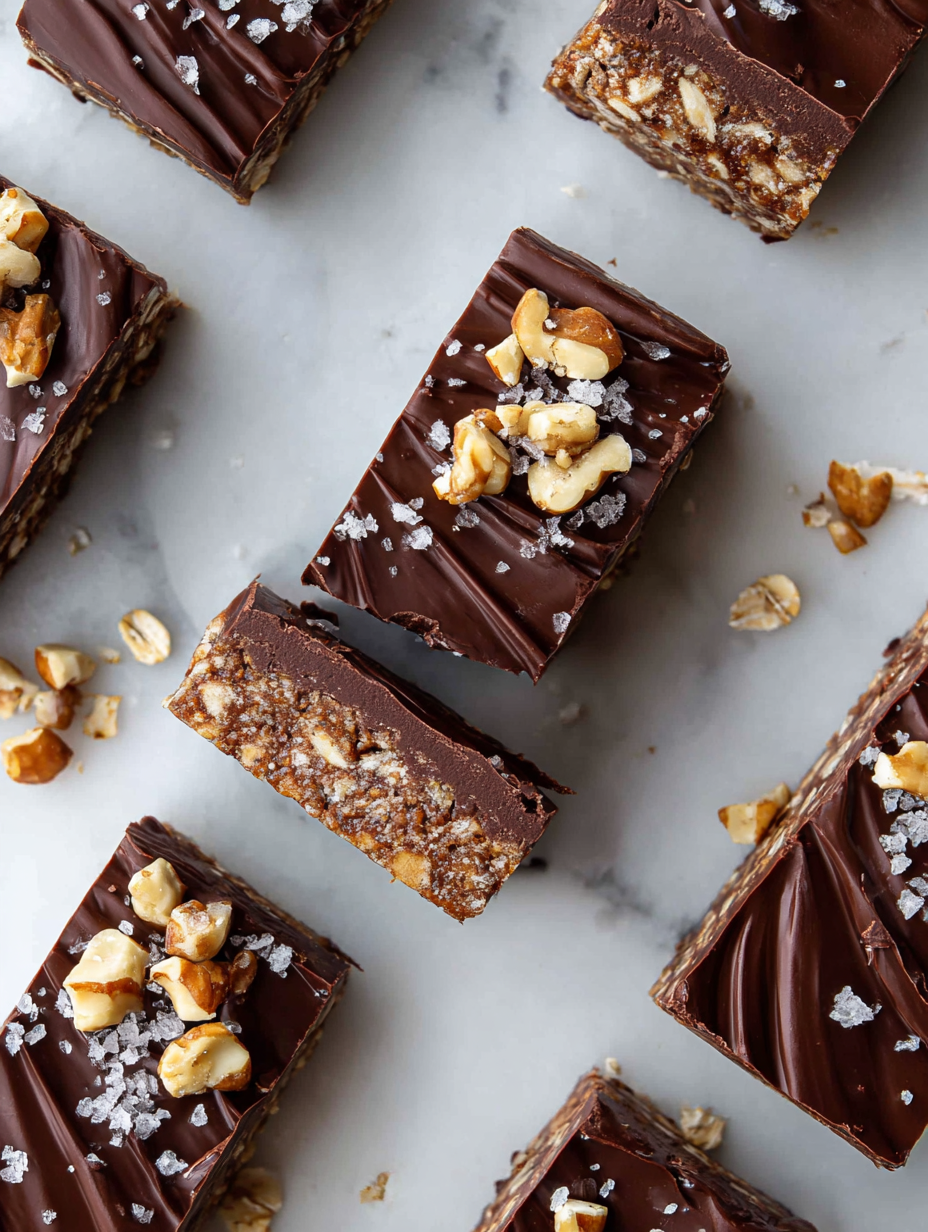
- Add-ins: Nuts, dried fruit, or even crushed pretzels add personality. I love the salty crunch of pretzels with chocolate—try it for a satisfying contrast.
- Vanilla extract: A splash enhances the overall flavor, making the chocolate pop. Skip if you want a more intense cocoa focus, but don’t omit entirely—trust me.
- Salt: Just a pinch heightens all the flavors and cuts through the sweetness. I sprinkle a bit on top for a finishing touch, but a tiny bit mixed in works too.
Spotlight on key ingredients
Chocolate and Crispy Rice Cereal:
- Chocolate: I use good-quality dark chocolate for a rich, slightly bitter kick that balances the sweetness. You can swap in milk chocolate if you prefer a milder, creamier flavor.
- Crispy rice cereal: It gives that satisfying crunch and lightness. If you’re out, crushed cornflakes work fine, but the texture will be slightly denser and less airy.
- Butter: I melt unsalted butter to help everything stick together smoothly. For a dairy-free version, try coconut oil—just expect a slight coconut aroma that pairs nicely with the chocolate.
Notes for ingredient swaps
- Chocolate: I recommend using good-quality dark chocolate for a deep, rich flavor. Swap with milk chocolate if you prefer a creamier, sweeter taste, but expect a softer set.
- Crispy rice cereal: I love the airy crunch it provides. If you’re out, crushed cornflakes or even popped amaranth work, but the texture will be denser and less bubbly.
- Butter: I melt unsalted butter for smooth binding. For dairy-free, coconut oil is a solid swap—just note it will add a subtle coconut aroma that pairs nicely with chocolate.
- Sweetener: I sometimes add a teaspoon of honey or maple syrup for complexity. To keep it less sweet, cut back slightly; your bars will still hold together fine.
- Add-ins: Nuts, dried fruits, or pretzels give personality. I adore the salty crunch of pretzels with chocolate—try it for a contrasting bite.
- Vanilla extract: A splash boosts flavor and rounds out the richness. Skip if you want a more intense cocoa hit, but don’t omit entirely—they make a difference.
- Salt: I sprinkle a tiny pinch on top to enhance all flavors. Mixing a bit into the chocolate helps, but a light sprinkle on top is my favorite finishing touch.
Equipment & Tools
- 20x20cm (8×8 inch) square pan: To hold and shape the bars.
- Microwave-safe bowl: To melt the chocolate evenly.
- Spatula: For folding and pressing the mixture.
- Sharp knife: To cut the bars cleanly.
- Parchment paper: To prevent sticking and easy removal.
Step-by-step guide to no bake crunch bars
- Equipment ready: line a 20x20cm (8×8 inch) square pan with parchment paper, leaving overhang for easy removal. Have a microwave-safe bowl, a spatula, and a sharp knife nearby.
- Melt the chocolate: chop 200g dark chocolate into small pieces. Microwave in 30-second bursts, stirring after each, until smooth and glossy (~1-2 minutes total). Be careful not to overheat; chocolate burns easily. If it does, add a teaspoon of oil and stir until smooth.
- Prepare the crunch: in a large bowl, combine 3 cups crispy rice cereal, ½ cup chopped nuts (if using), and ¼ teaspoon sea salt. Toss to distribute evenly.
- Mix the ingredients: pour melted chocolate over the dry mix. Use the spatula to fold everything together until well coated and sticky. If the mixture seems too thick, add a teaspoon of melted butter or a splash of honey to loosen it up.
- Press into pan: transfer the mixture to your prepared pan. Use the back of the spatula or a piece of parchment to press down firmly, creating an even layer. Make sure to pack it in so it holds together when sliced.
- Chill: let the bars set in the fridge for at least 2 hours. This helps the chocolate firm up and the crunch to compact. For quicker setting, place in the freezer for about 30 minutes, but don’t forget to set a timer.
- Cut into bars: once firm, lift the entire block out of the pan using the parchment overhang. Use a sharp knife to cut into rectangles or squares. Wipe the knife clean between cuts for neat edges.
- Finishing touches: optionally, melt some extra chocolate and drizzle over the bars for a decorative touch. Allow the drizzle to set for 15-20 minutes at room temperature or in the fridge.
- Serve: enjoy immediately or store in an airtight container in the fridge for up to a week. The bars will stay firm and chocolatey, with a satisfying crunch in every bite.
Chill the assembled bars in the fridge for at least 2 hours or until firm. Use the parchment to lift out and cut into desired shapes. Drizzle with melted chocolate if desired. Serve directly or store in an airtight container in the fridge.
How to Know It’s Done
- Chocolate is glossy and fluid before mixing.
- Mixture is evenly coated and sticky enough to press.
- Bars are firm and hold shape after chilling.
No-Bake Chocolate Crunch Bars
Ingredients
Equipment
Method
- Line your square pan with parchment paper, leaving some overhang for easy lifting later.
- Place the chopped dark chocolate in a microwave-safe bowl, then melt it in short 30-second bursts, stirring well after each, until smooth and glossy. This should take about 1-2 minutes total. The chocolate will smell rich and start to thicken as it melts.
- In a large bowl, combine the crispy rice cereal, chopped nuts (if using), and sea salt. Toss gently to distribute evenly, creating a crunchy, textured mixture.
- Pour the melted chocolate over the dry mixture. Use a spatula to fold everything together carefully, ensuring all the cereal is coated with chocolate and sticky enough to hold together. The mixture will become shiny and slightly thickened.
- Transfer the chocolate-coated mixture into your prepared pan. Press it down firmly with the back of the spatula or a piece of parchment, creating an even, compact layer. This helps the bars hold their shape once set.
- In a small saucepan or microwave, melt the butter and vanilla extract together until just warm and combined. Drizzle this over the pressed mixture to add extra richness.
- Place the pan in the fridge and chill for at least 2 hours, or until the chocolate is firm and the bars are set. For quicker setting, you can freeze for about 30 minutes, but don’t forget to time it.
- Once firm, lift the entire block out of the pan using the parchment overhang. Use a sharp knife to cut into even rectangles or squares, wiping the blade clean between cuts for neat edges.
- If desired, melt a small amount of chocolate and drizzle over the top of the bars for a decorative finish. Let the drizzle set for about 15-20 minutes in the fridge.
- Serve the bars immediately or store them in an airtight container in the fridge for up to a week. For a softer texture, let them sit at room temperature for 10 minutes before enjoying.
Top Tips for Perfect Bars
- Bolded mini-head: Use high-quality chocolate for a glossy finish and richer flavor.
- Bolded mini-head: Melt chocolate slowly in short bursts to avoid burning—stir often and watch for a shiny, smooth texture.
- Bolded mini-head: When mixing in cereal, fold gently to keep the crunch intact and avoid crushing the cereal too much.
- Bolded mini-head: Press the mixture firmly into the pan with the back of a spatula or parchment to ensure clean, even bars.
- Bolded mini-head: Chill in the fridge until the bars are firm and snap easily—about 2 hours or more for best texture.
- Bolded mini-head: For a shiny, professional-looking finish, drizzle melted chocolate over set bars and let it set completely.
- Bolded mini-head: If the mixture feels too thick, add a tiny splash of warm melted butter or honey to loosen it up.
Common mistakes and how to fix them
- TOO MUCH chocolate: Use less to prevent overly soft bars; fix with more cereal or chill longer.
- DUMPED ingredients: Add ingredients gradually to avoid clumping or uneven coating.
- OVER-TORCHED chocolate: Remove from heat immediately if chocolate smells burnt; start melting again gently.
- MISSED chilling time: Don’t skip or rush the fridge; it’s key for firm, snap-worthy bars.
Quick Fixes for Common Problems
- If the mixture is too soft, splash in a little more cereal for crunch.
- When chocolate seizes, dump in a teaspoon of oil and stir until smooth.
- Over-torched chocolate smells burnt; rescue by starting with fresh chocolate and melting gently.
- DUMPED ingredients can cause uneven texture; add gradually and fold carefully.
- heading
Prep, store, and reheat tips
- Prepare the mixture and press into the pan a day ahead; chilling overnight enhances flavor and firmness.
- Store the bars in an airtight container in the fridge for up to a week, maintaining their crispness and chocolate sheen.
- Refrigerated bars will stay firm and fresh, but for softer texture, allow to sit at room temperature for 10 minutes before serving.
- To reheat, briefly warm in the microwave at 50% power for 10 seconds, just until the chocolate is slightly softer and more melt-in-your-mouth.
Top questions about no bake chocolate crunch bars
1. Can I use milk chocolate instead of dark?
Yes, you can use milk chocolate for a sweeter, creamier bar, but keep in mind it will be softer after chilling.
2. Can I swap the rice cereal for something else?
Absolutely, crushed cornflakes or even chopped pretzels work well as crunchy substitutes for rice cereal.
3. Is there a dairy-free option?
Yes, coconut oil can replace butter for a dairy-free version, adding a subtle coconut aroma and slight melt-in-your-mouth texture.
4. How do I know when the bars are ready to cut?
Chill the bars for at least 2 hours in the fridge; they should be firm, shiny, and snap cleanly when cut.
5. How should I store the bars?
Store in an airtight container in the fridge for up to a week; for softer texture, let them sit at room temp a few minutes before serving.
6. What if my chocolate seizes during melting?
If the chocolate seizes while melting, add a teaspoon of oil and stir until smooth again, avoiding burning.
7. How do I get clean cuts?
Use a sharp knife for clean cuts; wipe it with a damp cloth between slices to prevent sticking and crushing the crunch.
8. How can I make the bars look more appealing?
For a shiny finish, drizzle melted chocolate over the set bars and let it harden in the fridge for 15-20 minutes.
9. My mixture is too stiff to press down, what do I do?
If mixture feels too thick to press, add a small splash of warm melted butter or honey to loosen it.
10. Can I make these ahead of time?
Yes, you can prepare the mixture and press into the pan a day ahead; just keep it covered in the fridge.
These no-bake chocolate crunch bars are a simple way to satisfy a sweet tooth without the fuss of baking. They come together quickly, and their crisp, chocolatey bite makes them a go-to for busy days or unexpected guests.
I find that the best part is how adaptable they are—adding nuts, dried fruit, or even a sprinkle of sea salt can totally change the flavor profile. Plus, they’re a reminder that sometimes, the simplest recipes are the most satisfying.