
Sometimes, the simplest treats carry the most nostalgia. These no bake peanut clusters remind me of childhood afternoons, sticky fingers, and the thrill of a quick fix when sweets were needed fast. No fuss, no oven, just honest ingredients coming together in a way that feels like a warm hug from the past.
They’re perfect for busy days or when you want something sweet without the hassle of baking. The rich peanut flavor, combined with the crunch of crispy bits, makes every bite feel like a small celebration. It’s about keeping it straightforward but satisfying, a little pocket of comfort that you can whip up in no time.
What I love most is how forgiving this recipe is. No oven means less stress, and the ingredients are flexible—more chocolate, extra peanuts, or a dash of sea salt if you’re feeling fancy. These clusters are a quick way to bring a bit of joy, especially when life feels too hectic for anything more complicated.
Focusing on how these peanut clusters serve as a nostalgic, no-fuss comfort food that’s perfect for busy days, yet packed with rich, familiar flavors that remind you of simpler times.
Nostalgic No-Bake Indulgence
- Making these peanut clusters takes me back to simpler times, filled with childhood messes and sweet surprises.
- I love how forgiving this recipe is—no oven, no fuss, just pure, crunchy, peanutty comfort.
- Whenever I need a quick pick-me-up, these clusters are my go-to for that perfect balance of salty and sweet.
- Sharing these with friends always sparks a nostalgic smile—everyone loves a no-bake moment of joy.
The story behind this recipe
This recipe was born out of late nights when I needed a sweet fix without turning on the oven. I remember rummaging through my pantry, grabbing whatever nuts and chocolate bits I had, and just melting them together. The best part? It’s a messy, forgiving process that feels almost instinctive—like a little act of kitchen rebellion after a long day. Now, whenever I want a quick, satisfying treat, these clusters remind me that simple ingredients can create something truly comforting.
Historical snippets about peanut clusters
- These no bake peanut clusters trace back to 1950s home kitchens, where resourcefulness was key and ovens weren’t always available.
- They became popular during wartime rationing, serving as a simple, satisfying treat with pantry staples like peanuts and chocolate.
- In some regions, folks believe these clusters originated as a way to use up leftover candy and nuts, creating a delicious, improvised dessert.
- Over the decades, they’ve evolved into a nostalgic staple, often shared during family gatherings and holiday seasons as an easy homemade gift.
Ingredient breakdown: key components
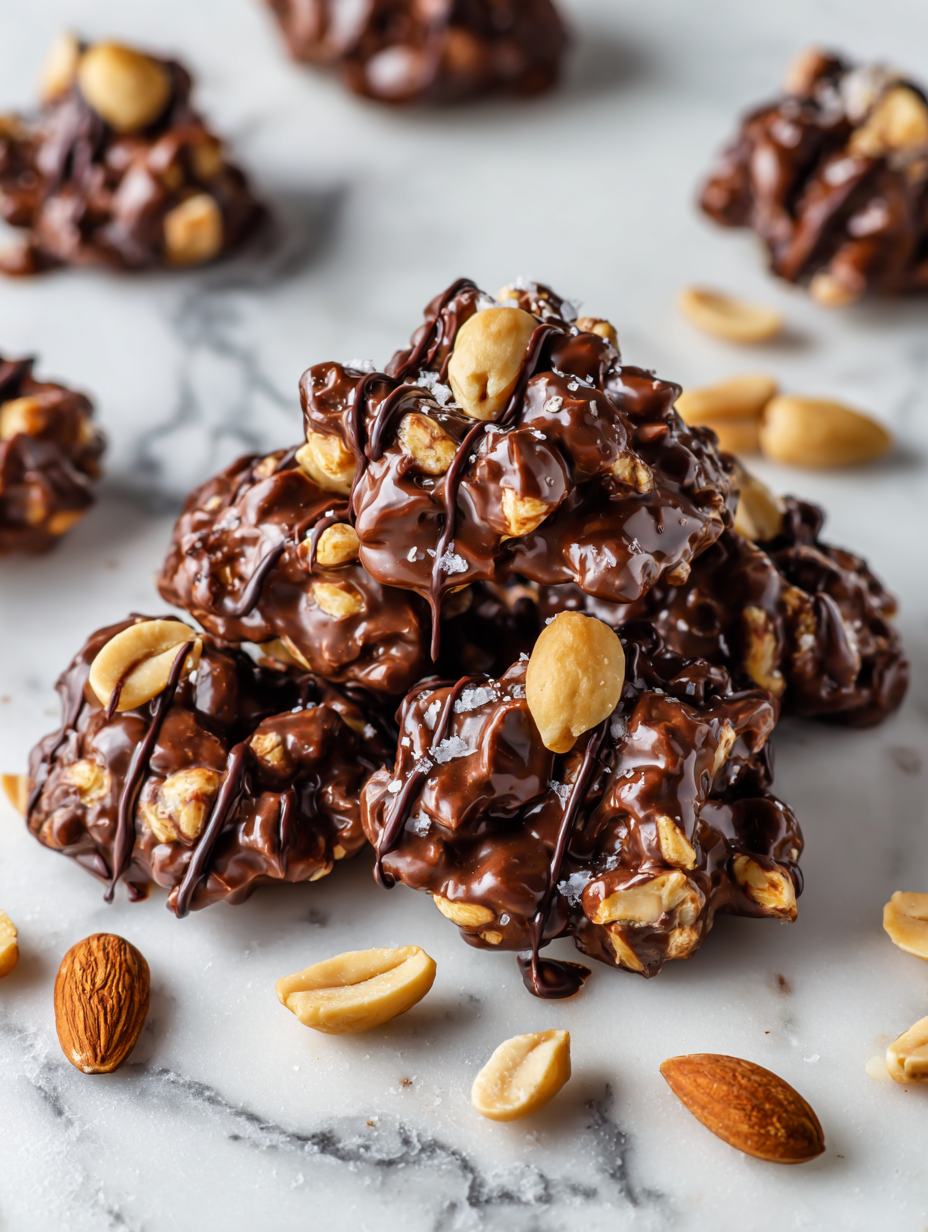
- Peanut butter: I go for creamy, smooth peanut butter, the kind that melts into the chocolate and gives a rich, nutty aroma. You can swap it for almond or sunflower butter if you prefer a different nutty twist.
- Chocolate: I love using semi-sweet or dark chocolate because it balances the sweetness and adds depth. If you want a milder flavor, milk chocolate works; for a more intense cocoa hit, try bittersweet.
- Peanuts: Salted roasted peanuts add crunch and saltiness that cuts through the sweetness. For a different texture, try chopped almonds or cashews, or even toasted coconut for a tropical vibe.
- Crispy rice or cornflakes: These give the clusters a satisfying crunch. If you’re out, crushed graham crackers or even crushed pretzels work as tasty substitutes.
- Sweetener (optional): I don’t always add extra sugar, but a drizzle of honey or maple syrup can heighten the overall gooey texture and flavor—use sparingly to avoid overly sticky clusters.
- Vanilla extract: Just a splash brightens everything up with a warm, cozy aroma. If you’re out, a pinch of cinnamon or a dash of almond extract can add a new dimension.
Spotlight on key ingredients
Peanut butter:
- I prefer creamy, smooth peanut butter that melts seamlessly into the chocolate. It provides a rich, nutty aroma. Swap for almond or sunflower butter for a different nutty profile.
- Chocolate: I opt for semi-sweet or dark chocolate because they balance sweetness with depth. Milk chocolate works if you want a milder, creamier flavor. Bittersweet gives an intense cocoa punch.
Peanuts:
- Crispy rice cereal: It gives the clusters that satisfying crunch. When crushed into smaller bits, it adds more surface area for crunch. Cornflakes or crushed graham crackers are good substitutes if you run out.
- Roasted, salted peanuts add a salty crunch that complements the sweetness. Toasted almonds or cashews offer a different texture and flavor, while toasted coconut provides a tropical twist.
Notes for ingredient swaps
- Dairy-Free: Use coconut oil-based chocolate or dairy-free chocolate chips. Expect a slightly different melt and flavor profile, but still rich and satisfying.
- Nut Allergies: Swap peanuts for roasted pumpkin seeds or sunflower seeds. They add crunch and nutty flavor without the allergy concern.
- Sweetener: Replace honey with maple syrup or agave nectar for a different sweetness nuance. Keep in mind, this may slightly alter the texture.
- Chocolate: Try milk chocolate or white chocolate if dark isn’t your thing. Milk chocolate is creamier, white chocolate is sweeter and milky.
- Peanuts: Use chopped almonds, cashews, or pecans for a different crunch and flavor. Toast them lightly beforehand for extra aroma.
- Crispy Bits: Cornflakes work great, but crushed graham crackers or pretzels add a different kind of crunch and saltiness.
- Flavor Boost: Add a pinch of sea salt or a splash of vanilla extract to enhance depth. Adjust sweet and salty balance to your taste.
Equipment & Tools
- Microwave-safe bowl: For melting chocolate and peanut butter evenly.
- Spatula: To fold ingredients and scoop clusters.
- Parchment paper-lined baking sheet: To prevent sticking and easy cleanup.
- Spoon: For scooping and shaping clusters.
Step-by-step guide to peanut clusters
- Gather your equipment: a microwave-safe bowl, a spatula, a baking sheet lined with parchment paper, and a spoon for scooping. The bowl is for melting, the sheet for setting, and the spatula for mixing.
- In the microwave-safe bowl, combine 2 cups of semi-sweet chocolate chips and 1/2 cup of peanut butter. Microwave in 30-second bursts, stirring after each, until smooth and glossy. This takes about 1.5 minutes total. Be careful not to overheat; the chocolate should be just melted, not sizzling.
- Add 1 1/2 cups of salted roasted peanuts and 1 2/3 cups of crispy rice cereal to the melted mixture. Use the spatula to fold everything together evenly. Look for a shiny, gooey mixture with bits of peanut and crunch evenly coated.
- Scoop spoonfuls of the mixture onto the prepared parchment-lined baking sheet. About 1 to 1.5-inch mounds work well. Leave space between clusters for spreading. If the mixture is too thick to scoop, microwave it for 10 seconds to loosen it up.
- Gently press down each cluster with the back of your spoon to flatten slightly. This helps them set into a more uniform shape and ensures they stick together better.
- Let the clusters rest at room temperature for 30 minutes to an hour, or until firm. If you’re in a hurry, refrigerate for 20 minutes. They should be shiny, hold their shape, and have a slight crackle when you gently tap them.
- Once set, transfer the clusters to an airtight container. Store at room temperature for up to 3 days or in the fridge for up to a week. For longer storage, freeze them for up to 3 months. Reheat briefly if they soften in the fridge—just 10 seconds in the microwave until slightly shiny again.
Let the clusters rest at room temperature until firm, about 30 minutes. For quicker setting, refrigerate for 20 minutes. Once hardened, transfer to an airtight container. Serve directly from the fridge or room temp, enjoying the glossy sheen and crunchy bite.
How to Know It’s Done
- Chocolate is fully melted and glossy before mixing.
- Clusters hold their shape with a slight crackle when tapped.
- They are firm and set after resting or chilling.
Nostalgic No-Bake Peanut Clusters
Ingredients
Equipment
Method
- Combine the chocolate chips and peanut butter in a microwave-safe bowl. Microwave in 30-second bursts, stirring after each, until the mixture is smooth, glossy, and fully melted, about 1.5 minutes total.
- Add the salted roasted peanuts and crispy rice cereal to the melted chocolate mixture. Use a spatula to gently fold everything together until the ingredients are evenly coated and combined, creating a shiny, textured mixture.
- Using a spoon, scoop about one heaping tablespoon of the mixture and drop it onto the parchment-lined baking sheet. Repeat with the remaining mixture, spacing each cluster about 1-2 inches apart.
- Gently press down on each cluster with the back of your spoon to flatten slightly, helping them set into a uniform shape and ensuring they stick together better.
- Let the clusters rest at room temperature for about 30 minutes, or refrigerate for 20 minutes until they are firm and glossy.
- Once set, remove the clusters from the fridge or let them come to room temperature. Store in an airtight container at room temperature for up to 3 days, or in the fridge for up to a week. Enjoy these nostalgic, crunchy bites anytime you need a sweet, comforting treat.
Pro tips for perfect clusters
- Bolded mini-head: Use low heat → Melt chocolate slowly to prevent burning and achieve a glossy finish.
- Bolded mini-head: Add ingredients gradually → Incorporate peanuts and cereal carefully to avoid breaking or uneven coating.
- Bolded mini-head: Chill in stages → Refrigerate clusters for 10-minute intervals to set quickly without sweating.
- Bolded mini-head: Use fresh, good-quality chocolate → Melts more smoothly and has a richer flavor.
- Bolded mini-head: Fold gently → Keep the mixture airy and prevent breaking the crunch when mixing.
- Bolded mini-head: Avoid overmixing → Stop once ingredients are evenly coated to maintain crunch and texture.
- Bolded mini-head: Store in airtight container → Keeps clusters crisp and prevents moisture from softening them.
Common mistakes and how to fix them
- FORGOT to stir continuously → Stir every 30 seconds to prevent burning.
- DUMPED the chocolate mixture directly on parchment → Use a spoon for even distribution.
- OVER-TORCHED the chocolate → Remove from heat immediately once melted; residual heat melts it fully.
- MISSED the chill step → Refrigerate clusters for at least 20 minutes for firm setting.
Quick fixes and pantry swaps
- If chocolate seizes, splash in a little coconut oil and stir gently.
- When clusters are too sticky, refrigerate for 5 minutes before shaping.
- Splash extra chocolate for a glossy finish and richer flavor.
- Patch dull flavor with a pinch of sea salt after setting.
- Shield delicate clusters from humidity by storing in an airtight container.
Prep, store, and reheat tips
- You can prep the mixture a day in advance; keep it covered in the fridge to prevent it from drying out.
- Store the clusters in an airtight container at room temperature for up to 3 days; refrigerate for up to a week to maintain freshness.
- The flavors deepen slightly as they sit, with the chocolate melding into the peanuts—expect a richer, more cohesive taste after a day.
- Reheat briefly in the microwave for 10 seconds if they soften in the fridge, until they shimmer slightly and regain crunch.
Top questions about peanut clusters
1. Can I use different nut butters?
Yes, you can substitute creamy almond or sunflower butter, which will add a different nutty aroma and slightly alter the texture, but still work well in binding the clusters.
2. Can I use other types of chocolate?
Absolutely. Dark chocolate gives a richer, less sweet flavor, while milk chocolate makes it milder and creamier. White chocolate is sweeter and milky, for a different twist.
3. Can I replace peanuts?
Yes. If you’re allergic to peanuts, try roasted pumpkin seeds or sunflower seeds. They add crunch and flavor without the allergen, though they won’t replicate the peanut taste exactly.
4. How long do I need to chill the clusters?
Refrigerate for about 20 minutes to help set the clusters faster and maintain their shape. Room temperature is fine if you have time; they’ll still firm up after about an hour.
5. What if the chocolate seizes?
If the chocolate seizes or becomes grainy, splash in a teaspoon of coconut oil and stir until smooth. This restores gloss and smoothness.
6. How should I melt the chocolate?
Use low, gentle heat when melting chocolate to avoid burning or seizing. Stir frequently for a glossy, smooth finish.
7. Can I make these in advance?
You can prepare the mixture up to a day ahead; keep it covered in the fridge. The flavor melds nicely, and it’s ready to scoop when you are.
8. How should I store the clusters?
Store the clusters in an airtight container at room temp for up to 3 days or refrigerated for up to a week. Longer storage in the freezer keeps them fresh for months.
9. What do I do if clusters are too soft?
If your clusters are too soft or sticky, refrigerate them for 5 minutes. This helps them firm up without losing crunch.
10. How do I know when they’re done?
When the mixture looks glossy and the clusters hold their shape without oozing or sticking excessively, they’re ready. They should crackle gently when tapped and have a firm texture.
These no bake peanut clusters are more than just a quick treat; they’re a small reminder that simple ingredients can create something comforting and satisfying. When I make them, it’s like a little moment of nostalgia mixed with a pinch of chaos—melting chocolate, crunchy peanuts, and the smell of sweet richness filling the kitchen.
They’re perfect for when you need a sweet fix without fuss, especially now when easy, homemade comfort food feels more necessary than ever. No matter the occasion, these clusters come together fast and disappear just as quickly, leaving behind a warm, peanutty glow in your day.