
In the whirlwind of a busy afternoon, I often find myself reaching for something sweet and satisfying without the fuss of baking. These no-bake chocolate oat bites are my secret weapon—quick to whip up, no oven needed, and packed with honest, wholesome ingredients. They’re a little messy to make but always a hit when I need a quick pick-me-up that feels indulgent but isn’t complicated.
What I love most is how adaptable they are—adjusting the sweetness, adding a pinch of sea salt, or tossing in a handful of nuts or dried fruit. It’s the kind of recipe that feels like a cozy secret, one I turn to when the pantry’s running low but I still crave that rich, chocolatey hit. These bites have become my personal comfort, a little chaos in a compact form that I can stash away for when cravings strike unexpectedly.
This recipe is inspired by the chaos of last-minute snack cravings, where I needed something quick, satisfying, and no-fuss. No bake, no melting, just simple ingredients coming together into a rich, chewy bite. It’s my go-to when the pantry’s half-empty but I still crave a little sweet indulgence.
A Pantry-Driven Indulgence
- I love how these bites come together in just minutes, perfect for when I need something sweet fast.
- There’s a nostalgic comfort in the chewy oats mixed with rich chocolate—reminds me of childhood treats.
- Cracking into one of these when they’ve set is like a little reward—crispy edges with gooey centers.
- I’ve snuck these into movie nights, and they always disappear faster than I expect.
- Making them is almost meditative—measuring, mixing, and then waiting as the fridge does its magic.
The inspiration behind these bites
- This recipe sprouted from a lazy afternoon when I was rummaging through my pantry and found a half-used bag of oats and a nearly empty jar of cocoa. Instead of letting them sit, I mixed them up because sometimes, the simplest ingredients make the best treats — no oven, no fuss, just a quick fix for those unexpected sweet cravings. It’s funny how a little kitchen improvisation can turn into a go-to snack that’s both satisfying and honest.
- These bites remind me of childhood energy balls my mom used to make, but with a grown-up chocolate punch. I like that they’re forgiving — a splash more honey, a handful of nuts — whatever feels right in the moment. It’s a recipe born from chaos and convenience, but it’s become a small ritual I turn to when I need something sweet and straightforward, no apologies.
- heading: ‘The story behind this recipe’
Historical roots of no-bake treats
- These no-bake bites trace back to resourceful home cooks during wartime rationing, where simplicity and shelf-stable ingredients were key.
- Originally, they were a way to use up leftover oats and cocoa powder, turning pantry scraps into a satisfying treat.
- They gained popularity in the health food movement of the 1970s as a quick, wholesome snack option.
- Modern variations often include superfoods like chia seeds or protein powder, but the classic version remains a nostalgic favorite.
Key ingredients and tips
- Rolled oats: I use old-fashioned oats for that chewy texture and hearty bite—skip steel-cut, they’re too chunky to bind well.
- Dark chocolate: I prefer a bittersweet bar; it melts smoothly and balances the sweetness—feel free to swap for semi-sweet if you like milder tones.
- Nut butter: Creamy peanut butter is my go-to for richness—if you’re allergic, almond or sunflower seed butter works just as well, adding a slightly different flavor.
- Honey: It adds that sticky, sweet glue—if you want vegan, maple syrup is a good substitute, just a tad more floral and less thick.
- Coconut oil: I melt it to help the bites set with a glossy finish—skip it if you want a firmer, denser bite, or swap for a splash of milk for softer texture.
- Vanilla extract: A splash brightens everything up with a warm note—don’t skip it, but if you’re out, a pinch of cinnamon can add a cozy alternative.
- Sea salt: Just a pinch enhances the chocolate’s depth—try finishing with a tiny sprinkle of flaky salt for extra shimmer and a savory hit.
Spotlight on Key Ingredients
Rolled oats:
- I love how their chewy texture holds everything together, almost like a sturdy canvas for the chocolate and nut butter. They soften slightly but still keep their integrity, adding a hearty bite.
- Dark chocolate: I prefer a rich, slightly bitter bar that melts smoothly, creating a glossy coating. It’s the sensory anchor—bittersweet with a hint of smokiness that balances sweetness.
Nut butter:
- Creamy peanut butter is my pick for that indulgent richness. It’s velvety, almost melting into the oats, and adds a savory depth that makes these bites addictive.
- Honey: It’s the sticky glue that binds everything—sweet, fragrant, with a floral note that amplifies the chocolate’s richness. It’s what makes the mixture cling together perfectly.
Notes for ingredient swaps
- Dairy-Free: Use coconut oil and dairy-free chocolate—expect a slightly different melt and richer coconut flavor.
- Nut Butter: Swap peanut butter for almond or sunflower seed butter—note the flavor and slightly different creaminess.
- Sweetener: Maple syrup can replace honey—less sticky, with a more floral, caramel-like taste.
- Oats: Use gluten-free rolled oats if needed—texture remains chewy, but check for cross-contamination if sensitive.
- Chocolate: White or milk chocolate can be substituted—altering the taste and sweetness level, richer or milder.
- Add-Ins: Toss in dried fruit or nuts—adjust the moisture content and crunch, for more texture and flavor.
- Oil: Avocado or light olive oil can replace coconut oil—less coconut aroma, may affect firmness slightly.
Equipment & Tools
- Microwave: To melt chocolate and coconut oil evenly.
- Mixing bowl: To combine all ingredients smoothly.
- Spatula: To stir and fold ingredients thoroughly.
- Parchment-lined baking sheet: To hold the bites while they chill and set.
Step-by-step guide to no bake bites
- Gather your equipment: a mixing bowl, a spatula, and a baking sheet lined with parchment. No oven needed, so keep it simple.
- Melt the dark chocolate and coconut oil together: use a microwave in 20-second bursts, stirring each time, until smooth. Smell that rich cocoa aroma filling your kitchen.
- In the mixing bowl, combine rolled oats, nut butter, honey, vanilla extract, and a pinch of sea salt. Mix thoroughly until everything is evenly coated and sticky.
- Pour in the melted chocolate mixture and stir until fully incorporated. The mixture should be glossy and hold together when pressed—if too dry, add a splash more honey or nut butter.
- Using a spoon or your hands, scoop about a tablespoon of the mixture and roll into a rough ball. Place on the prepared baking sheet. Repeat until all mixture is used. They should be about 1 inch in diameter.
- Press lightly on each ball to flatten slightly—this helps them set evenly. If they crack or fall apart, add a little more melted chocolate or honey to bind.
- Transfer the tray to the fridge and let the bites chill for at least 30 minutes. They should firm up, with a slight sheen from the chocolate coating. No oven, just patience.
- Once set, remove from fridge. Check for firmness; they should be chewy yet hold their shape. If they feel too soft, give them a bit more chill time.
- Serve directly from the fridge or let sit at room temp for 5 minutes for a softer bite. Store leftovers in an airtight container in the fridge for up to a week.
Chill the bites in the fridge for at least 30 minutes until firm. Serve straight from the fridge or at room temperature after a few minutes. Store in an airtight container in the fridge for up to a week. For a softer bite, let them sit at room temp for 5 minutes before serving.
How to Know It’s Done
- Chocolate is fully melted and glossy before mixing.
- Mixture holds together when pressed, not crumbly.
- Bites are firm but chewy after chilling, with a shiny chocolate coating.
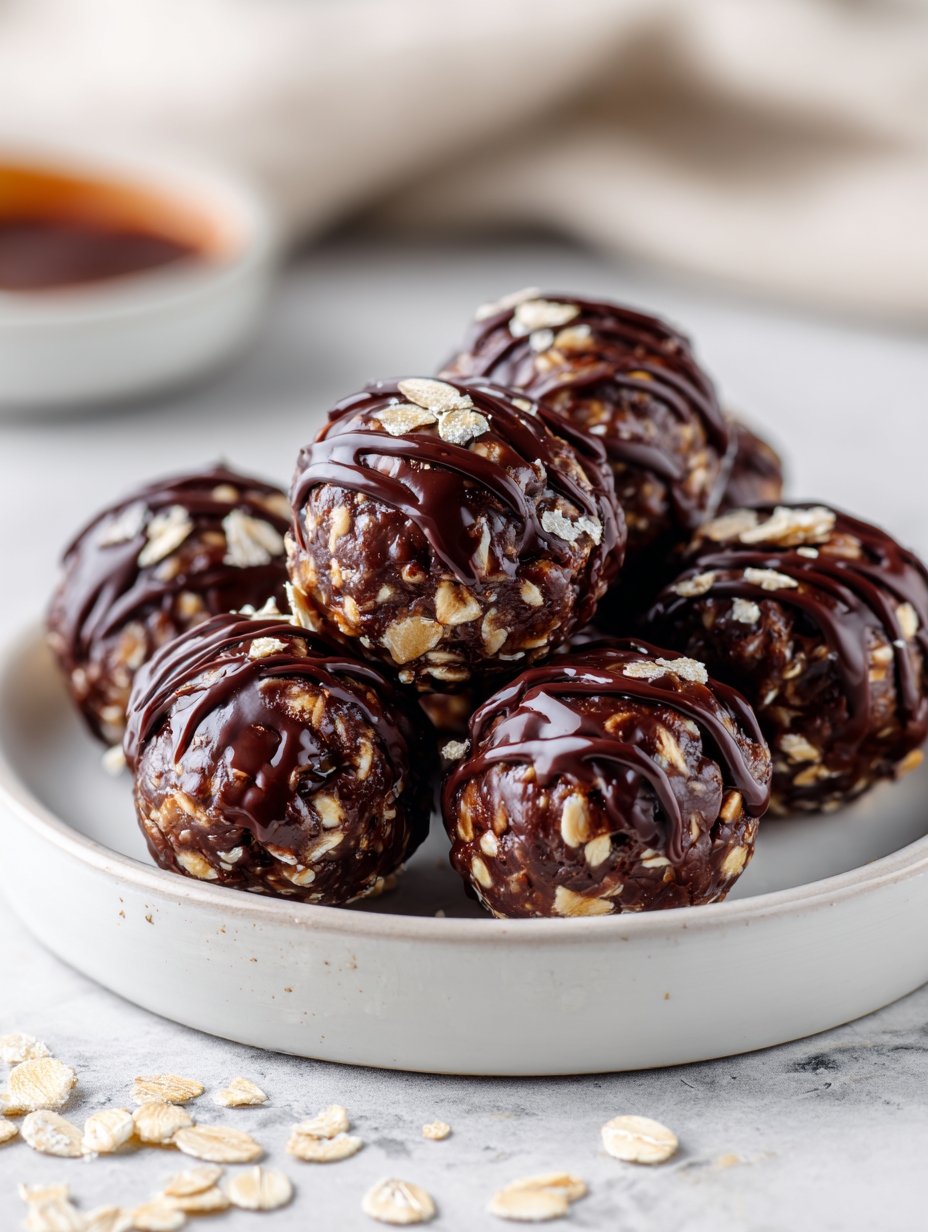
No-Bake Chocolate Oat Bites
Ingredients
Equipment
Method
- Place the chopped dark chocolate and melted coconut oil in a microwave-safe bowl. Microwave in 20-second bursts, stirring each time, until the chocolate is fully melted and smooth, filling your kitchen with a rich cocoa aroma.
- In a large mixing bowl, combine the rolled oats, nut butter, honey, vanilla extract, and a pinch of sea salt. Mix everything thoroughly with a spatula until the mixture is sticky, fragrant, and well combined.
- Pour the melted chocolate mixture into the bowl with the oat mixture. Stir vigorously until the chocolate is evenly distributed and the mixture becomes glossy and sticky, holding together when pressed.
- Using a spoon or your hands, scoop approximately a tablespoon of the mixture and roll it into a rough ball. Place each ball onto the parchment-lined baking sheet and gently press it down to flatten slightly. Repeat with the remaining mixture.
- Once all the bites are shaped, place the baking sheet in the fridge. Chill for at least 30 minutes until the bites firm up, the chocolate coating glistening and set.
- Remove the set bites from the fridge and serve straight from the fridge for a chewy, chocolaty treat. For a softer bite, let them sit at room temperature for 5 minutes before enjoying.
Notes
Pro tips for perfect no-bake bites
- Use high-quality chocolate for that rich, glossy melt.
- Warm the nut butter slightly to make mixing easier.
- Chill the mixture before rolling to prevent sticking and improve shape.
- Press the bites firmly to ensure they hold together after chilling.
- Use a light hand when flattening for even setting without cracks.
- Add a pinch of sea salt on top before chilling for a flavor pop.
- Store in an airtight container in the fridge to keep them firm and fresh.
Common mistakes and how to fix them
- FORGOT to chill: Bites may be too soft if not refrigerated long enough—chill for at least 30 minutes.
- DUMPED ingredients: Mixing in dry oats too early can cause uneven texture—add last with melted chocolate.
- OVER-TORCHED chocolate: Burnt chocolate ruins flavor—melt slowly in short bursts, stirring often.
- MISSED salt pinch: Skipping sea salt dulls the flavor—add a tiny pinch to enhance the chocolate richness.
Quick Fixes and Pantry Swaps
- When mixture is too crumbly, splash in a little more honey to bind.
- If bites are too soft, patch with an extra layer of melted chocolate and chill again.
- Splash a pinch of salt if chocolate tastes flat or overly sweet.
- When chocolate crackles during melting, lower heat and stir more frequently.
- Shield your mixture from humidity; if it’s sticky, refrigerate for 10 minutes before rolling.
Prep and storage tips
- You can prepare the mixture up to 24 hours in advance; keep it covered in the fridge, where it will develop a richer chocolate aroma.
- Store the finished bites in an airtight container in the fridge for up to a week. They stay chewy and fresh, with a glossy chocolate coating that shimmers slightly.
- For longer storage, freeze the bites for up to a month. They may soften slightly after thawing; let them sit at room temperature for 5 minutes to regain their chewy texture.
- Reheat by letting them sit at room temperature for a few minutes or place in the fridge for 10 minutes if you prefer them slightly softer. They won’t melt, but the flavors will become more pronounced.
Top questions about no bake chocolate oat bites
1. Can I use chocolate chips instead of a bar?
Use a good quality dark chocolate bar to ensure smooth melting and rich flavor. Cheaper chocolates might seize or be grainy.
2. Are chocolate chips a good substitute?
Yes, chocolate chips melt just as well, but they often contain stabilizers that can affect smoothness. Melt gently and stir well.
3. How do I make nut butter easier to mix?
Soften the nut butter slightly in the microwave or at room temperature to make mixing easier and smoother.
4. My mixture is too dry or too sticky, what now?
If the mixture feels too dry, add a teaspoon of honey or nut butter. Too sticky? Chill for 10 minutes or add a bit more oats.
5. Can I use steel-cut oats?
Use old-fashioned rolled oats for chewy texture. Steel-cut oats are too coarse and won’t bind well in this recipe.
6. How long can I store these bites?
Yes, you can freeze the bites for up to a month. Let them thaw at room temperature for 5 minutes before eating.
7. Should I chill the mixture before shaping?
Chill the mixture for at least 30 minutes to help it firm up and make rolling easier.
8. Can I omit salt?
Yes, adding a pinch of sea salt enhances the chocolate flavor and balances sweetness. Sprinkle on top before chilling if desired.
9. Can I make these vegan?
Yes, for a vegan version, swap honey with maple syrup or agave nectar. The texture remains sticky and sweet.
10. How do I know when the chocolate is melted enough?
Ensure the chocolate is fully melted and glossy before mixing. Overheated or burnt chocolate will ruin the flavor.
These no-bake chocolate oat bites are a reminder that simplicity can be powerful. They come together quickly, satisfy that sweet tooth, and keep well in the fridge for busy days. Sometimes, the best treats are those born from pantry improvisation and honest ingredients.
Whenever I need a little indulgence without the fuss, these bites are my go-to. They’re a small, messy reminder that good things don’t always need perfect conditions—just a bit of honest effort and a dash of chocolate.