
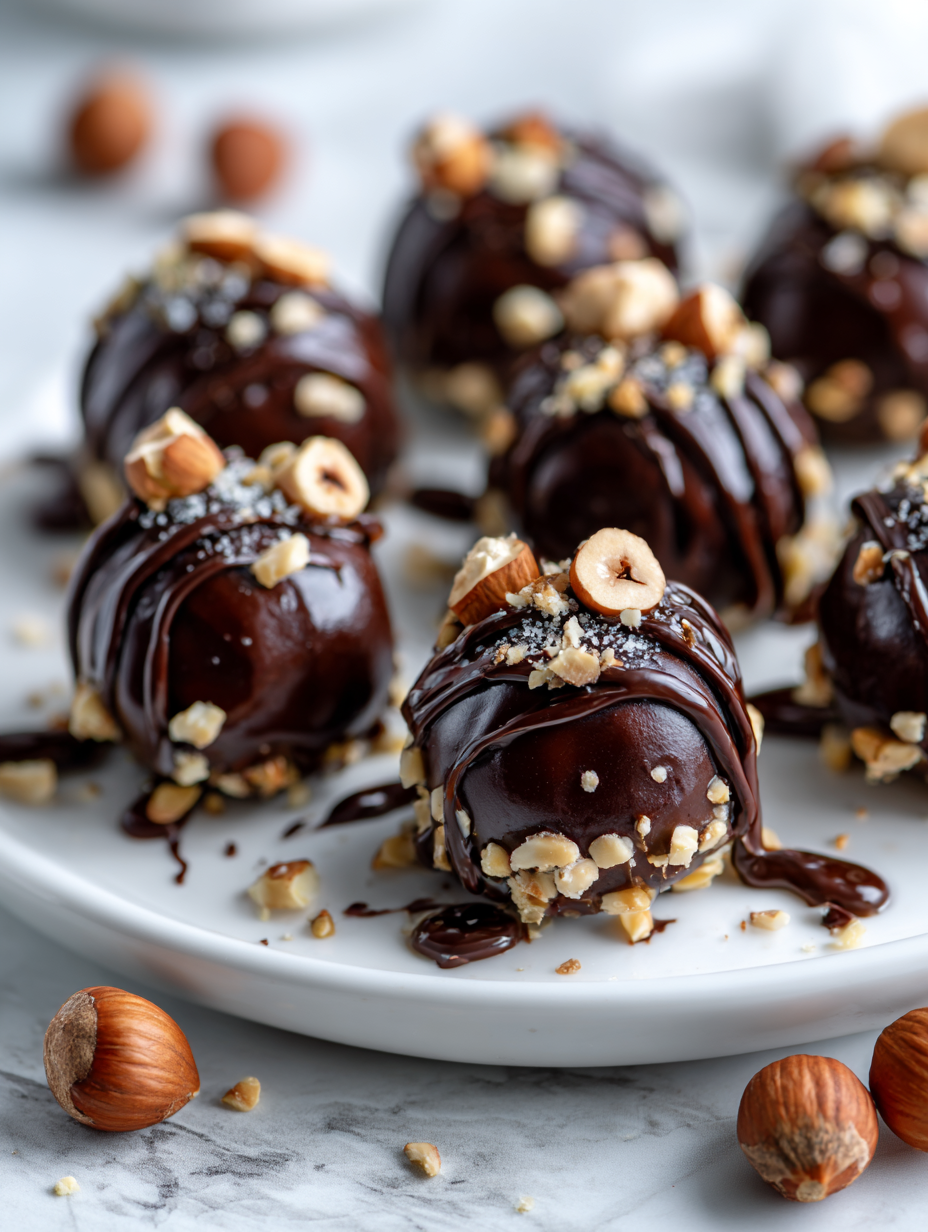
This recipe came about because I was craving something both crunchy and chewy, a real contrast in texture that keeps you reaching for more. Toasted hazelnuts give that satisfying crunch, while the chewy chocolate base pulls it all together in a way that feels indulgent but still simple enough for a quick treat.
What I love about these no-bake bites is how they turn ordinary ingredients into something unexpectedly special. No oven, no fuss—just a handful of pantry staples and a little patience to let everything set. It’s a snack that feels like a little celebration, perfect for those moments when you want something sweet but don’t want to mess around.
Focusing on the unexpected crunch of toasted hazelnuts combined with a chewy, chocolatey bite, this recipe celebrates the sensory contrast that makes no-bake treats irresistibly addictive.
Crunch Meets Chewy Delight
- These bites remind me of childhood afternoons in my grandma’s kitchen, where the smell of toasted nuts filled the air and everything felt simpler.
- I get a rush of pride every time I make these—nothing beats the satisfaction of a treat I whipped up with just pantry staples.
- There’s a chaotic joy in chopping hazelnuts while the kitchen smells like roasted heaven, then seeing that perfect, crunchy bite come together.
- Whenever I need a quick pick-me-up, these bites are my go-to—sweet, nutty, and just enough richness to make me smile.
- Sometimes I crave the rustic, honest feel of these treats, like a little homemade rebellion against overly polished desserts.
Story Behind This Recipe
- This recipe sprouted from a lazy Sunday afternoon when I found a bag of toasted hazelnuts in the pantry, leftover from another project. I didn’t want to turn on the oven, but still craved something rich and nutty that could come together quickly. The idea of combining those crunchy nuts with a chewy, chocolatey base felt like a little rebellion against complicated baking.
- Every time I make these, I think about how simple ingredients can surprise you. It’s like a little secret—no fuss, no heat, just good, honest flavors. They’re my go-to when I need a quick fix that’s both satisfying and a little indulgent.
- heading
- Story Behind This Recipe
Historical & Cultural Tidbits
- These bites have roots in European holiday treats, where roasted nuts and chocolate are a classic combo.
- The no-bake aspect comes from a tradition of simple, pantry-friendly sweets that emerged during wartime shortages.
- Hazelnuts have long been prized in confectionery, especially in regions where they grow abundantly, like Piedmont in Italy.
- This recipe echoes the rustic, honest approach of old-world snacks that emphasize flavor over fuss.
- Modern fuss-free desserts like these tap into a nostalgic desire for quick, satisfying bites that feel indulgent without the oven.
Ingredient Breakdown: Key Components
- Hazelnuts: I love to toast my hazelnuts until they’re fragrant and slightly charred, which brings out their nutty depth. If you prefer a milder flavor, skip the toast, but you’ll miss that smoky kick.
- Dark chocolate: I use high-quality dark chocolate because it melts smoothly and adds a rich, bittersweet contrast. For a sweeter bite, try milk chocolate, but the flavor won’t be as intense.
- Honey or maple syrup: I opt for honey for a floral note that complements the nuts, but maple syrup can add a caramel-y warmth if that’s what you’re craving.
- Coconut oil: I melt a little to help everything bind together, giving the bites a subtle sheen and a melt-in-your-mouth texture. If you want a vegan version, try almond or avocado oil, but the texture might change slightly.
- Oats: I use old-fashioned rolled oats for a chewy bite and rustic texture. If you prefer a finer texture, pulse them briefly in a food processor, but don’t overdo it—you want some bite.
- Sea salt: I sprinkle a pinch for contrast—trust me, it elevates the chocolate and hazelnut flavor. If you’re sensitive to salt, reduce a bit, but don’t skip it entirely.
- Optional add-ins: I sometimes toss in dried cranberries or toasted coconut flakes for extra flavor and texture, but keep it simple if you’re after pure nutty chocolate bliss.
Key Ingredients in Focus
Hazelnuts:
- I toast mine until fragrant and just slightly charred—brings out that deep, smoky nuttiness. Skip the toasting for a milder, less complex flavor.
- Their crunchy texture contrasts beautifully with the chewy chocolate base, adding a satisfying bite that keeps your teeth interested.
Dark Chocolate:
- I prefer a high cacao percentage—around 70-85%. It melts smoothly and adds that bittersweet punch that balances the sweetness.
- When melted, it should be glossy and fluid. If it seizes or becomes dull, a splash of warm coconut oil helps bring it back to life.
Notes for ingredient swaps
- Dairy-Free: Use coconut butter or vegan chocolate. Expect a slightly different richness and creaminess, but still delicious.
- Nut-Free: Swap hazelnuts for toasted sunflower seeds or pumpkin seeds. They won’t have the same aromatic toastiness but add a lovely crunch.
- Sweetener: Replace honey with agave syrup or brown rice syrup for a milder sweetness. Keep in mind, the texture might be a tad stickier.
- Chocolate: Use dark chocolate chips or vegan chocolate chunks. The texture remains smooth, though the flavor might shift slightly toward more bitter notes.
- Oats: Omit or swap for finely chopped rice cereal for a crisper bite. Finer oats give a more uniform texture, but less chew.
- Oil: Substitute coconut oil with light olive oil or avocado oil. The flavor will change slightly, but the structure stays intact.
- Add-ins: Toss in dried berries or chopped dried apricots for a fruity pop. They add chew but can also introduce extra moisture, so adjust accordingly.
Equipment & Tools
- Baking sheet: To hold the bites during chilling and prevent sticking.
- Mixing bowl: For combining and stirring ingredients thoroughly.
- Small saucepan: To melt chocolate and coconut oil gently.
- Spatula: For mixing and transferring ingredients.
- Cookie scoop or spoon: To portion the mixture evenly into bites.
Step-by-step guide to hazelnut bites
- Equipment & Tools: Line a baking sheet with parchment paper; use a mixing bowl for blending; a spatula for mixing; and a small saucepan for melting chocolate and oil.
- Toast hazelnuts: Spread hazelnuts on a baking sheet. Toast at 180°C (350°F) for 10 minutes. Cool until fragrant and slightly charred, about 15 minutes.
- Chop hazelnuts: Once cooled, roughly chop the nuts to your preferred crunch level. Set aside.
- Melt chocolate and coconut oil: In a small saucepan over low heat (about 50°C/122°F), melt the chocolate and coconut oil together, stirring until smooth. Watch for glossy sheen; if it seizes, add a tiny splash of warm milk or coconut oil and stir gently.
- Mix ingredients: In a mixing bowl, combine chopped hazelnuts, honey or maple syrup, oats, and a pinch of sea salt. Pour the melted chocolate mixture over and stir until everything is evenly coated and sticky.
- Form bites: Using a spoon or small cookie scoop, portion the mixture onto the prepared baking sheet. Press gently to form compact bites about 2 inches wide.
- Chill to set: Place the tray in the fridge. Let the bites firm up for at least 30 minutes. For crunchier texture, chill longer, up to 2 hours.
- Final check: The bites should be firm, shiny, and hold their shape. The chocolate should be set and not sticky to the touch.
- Serve & store: Keep in an airtight container in the fridge for up to a week. For longer storage, freeze for up to a month.
Chill the bites until firm, about 30 minutes to 2 hours. Serve directly from the fridge, or let sit at room temperature for 5 minutes for softer texture. Arrange on a plate or store in an airtight container.
How to Know It’s Done
- Chocolate is glossy and fully melted before mixing.
- Bites hold shape without crumbling when pressed.
- Chocolate is fully set and shiny after chilling.
Hazelnut Chocolate No-Bake Bites
Ingredients
Equipment
Method
- Spread the hazelnuts on a baking sheet and toast them in a preheated oven at 180°C (350°F) for about 10 minutes, until fragrant and slightly charred. Let them cool for 15 minutes before roughly chopping to create crunchy pieces.
- In a small saucepan over low heat, melt the dark chocolate with the coconut oil, stirring constantly until smooth and glossy. Remove from heat once fully melted and shiny.
- In a large mixing bowl, combine the chopped hazelnuts, rolled oats, and a pinch of sea salt. Stir together to distribute evenly.
- Pour the melted chocolate mixture over the dry ingredients, then drizzle in the honey. Mix everything thoroughly with a spatula until all ingredients are evenly coated and sticky.
- Using a cookie scoop or spoon, portion the mixture onto a parchment-lined baking sheet, pressing gently to form compact, roughly 2-inch wide bites. Repeat until all the mixture is used.
- Place the tray in the fridge and chill for at least 30 minutes, or until the bites are firm and the chocolate is set. The bites should hold their shape and have a shiny appearance.
- Once set, remove the bites from the fridge and enjoy! Store leftovers in an airtight container in the fridge for up to a week or freeze for longer storage.
Pro tips for perfect bites
- Toasted nuts: Toast until fragrant and slightly charred for that smoky depth, then cool before chopping.
- Melting chocolate: Use gentle heat and stir constantly. Aim for a glossy, fully melted texture—if seized, add a splash of warm oil.
- Proper mixing: Ensure all ingredients are evenly coated—use a spatula to fold rather than stir vigorously to maintain texture.
- Chilling: Let the bites chill until firm, at least 30 minutes. For crunchier bites, extend to 2 hours in the fridge.
- Handling sticky mixture: Lightly oil your hands or scoop to prevent sticking when forming bites, for cleaner shaping.
- Salt contrast: Don’t skip the pinch of sea salt—it’s key to balancing the richness and enhancing the nutty flavors.
- Storage: Keep bites in an airtight container in the fridge. For best texture, serve slightly softened at room temp, about 5 minutes out of the fridge.
Common mistakes and how to fix them
- FORGOT to toast nuts? Roast an extra 5 minutes, then cool before chopping.
- DUMPED chocolate too hot? Let it cool slightly to avoid seizing or burning.
- OVER-TORCHED nuts? Remove from oven immediately and cool; bitterness ruins crunch.
- MISSED the salt? Add a pinch more after mixing for flavor contrast.
Quick fixes and pantry swaps
- If mixture is too sticky, splash with a little warm water or oil for easier shaping.
- When bites crackle loudly in the fridge, they’re cooling properly—just patience is key.
- Splash a bit of warm milk if melted chocolate seizes during melting process.
- Patch over dry spots by pressing additional chopped nuts into the surface before chilling.
- Shield from moisture by wrapping bites tightly if storing for more than a week.
Prep, store, and reheat tips
- Prepare the mixture up to 24 hours in advance; keep it covered in the fridge, where flavors meld and intensify, developing a richer nutty aroma.
- Store the finished bites in an airtight container in the fridge for up to a week. Expect the texture to stay firm but slightly chewier as flavors deepen.
- For longer storage, freeze the bites for up to a month. Wrap individually with parchment to prevent sticking and freezer burn.
- Reheat by letting bites sit at room temperature for 5 minutes or placing in a low oven (around 90°C/194°F) for a quick warm-up. Expect a melty, fragrant chocolate scent and slightly softer bite.
Top questions about hazelnut bites
1. Can I substitute hazelnuts with other nuts?
Yes, you can use chopped roasted almonds or pecans for a different crunch and flavor, but the hazelnuts add a unique smoky nuttiness.
2. Can I use milk chocolate instead of dark?
Absolutely. You can replace dark chocolate with milk chocolate for a sweeter, creamier taste. Just keep an eye on melting times since milk chocolate is softer.
3. Can I replace honey with another sweetener?
Yes, honey can be swapped with maple syrup or agave. Expect a slightly different sweetness profile, but it will still bind well.
4. Can I omit or replace coconut oil?
Using coconut oil helps the mixture set nicely. If unavailable, almond or avocado oil works, but the texture might be a bit less glossy.
5. How long should I chill the bites?
Chilling the bites for at least 30 minutes is key. If rushed, they may be too soft and break easily when handled.
6. How do I handle sticky mixture when forming bites?
To prevent sticking, lightly oil your hands or scoop before shaping. Using a cookie scoop makes it easier to handle sticky mixture.
7. Should I chop the nuts finely or leave them chunky?
Chop the toasted hazelnuts roughly for more crunch. For a finer texture, pulse them briefly in a food processor, but don’t overdo it.
8. How should I store these bites?
Store the bites in an airtight container in the fridge for up to a week. For longer storage, freeze for up to a month.
9. What if my melted chocolate seizes?
If the chocolate seizes during melting, let it cool slightly or add a splash of warm coconut oil to smooth it out.
10. Can I add other ingredients to the mixture?
You can customize add-ins like dried cranberries or toasted coconut flakes to add extra flavor and texture, but keep proportions balanced.
These no-bake hazelnut bites are a reminder that simple ingredients can create something deeply satisfying. I like how the smoky crunch of toasted nuts contrasts with the rich, chewy chocolate base—it’s a little moment of joy you can whip up in no time.
Whenever I make these, I feel a quiet pride in turning pantry staples into a treat that’s honest and indulgent. They’re perfect for whenever you need a quick, homemade fix that hits all the right notes—crunch, chew, and a burst of nutty sweetness.